How to Measure for Made to Measure Blinds – Don’t Make My $500 Mistake
Authored By Michael Turner -30 Years Home Improvement Expertise | Updated 2026 | BlindShades.pro
Updated on May 1, 2026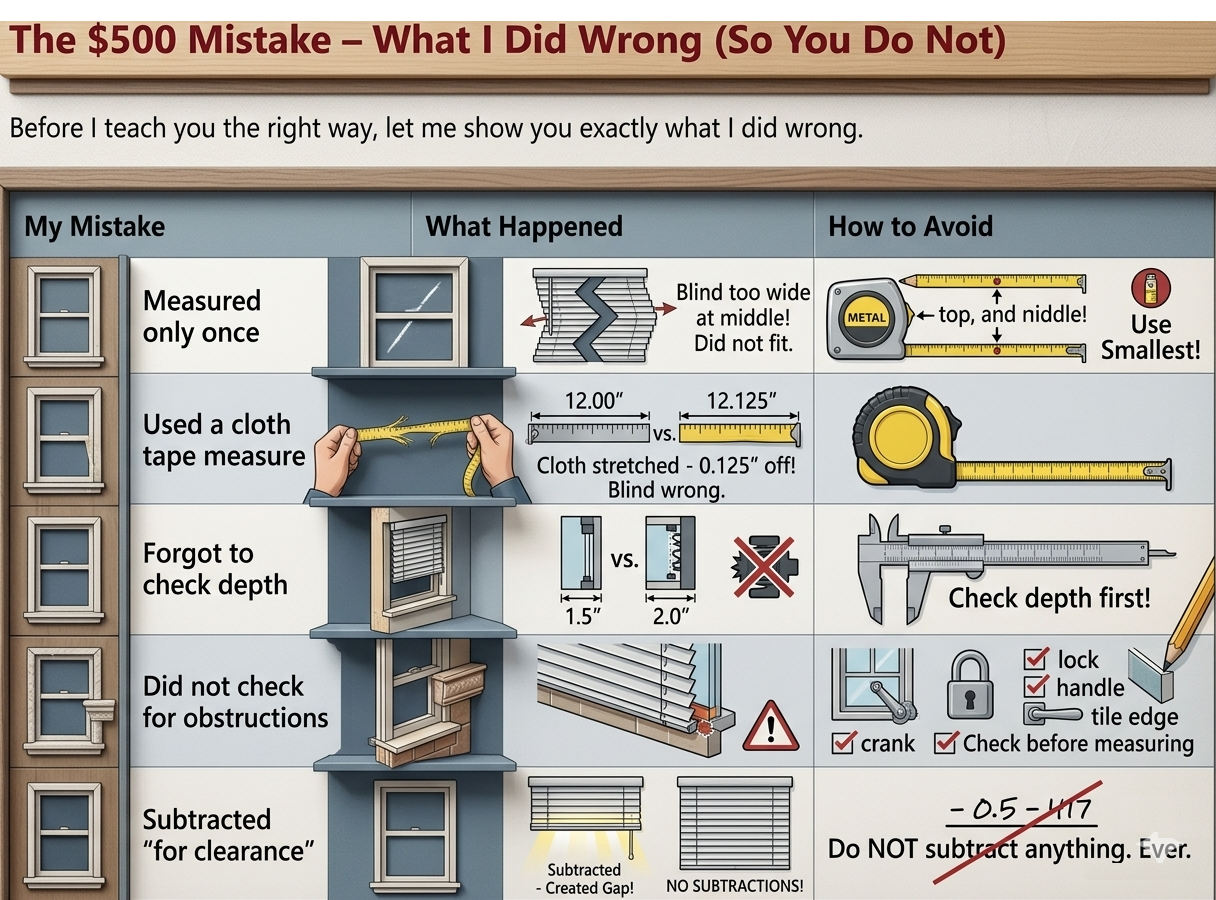
Last Updated: May 2026 | Originally Published: April 2026
Learn how to measure for made to measure blinds the right way. Step-by-step guide for inside/outside mounts + free printable checklist. Avoid $500 mistakes.
Here is what I learned the hard way:
- I measured only once. My window was not square. The blinds did not fit. Cost me $500.
- I used a cloth tape measure. It stretched. My measurements were wrong.
- I forgot to check for obstructions (tile, handles). The blinds hit them.
Who this guide is for: Homeowners and renters who want to measure correctly the first time.
Who this guide is NOT for: People hiring professional measuring service (35−50) – worth it if you are unsure).
Why Most People Measure Wrong (And How to Avoid It)
Here is a truth no one told me before I wasted my money: Measuring for made to measure blinds is easy – but measuring wrong is even easier.
I learned this the hard way.
My first attempt at ordering made to measure blinds ended in disaster. I measured my living room window once. Just once. I assumed my window was perfectly square. It was not.
The blinds arrived. I tried to install them. They did not fit.
The company refused a return because the blinds were custom made. I was out $500.
That mistake taught me exactly how to measure correctly. I have now measured and installed blinds in 12 windows across my home. I have timed myself. I have made every mistake so you do not have to.
This guide is what I wish someone had given me before I wasted that $500.
Follow these steps exactly. Measure three times. Order once.
Internal link: Once you have your measurements, see my Made to Measure Blinds Buying Guide for recommendations on which blinds to buy.
The $500 Mistake – What I Did Wrong (So You Do Not)
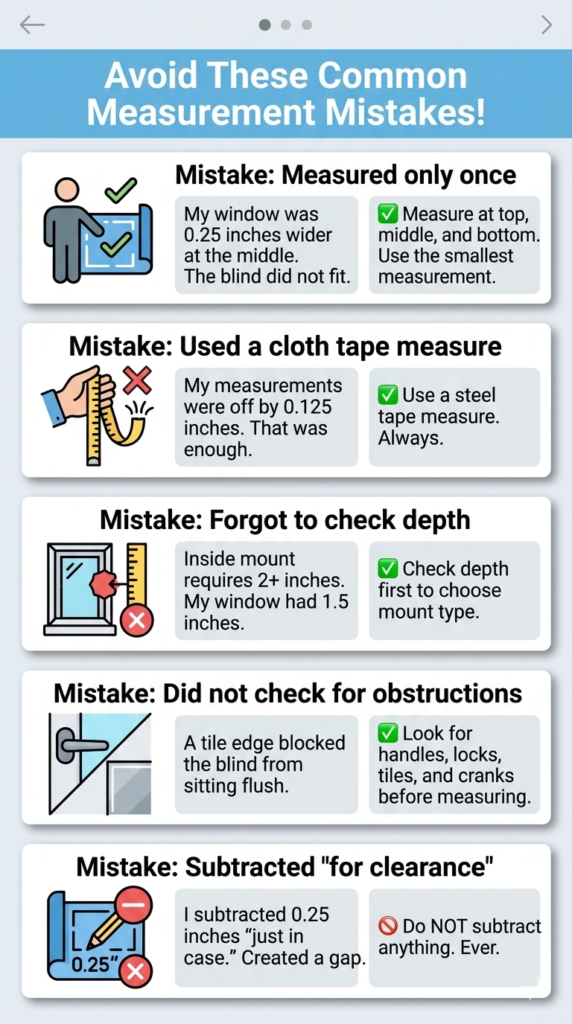
Before I teach you the right way, let me show you exactly what I did wrong.
| My Mistake | What Happened | How to Avoid |
|---|---|---|
| Measured only once | My window was 0.25 inches wider at the middle than the top. The blind did not fit. | Measure at three points (top, middle, bottom). Use the smallest. |
| Used a cloth tape measure | Cloth stretches. My measurements were off by 0.125 inches. That was enough. | Use a steel tape measure. Always. |
| Forgot to check depth | Inside mount requires 2+ inches of depth. My window had 1.5 inches. | Check depth before choosing mount type. |
| Did not check for obstructions | A tile edge blocked the blind from sitting flush. | Look for handles, locks, tiles, and cranks before measuring. |
| Subtracted “for clearance” | I subtracted 0.25 inches “just in case.” That created a gap. | Do NOT subtract anything. Ever. |
The worst part: I knew I should measure three times. I was just impatient. Do not be impatient. Take the extra 5 minutes. It is cheaper than $500.

What You Will Need to Measure for Made to Measure Blinds
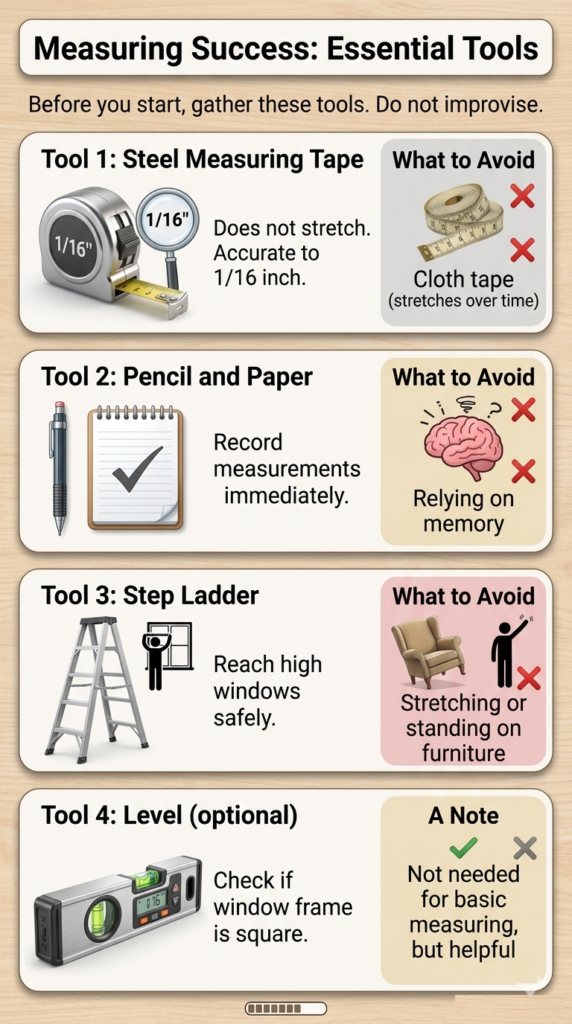
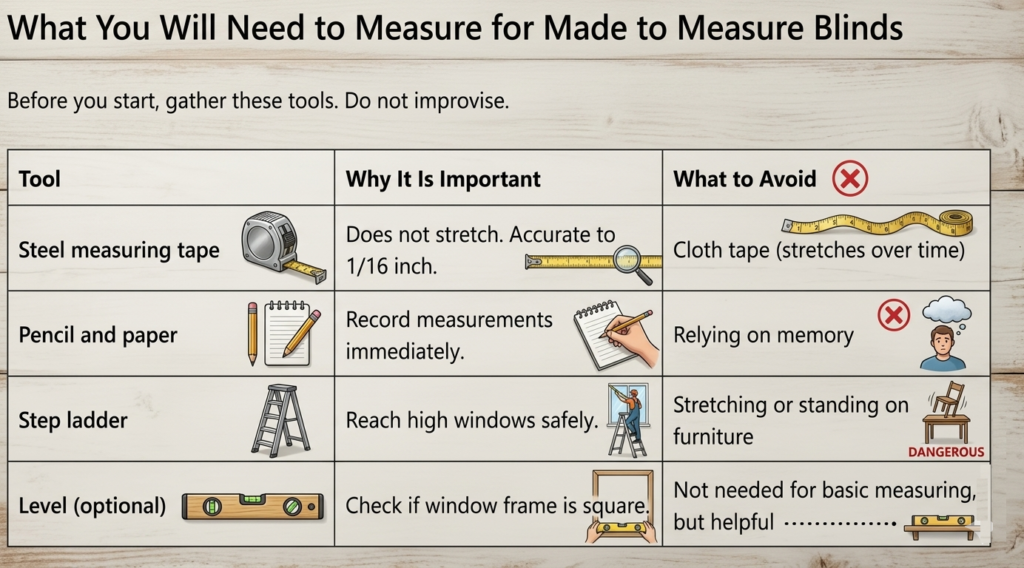
Before you start, gather these tools. Do not improvise.
| Tool | Why It Is Important | What to Avoid |
|---|---|---|
| Steel measuring tape | Does not stretch. Accurate to 1/16 inch. | Cloth tape (stretches over time) |
| Pencil and paper | Record measurements immediately. | Relying on memory |
| Step ladder | Reach high windows safely. | Stretching or standing on furniture |
| Level (optional) | Check if window frame is square. | Not needed for basic measuring, but helpful |
Pro tip: Buy a steel tape measure at Home Depot or Lowe’s for 10−15. It will last forever. The cloth tape measure in your sewing kit is not for windows.
Step 1 – Decide Inside Mount vs. Outside Mount (This Changes Everything)
This is the most important decision you will make. Your mount type determines how you measure and what measurements you submit.
Inside Mount
| Feature | Detail |
|---|---|
| Best for | Windows with deep recess (at least 2 inches depth) |
| How it looks | Blind fits inside the window frame |
| Light gaps | Minimal (small gaps on sides) |
| Depth required | Minimum 2 inches |
Choose inside mount if:
- Your window has at least 2 inches of depth (measure from glass to edge of frame)
- You want a clean, built-in look
- You do not need complete blackout
- You are installing on standard rectangular windows
Outside Mount
| Feature | Detail |
|---|---|
| Best for | Shallow windows, blackout needs, sliding doors |
| How it looks | Blind mounts on wall above window |
| Light gaps | None (covers entire frame) |
| Depth required | None |
Choose outside mount if:
- Your window has less than 2 inches of depth
- You want complete blackout (no light gaps)
- You are covering a sliding glass door
- Your window frame has obstructions (handles, tiles, cranks)
My Recommendation Based on Room
| Room | Recommended Mount | Why |
|---|---|---|
| Bedroom | Outside mount | Complete blackout for sleep |
| Living room | Inside mount | Cleaner, built-in look |
| Kitchen | Inside mount | Standard windows usually have depth |
| Bathroom | Outside mount | Covers tiles and obstructions |
| Nursery | Outside mount | Maximum blackout for naps |
| Sliding door | Outside mount | Covers entire door frame |
Still unsure? See my detailed Inside vs Outside Mount guide.
Step 2 – How to Measure for Inside Mount (Step-by-Step)
Measuring Width
Follow these steps exactly. Do not skip any.
Step 1: Measure the width of your window at the top of the opening. Record this number.
Step 2: Measure the width of your window at the middle of the opening. Record this number.
Step 3: Measure the width of your window at the bottom of the opening. Record this number.
Step 4: Use the SMALLEST of these three measurements.
Step 5: Do NOT subtract anything. Do NOT round down or up. The manufacturer will make the necessary adjustments.
Real example from my living room:
| Position | Measurement |
|---|---|
| Top of window | 34.5 inches |
| Middle of window | 34.75 inches |
| Bottom of window | 34.5 inches |
| Order width (smallest) | 34.5 inches |
Why use the smallest measurement? Windows are rarely perfectly square. Using the smallest measurement ensures the blind will fit at the narrowest point. If you used the largest measurement (34.75 inches), the blind would be too wide for the top and bottom.
Measuring Height
Step 1: Measure the height from the top of the window opening to the window sill at the left side. Record this number.
Step 2: Measure the height at the center of the window. Record this number.
Step 3: Measure the height at the right side of the window. Record this number.
Step 4: Use the SMALLEST of these three measurements.
Real example from my living room:
| Position | Measurement |
|---|---|
| Left side | 48 inches |
| Center | 48.25 inches |
| Right side | 48 inches |
| Order height (smallest) | 48 inches |
Check Depth (Critical for Inside Mount)
Inside mount requires at least 2 inches of depth for most blinds.
How to measure depth:
- Place your steel tape measure against the glass of your window
- Measure to the front edge of the window frame
- Record the depth in inches
Depth requirements by blind type:
| Blind Type | Minimum Depth Required |
|---|---|
| Roller blinds | 1.5 inches |
| Roman shades | 2 inches |
| Cellular shades | 1.5 inches |
| Faux wood blinds | 2 inches |
| Vertical blinds | 3 inches (headrail clearance) |
If you have less than 2 inches of depth: You cannot use inside mount. Switch to outside mount. Do not try to force it.
Step 3 – How to Measure for Outside Mount (Step-by-Step)
Outside mount is actually simpler than inside mount because you are not constrained by the window frame dimensions.
Measuring Width
Step 1: Measure the width of your window frame (from left edge to right edge).
Step 2: ADD 4-6 inches TOTAL (2-3 inches on each side).
Formula: Window frame width + 4 to 6 inches = Order width
Real example from my sliding door:
| Window Frame Width | Add | Order Width |
|---|---|---|
| 71.5 inches | + 4-6 inches | 75.5-77.5 inches |
Why add extra width? The blind needs to extend beyond the window frame on both sides to block light completely. The more you add, the better the light blockage.
Pro tip by application:
| Application | Add to Each Side | Total Added |
|---|---|---|
| Standard light control | 2 inches | 4 inches |
| Good blackout | 3 inches | 6 inches |
| Maximum blackout (bedrooms) | 4 inches | 8 inches |
Measuring Height
Step 1: Measure from the top of the window frame to the bottom of the window sill (or floor for floor-length blinds).
Step 2: ADD 4-6 inches TOTAL (2-3 inches above the frame, 2-3 inches below).
Formula: Window frame height + 4 to 6 inches = Order height
Real example from my sliding door:
| Window Frame Height | Add | Order Height |
|---|---|---|
| 80 inches | + 4-6 inches | 84-86 inches |
Pro tip for sliding glass doors: Measure from the top of the door frame to the floor. Add 2-4 inches above the frame. The blind should hang to within 1/2 inch of the floor (allows door to slide without dragging).
Step 4 – Printable Measuring Checklist
Copy this checklist and use it for every window. Take it with you to the window – do not rely on memory.
text
WINDOW MEASUREMENT CHECKLIST
Window location: ___________________________
(e.g., Living Room – Left Window)
Mount type selected:
☐ Inside mount ☐ Outside mount
INSIDE MOUNT ONLY
Inside mount width:
Top: _______ inches
Middle: _______ inches
Bottom: _______ inches
→ ORDER WIDTH (smallest): _______ inches
Inside mount height:
Left: _______ inches
Center: _______ inches
Right: _______ inches
→ ORDER HEIGHT (smallest): _______ inches
Depth check:
Depth: _______ inches (must be 2+ inches for inside mount)
OUTSIDE MOUNT ONLY
Outside mount width:
Window frame width: _______ inches
→ ORDER WIDTH (add 4-6 inches): _______ inches
Outside mount height:
Window frame height: _______ inches
→ ORDER HEIGHT (add 4-6 inches): _______ inches
DOUBLE CHECK
- ☐ Measured at three points for width
- ☐ Measured at three points for height
- ☐ Used smallest measurements
- ☐ Did NOT subtract anything
- ☐ Checked depth for inside mount
- ☐ Added 4-6 inches for outside mount
- ☐ Checked for obstructions (handles, tiles, locks)
Step 5 – Common Measuring Mistakes to Avoid
I made most of these myself. Learn from my errors.
| # | Mistake | Why It Is Wrong | How to Avoid |
|---|---|---|---|
| 1 | Using a cloth tape measure | Cloth stretches, giving inaccurate measurements | Use a steel tape measure |
| 2 | Measuring only one spot | Windows are rarely perfectly square | Measure at three points (top, middle, bottom) |
| 3 | Forgetting to check for obstructions | Handles, locks, cranks, and tiles can block the blind | Check the entire window area before measuring |
| 4 | Subtracting measurements | Manufacturers build in tolerances – you will create gaps | Do NOT subtract anything |
| 5 | Rounding down | If your window is 35.75 inches, ordering 35.5 inches will be too narrow | Use the exact measurement |
| 6 | Inside mount with insufficient depth | Blind will not fit inside the frame | Check depth before choosing mount type |
| 7 | Not accounting for baseboards | Outside mount must clear baseboards | Measure from the wall, not the frame |
| 8 | Assuming all windows are the same size | Construction variance of 1/4 to 1/2 inch is common | Measure each window individually |
The most expensive mistake: Measuring only once. I did this. It cost me $500. Do not do this.
Step 6 – What to Do If You Are Unsure
If you have any doubt about your measurements, do not guess. You have three options.
Option 1: Free Phone Consultation
Most online blind companies offer free measuring consultations:
| Company | Service | Cost |
|---|---|---|
| Blindster | Phone consultation with measuring expert | Free |
| SelectBlinds | Video call with design consultant | Free |
| Blinds.com | Measuring guide + customer support chat | Free |
Option 2: Professional Measuring Service
For a small fee, you can have a professional come to your home and measure your windows:
| Provider | Cost | Notes |
|---|---|---|
| Lowe’s | 35−50 | Includes consultation |
| Home Depot | 35−50 | Applies toward purchase |
| TaskRabbit | 40−80 | Independent handyman |
Option 3: Pay for Professional Measuring
If you are unsure, pay for professional measuring. It costs 35−50 and saves you from ordering $500 worth of blinds that do not fit.
The math: 50measuringfeevs.500 in blinds that cannot be returned. Professional measuring is cheap insurance.
Ready to order? See my Made to Measure Blinds Buying Guide for recommendations.
Installation – What to Expect After Measuring
Once you have your measurements and have ordered your made to measure blinds, installation is the next step.
What you will receive:
- Your custom blinds (cut to your exact measurements)
- Mounting brackets (2-4 per blind)
- Screws and hardware
- Installation instructions
- Valance (decorative cover)
Installation time: 15-30 minutes per window
Tools you will need:
- Drill with screwdriver bit
- Level (do not skip this)
- Pencil
- Step ladder
Basic installation steps:
- Mark bracket positions using your measurements
- Level the brackets
- Screw brackets into the window frame or wall
- Snap the blind into the brackets
- Install the valance
- Test operation
For detailed installation instructions, see my How to Install Made to Measure Blinds guide (coming soon).
Maintenance – Keeping Your Blinds Clean
Proper maintenance extends the life of your made to measure blinds.
Weekly maintenance (5 minutes):
- Dust with microfiber cloth or vacuum with brush attachment
- Close slats fully before dusting (for blinds with slats)
Quarterly maintenance (30 minutes):
- Wipe down roller blinds with a damp cloth
- Vacuum roman and cellular shades (do not use water)
- Check for any loose brackets or hardware
- Test operation (raise and lower fully)
Annual maintenance (1 hour):
- Deep clean according to blind type (see table below)
- Tighten any loose screws
- Lubricate mechanisms if needed (silicone spray)
Cleaning by blind type:
| Blind Type | Cleaning Method | What to Avoid |
|---|---|---|
| Roller blinds | Wipe with damp cloth and mild soap | Submerging in water |
| Roman shades | Vacuum with brush attachment | Water or liquid cleaners |
| Cellular shades | Vacuum with brush attachment | Water or liquid cleaners |
| Faux wood blinds | Wipe with damp cloth, dry immediately | Excessive water |
| Vertical blinds | Wipe each slat, bathtub soak for deep clean | Machine washing |
For detailed maintenance instructions, see my How to Clean Made to Measure Blinds guide (coming soon).
Comparison – Inside Mount vs. Outside Mount (Which Is Right for You?)
If you are still deciding between inside mount and outside mount, here is a direct comparison.
| Factor | Inside Mount | Outside Mount |
|---|---|---|
| Aesthetic | Clean, built-in look | Covers entire window |
| Light blockage | Good (small side gaps) | Excellent (no gaps) |
| Depth required | 2+ inches | None |
| Best for blackout | No | Yes |
| Best for shallow windows | No | Yes |
| Installation difficulty | Easy | Easy |
| Works with obstructions | No (handles, tiles) | Yes (covers them) |
| Popularity | More common | Less common but growing |
Which should you choose?
| If you prioritize… | Choose… |
|---|---|
| Clean, built-in appearance | Inside mount |
| Complete blackout | Outside mount |
| Ease of installation | Either (both are easy) |
| Covering sliding doors | Outside mount |
| Windows with handles or tiles | Outside mount |
| Traditional look | Inside mount |
| Modern look | Either |
Material Guide – How Different Blinds Affect Measuring
The blind type you choose affects measurement requirements. Here is what to know.
Roller Blinds
| Property | Detail |
|---|---|
| Depth required (inside mount) | 1.5 inches minimum |
| Mount type | Inside or outside |
| Measuring consideration | Standard measuring applies |
Cellular Shades
| Property | Detail |
|---|---|
| Depth required (inside mount) | 1.5 inches minimum |
| Mount type | Inside or outside (outside recommended for blackout) |
| Measuring consideration | Outside mount needs 4-6 inches added |
Faux Wood Blinds
| Property | Detail |
|---|---|
| Depth required (inside mount) | 2 inches minimum |
| Mount type | Inside or outside |
| Measuring consideration | Heavier – ensure brackets are secure |
Vertical Blinds
| Property | Detail |
|---|---|
| Depth required (inside mount) | 3 inches minimum (headrail clearance) |
| Mount type | Outside mount recommended for sliding doors |
| Measuring consideration | Add 4-6 inches for outside mount |
FAQ Page -Frequently Asked Questions About Measuring for Blinds
Q: Can I measure for blinds myself or do I need a professional?
A: You can absolutely measure yourself. Thousands of homeowners do it successfully every day. Just follow the steps in this guide, measure three times, and double-check your numbers before ordering. That said, if you are unsure, $50 for professional measuring is cheap insurance.
Q: What happens if I measure wrong?
A: Most made to measure blind companies do not accept returns on custom orders since the blinds are made specifically for your windows. I learned this the hard way – it cost me $500. However, Blinds.com offers a “Perfect Fit Guarantee” – they will remake blinds if you measure incorrectly. Blindster has a 100% satisfaction guarantee.
Q: Should I measure in inches or centimeters?
A: Always measure in inches. All major blind companies (Blindster, SelectBlinds, Blinds.com, Lowe’s, Home Depot) use inches for their order forms.
Q: Do I need to measure for every window separately?
A: Yes. Even if your windows look the same size, measure each one individually. Construction variance of 1/4 to 1/2 inch is common. I learned this when two “identical” windows in my living room were 0.25 inches different.
Q: What if my window is not square?
A: This is common in older homes. Use the smallest width and smallest height measurements from your three measuring points. This ensures the blind will fit even if the window is slightly out of square.
Q: Can I measure for blinds on a sliding glass door myself?
A: Yes. Use outside mount. Measure the width of the door frame. Add 4-6 inches (2-3 inches each side). Measure from the top of the door frame to the floor. Add 2-4 inches above the frame. The blind should hang to within 1/2 inch of the floor.
Q: How do I measure for blinds on a French door?
A: Measure each door panel separately. Use inside mount if the panel has depth (at least 2 inches). Use outside mount if the panel is shallow. Ensure the blind does not block the door handle.
Q: What is the most common measuring mistake?
A: Measuring only one spot. Windows are rarely perfectly square. Measure at three points (top, middle, bottom) and use the smallest measurement. I made this mistake. It cost me $500.
Q: Can I use a laser measure instead of a tape measure?
A: Yes, laser measures are accurate. But a $15 steel tape measure from Home Depot works just as well and is easier for measuring depth.
Q: Should I measure to the nearest 1/8 inch or 1/16 inch?
A: 1/8 inch is sufficient. Most blind companies ask for measurements to the nearest 1/8 inch. Do not round to the nearest 1/4 inch – that can create gaps.
Your Action Plan (What to Do Next)
Step 1: Print the measuring checklist above or copy it to paper.
Step 2: Gather your steel tape measure, pencil, and ladder.
Step 3: Measure each window using the steps above. Measure three times.
Step 4: Double-check all measurements. Have someone else verify if possible.
Step 5: Take photos of your measurements (backup in case you lose the paper).
Step 6: Order your made to measure blinds from a trusted brand.
Step 7: Wait for delivery (7-21 days). Do not panic – custom manufacturing takes time.
Step 8: Install yourself (save 100−150 per window).
Ready to choose which blind to buy? See my Made to Measure Blinds Buying Guide for recommendations.