How to Measure for Panel Track Blinds

Authored By Michael Turner -30 Years Home Improvement Expertise | Updated 2026 | BlindShades.pro
Updated on June 28, 2026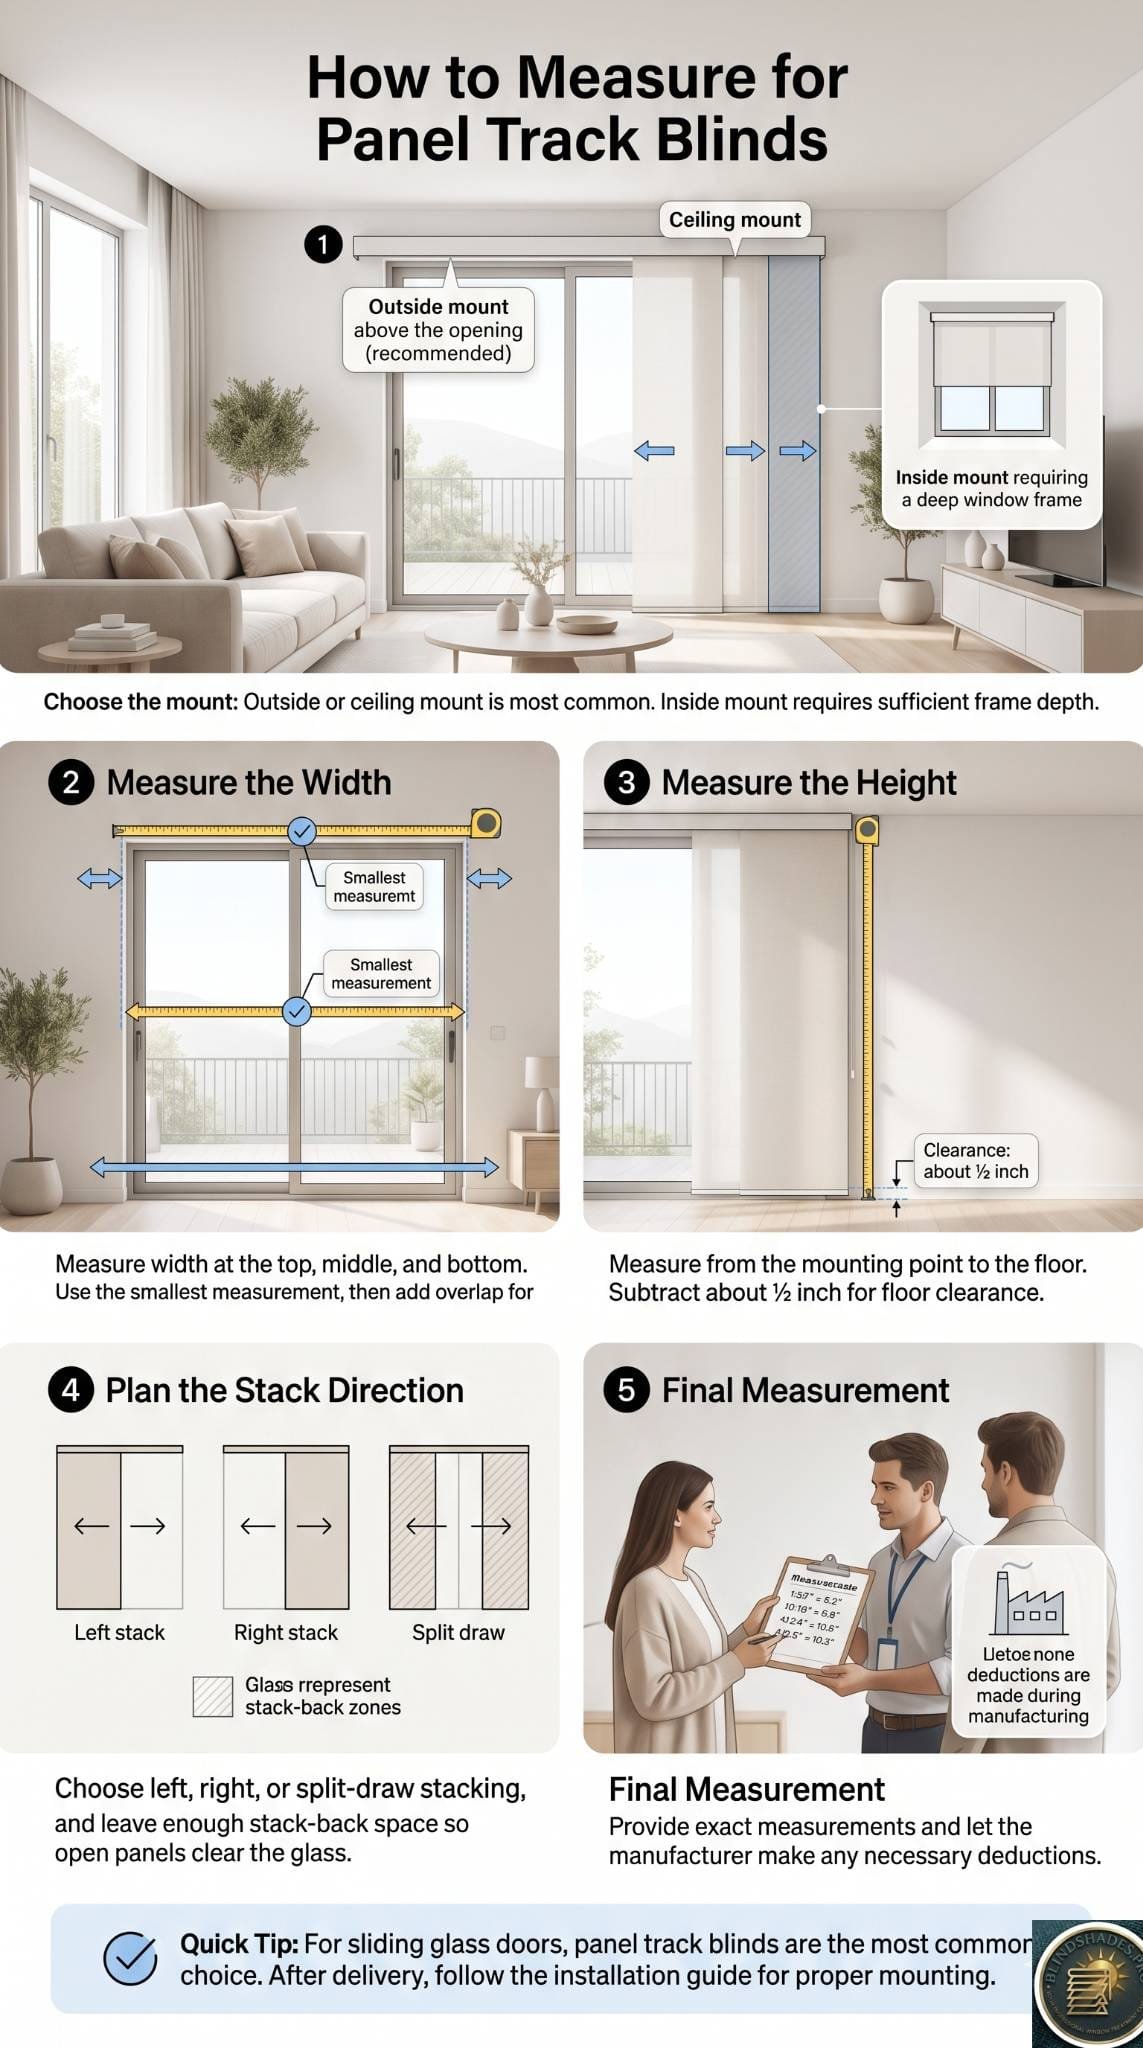
Authored by Michael Turner — 30 Years of Home Improvement Expertise | BlindShades.pro
To measure for panel track blinds, plan for the stack, not just the opening. Most panel tracks are mounted outside the opening or to the ceiling, both because the track needs a flat, level surface and because the wide panels need room to stack clear of the glass when open. Measure the width at three points and use the smallest, measure the height from the mount line to the floor and subtract about half an inch for clearance, and then add stack-back space to one side so the open panels do not block your view. As always, give your exact measurements and let the factory make any deductions. This guide walks through the mount choice, the measurements, and the stack planning that makes panel track blinds glide and look right.
Key Takeaways
- Outside or ceiling mount is the norm. Panel track blinds usually mount outside the opening or to the ceiling, since the track needs a level surface and the panels need room to stack clear of the glass.
- Plan the stack-back space. The single panel-track-specific step is leaving room to one side, or both sides for a split-draw, so the stacked panels do not cover the view when open.
- Smallest width, then add overlap. Measure the width at three points and use the smallest, then add overlap on each side for an outside mount so the panels cover the opening fully.
- Height runs to the floor, minus clearance. Measure from the mount line to the floor and subtract about half an inch so the panels clear the floor and glide freely; the height includes the headrail.
- Never deduct yourself. Submit exact measurements; the factory deducts for inside mounts automatically, while outside mounts are made to your exact size.
⭐ Quick Answer
To learn how to measure for panel track blinds, plan for the stack, not just the opening, since the wide panels need room to gather clear of the glass when open.
- Choose the mount: outside or ceiling is the norm, giving the panels room to stack, as The Shade Store notes; inside mount needs a deep frame.
- Measure the width at the top, middle, and bottom, use the smallest, and add overlap on each side for an outside mount, the method SelectBlinds teaches.
- Measure the height from the mount line to the floor and subtract about half an inch so the panels clear the floor and glide freely.
- Plan the stack: choose left, right, or split-draw, and leave stack-back space so open panels do not cover the view, as Blindsgalore advises.
- Never deduct yourself: give exact measurements and let the factory deduct for inside mounts. Then order from our best panel track blinds guide, see picks for sliding glass doors, or follow how to install panel track blinds.
Why Panel Track Blinds Are Usually Outside or Ceiling Mounted
The track needs a flat surface, and the panels need room to stack.
Unlike most blinds, panel track blinds are usually mounted outside the opening or to the ceiling rather than inside the frame. There are two reasons. First, the track needs a flat, level surface to mount to and for the panels to glide along, which the wall above or the ceiling provides cleanly. Second, and more importantly, the wide panels need somewhere to go when you open them, so you want room to one side, beyond the glass, for them to stack without blocking the view. Inside mount is possible when the opening is deep enough, but it is far less common for this product and leaves the stacked panels sitting over part of the glass. For sliding doors and wide windows, outside or ceiling mount is almost always the right call.
Choose Your Mount
Pick the mount first, because it changes how you measure.
| Mount | When to choose it | Notes |
|---|---|---|
| Outside (wall) | Most installations | Stack panels off the glass; cleanest look |
| Ceiling | Tall windows, room dividers, no wall space above | Floor-to-ceiling coverage |
| Inside (frame) | Deep frames only | Less common; stack sits over the glass |
For the great majority of windows and doors, an outside or ceiling mount gives the best look and operation. Choose inside mount only if you specifically want the track recessed and your frame is deep enough for it.
What You’ll Need
A steel tape and a moment to plan the stack.
Use a steel tape measure, never a cloth one, since cloth stretches and gives inaccurate readings. Have a pencil and paper to record the numbers and to sketch which way the panels will stack. A step stool helps you measure the full width straight across a wide opening, and a second person makes measuring a wide door far easier and more accurate.
How to Measure the Width
Three readings, use the smallest, then add overlap.
- Decide where the track will sit, above the opening for an outside or ceiling mount.
- Measure the width of the opening, or the area you want to cover, at three points: the top, the middle, and the bottom.
- Use the smallest of the three widths for an inside mount, rounding down, so the panels clear the sides.
- For an outside mount, add overlap on each side so the closed panels fully cover the opening with no light gaps.
- Record the width and note that you will also add stack-back space, covered below.
Measuring at three points also reveals whether the opening is out of square, which matters for the final mount choice.
How to Measure the Height
From the mount line to the floor, minus a little clearance.
- Measure the height from where the top of the track will sit down to the floor, at the left, center, and right.
- Use the measurement that gives proper clearance, then subtract about half an inch so the panels clear the floor and glide freely without dragging.
- Remember the height includes the headrail, so you are measuring the full finished drop from the mount line.
- For a room divider or floor-to-ceiling look, measure from the ceiling to the floor and subtract the clearance.
Panels that just clear the floor look intentional and move freely; panels cut too long drag, and too short leave a gap.
Plan the Stack Direction and Stack-Back Space
This is the step that separates panel track from every other blind.
The defining part of measuring for panel track blinds is planning where the panels go when open. First, choose the stack direction: panels can stack to the left, to the right, or split to both sides from the center, called a split-draw. Pick the direction that keeps the stacked panels out of your way, for example stacking away from the active side of a sliding door so you can walk through, or splitting to the center for French doors. Second, leave stack-back space: when open, the panels gather into a stack that has real width, so to keep them from covering the glass, extend the track and your width measurement past the opening on the stacking side. As a rough guide, allow several inches to roughly a foot of extra width on the stacking side, depending on the number and width of the panels. If you want a completely clear view when open, the entire stack should land on the wall beside the glass, not over it.
Outside-Mount Overlap and Stack Additions
What to add, and where.
| Addition | How much |
|---|---|
| Width overlap, each side | About 2 to 3 inches |
| Stack-back, stacking side | Several inches up to about a foot |
| Floor clearance, subtract | About half an inch |
| Above the opening | Enough for the bracket and a clean line |
Outside-mount panel track blinds are made to the exact size you provide, so the overlap and stack-back you build in are the coverage and clear-view you get. When in doubt, err toward a little more stack-back so the open panels clear the glass.
Don’t Make Your Own Deductions
Give exact measurements — the factory handles the rest.
As with any custom blind, submit your exact measurements and do not subtract anything yourself. For an inside mount, the factory automatically deducts a small amount so the panels operate freely within the frame. For an outside mount, no deductions are made, so the track is built to the exact width you provide, including your overlap and stack-back. If you deduct as well, the result is too small with gaps; if you add to compensate for a deduction you imagine, it ends up too big. Measure precisely, record width by height, and let the manufacturer do the math, including calculating the exact number of panels.
Which Measurement Do You Use?
The full rule grid in one place.
| Mount and dimension | Which reading | Rounding | Deductions |
|---|---|---|---|
| Inside, width | Smallest of three | Round down | Factory deducts |
| Inside, height | To the sill | As measured | None |
| Outside, width | Area plus overlap plus stack-back | As measured | None |
| Outside, height | Mount line to floor, minus clearance | As measured | None |
The logic is simple: for an inside mount, give the smallest width so the panels clear the frame and let the factory deduct, while for an outside mount, give the full coverage size, including your overlap and stack-back, since it is built exactly.
Checking for Square and Obstructions
The three-point measurement does double duty.
Measuring at three points tells you more than the size; if the readings differ noticeably, the opening is out of square, which is another reason to favor an outside or ceiling mount that can cover the unevenness cleanly. Before settling on the mount, also check for anything that could interfere with the track or the panels as they slide:
- Door handles and locks on sliding or French doors
- Ceiling fixtures, trim, or crown molding
- Light switches or outlets where brackets would go
- Enough clearance for the panels to clear furniture below
If an obstruction sits in the way, adjust the mount height or position so the track and panels run freely.
Common Measuring Mistakes
Most fit and glide problems trace back to a few slips.
| Mistake | Consequence |
|---|---|
| Forgetting stack-back space | Open panels cover the glass and view |
| Measuring only once | Misses an out-of-square opening |
| No floor clearance | Panels drag and bind |
| Making your own deductions | Track too small, gaps at the sides |
| Mixing up width and height | Wrong-size order |
| Ignoring the stack direction | Panels stack over the door you use |
| Using a cloth tape | Stretchy, inaccurate readings |
From Measurement to Order
Accurate numbers and a stack plan turn into smooth panels.
With your width, height, mount, and stack direction recorded, you are ready to order the right configuration with confidence. Take your measurements to a set you like in our best panel track blinds guide, or for the most common case, our picks for sliding glass doors. If you are weighing panel track against the slatted alternative, see panel track blinds vs vertical blinds. When your order arrives, follow how to install panel track blinds to mount the track level and hang the panels.
Best Sources
- SelectBlinds — on outside-mounting panel track blinds, measuring the width at three points, adding overlap for an outside mount, and planning the stack direction.
- Blindsgalore — on leaving stack-back space so the panels clear the glass when open, and choosing left, right, or split-draw stacking.
- The Shade Store — on inside versus outside mount, the minimum depth for an inside mount, and measuring height to the floor with a small clearance.
- Blinds Northwest — on outside-mount overlap per side and giving exact measurements without making your own deductions.
- American Blinds — on choosing an outside or ceiling mount for out-of-square openings and the automatic factory deduction for inside mounts.
Related Guides
- Best Panel Track Blinds Buying Guide
- How to Install Panel Track Blinds
- Panel Track Blinds for Sliding Glass Doors
- Panel Track Blinds vs Vertical Blinds
Frequently Asked Questions
How do you measure for panel track blinds?
To measure for panel track blinds, first choose the mount, usually outside or ceiling, so the panels have room to stack clear of the glass. Measure the width of the opening at three points and use the smallest, adding overlap on each side for an outside mount. Measure the height from where the track will sit down to the floor and subtract about half an inch for clearance. Then plan the stack direction and add stack-back space to one side so the open panels do not cover the view. Submit these exact measurements and let the factory make any deductions.
Should panel track blinds be inside or outside mount?
Panel track blinds are usually outside or ceiling mounted. The track needs a flat, level surface, and the wide panels need room to stack beside the glass when open, both of which an outside or ceiling mount provides. Inside mount is possible only when the frame is deep enough, and it leaves the stacked panels sitting over part of the glass, reducing the open view. For sliding doors and wide windows, an outside or ceiling mount almost always gives the best look and operation, and it is the better choice for an out-of-square opening too.
How much stack-back space do panel track blinds need?
Panel track blinds need enough room to one side, or both sides for a split-draw, for the open panels to stack without covering the glass. The exact amount depends on the number and width of the panels, but as a rough guide you should allow several inches up to roughly a foot of extra width on the stacking side. To keep a completely clear view when open, extend the track far enough past the opening that the entire stack lands on the wall beside the glass rather than over it. Planning this stack-back is the key step that separates measuring for panel track from other blinds.
Do you subtract anything when measuring for panel track blinds?
No, you should not subtract anything yourself. Submit your exact measurements, and for an inside mount the factory automatically deducts a small amount so the panels operate freely within the frame. For an outside mount, no deductions are made, so the track is built to the exact width you provide, including your overlap and stack-back space. If you deduct as well, the result is too small with gaps at the sides; if you add to offset an imagined deduction, it ends up too big. The manufacturer also calculates the exact number of panels from your measurements.
How do you measure the height for panel track blinds?
Measure the height from where the top of the track will sit, above the opening or at the ceiling, straight down to the floor, taking the reading at the left, center, and right. Then subtract about half an inch so the panels clear the floor and glide freely without dragging. Remember that the height includes the headrail, so you are measuring the full finished drop from the mount line. For a floor-to-ceiling look or a room divider, measure from the ceiling to the floor and subtract the same small clearance.
