How to Install Panel Track Blinds

Authored By Michael Turner -30 Years Home Improvement Expertise | Updated 2026 | BlindShades.pro
Updated on June 28, 2026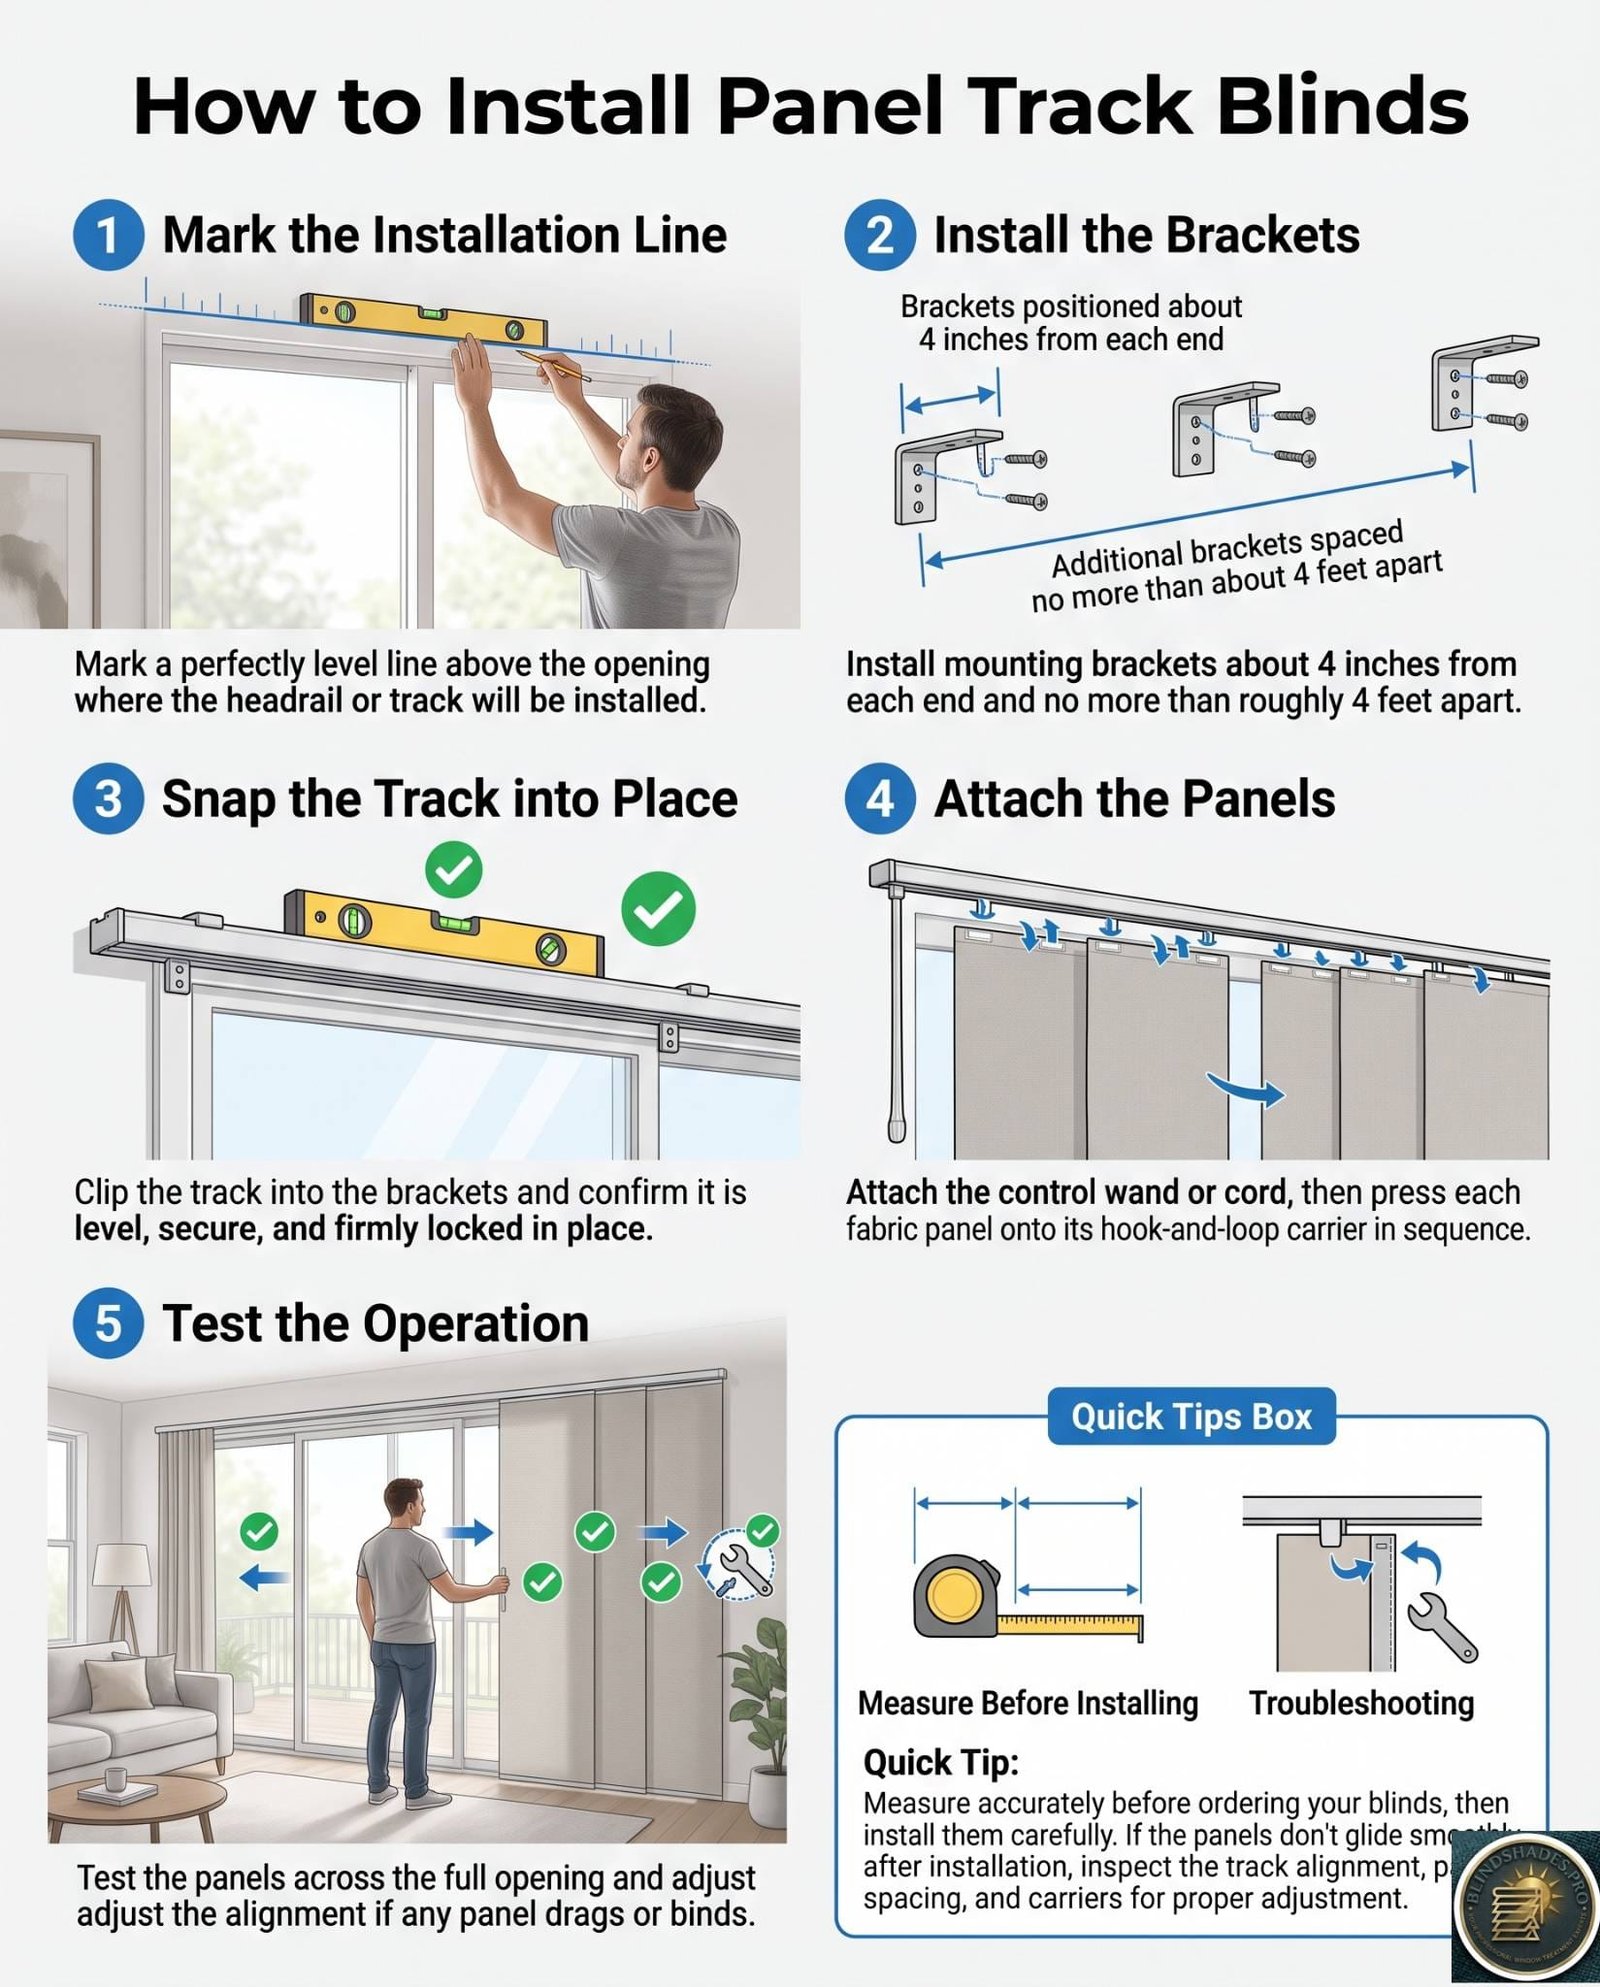
Authored by Michael Turner — 30 Years of Home Improvement Expertise | BlindShades.pro
To install panel track blinds, mount a perfectly level track first, then hang the panels last. Mark a level line above the opening, fasten the brackets about four inches from each end and no more than roughly four feet apart, clip the track into the brackets, attach the control wand or cord, and then press each fabric panel onto its hook-and-loop carrier in order. Finally, test the glide across the full opening. The single most important step is getting the track dead level, because an un-level track is the number one reason panels drag or will not slide. This is a DIY-friendly job for two people in about an hour. This guide walks through every step, plus wall, ceiling, and frame mounting.
Key Takeaways
- A level track is everything. An un-level track is the top cause of panels that drag or refuse to glide, so getting the bracket line dead level matters more than any other step.
- Space the brackets correctly. Place a bracket about four inches from each end and add brackets so they sit no more than roughly four feet apart, keeping the track straight and supported.
- Panels attach with hook-and-loop. The fabric panels press onto Velcro carriers in a set order, so attach them in sequence and they go on in seconds.
- Choose wall, ceiling, or frame mount. Wall mounting is most common; ceiling mounting suits tall windows and room dividers; frame mounting works on deep frames.
- Test the glide before you finish. Slide the panels fully open and closed to confirm smooth operation, and adjust the track if anything binds.
⭐ Quick Answer
To learn how to install panel track blinds, mount a perfectly level track first, then hang the panels last. It is a DIY-friendly job for two people in about an hour.
- Mark a level line: a dead-level bracket line above the opening is the single most important step, as Levolor stresses for smooth glide.
- Install the brackets: about four inches from each end and no more than roughly four feet apart, using anchors rated for the load.
- Mount the track: clip it into the brackets and confirm it is fully seated, level, and secure across its length.
- Attach and hang: fit the control wand or cord, then press each panel onto its hook-and-loop carrier in order, the method SelectBlinds shows.
- Test the glide: slide the panels fully open and closed, with wall, ceiling, or frame mounts all possible per Blinds To Go. Measure first with how to measure for panel track blinds, fix a sticking glide via panel track blinds that will not slide, or see our best panel track blinds guide.
Before You Start
Confirm your measurements and your mounting surface.
Before drilling anything, double-check two things. First, confirm your blinds match your measurements and that you know your stack direction, so the panels stack where you intend. Second, check your mounting surface: you need a flat, solid surface above the opening, on the wall or ceiling, that can hold the brackets, and you need to know what is behind it, studs, drywall, or masonry, so you use the right anchors. Have your hardware kit and instructions on hand, since bracket styles vary slightly by brand. A few minutes of checking here prevents crooked tracks and stripped holes later.
Tools and Parts You’ll Need
A short, common toolkit.
| Item | Purpose |
|---|---|
| Drill and bits | Pilot holes and driving screws |
| Level | Getting the track dead level |
| Tape measure and pencil | Marking the bracket line |
| Screws and wall anchors | Securing brackets to the surface |
| Step ladder | Reaching the mount line |
| Track, brackets, carriers, panels | The blind kit itself |
| Second person | Holding a wide track while you fasten |
A laser or long spirit level makes leveling a wide track much easier, and anchors rated above the weight of the loaded track are essential in drywall.
How to Install Panel Track Blinds: Step by Step
Level track first, panels last.
- Mark a level bracket line. Measure up to where the top of the track will sit, mark the line above the opening, and use a level to draw it dead level. This line determines whether the panels glide, so take your time here.
- Mark and install the brackets. Position a bracket about four inches in from each end of the track, then space any additional brackets evenly so none are more than roughly four feet apart. Mark the holes, drill pilot holes, set anchors if needed, and screw the brackets to the line.
- Mount the track. Clip or snap the track into the installed brackets according to your hardware, and confirm it is fully seated, level, and secure across its length.
- Attach the control. Fit the control wand or the cord-loop mechanism to the lead carrier so you can move the panels. Cordless wand control is the safest option in homes with children or pets.
- Hang the panels in order. Press each fabric panel onto its hook-and-loop carrier, working in the correct order from one end so the panels overlap properly and stack the right way. The Velcro grips instantly, so align each panel straight before pressing.
- Test the glide. Slide the panels fully open and fully closed several times. They should move smoothly and stack neatly. If anything drags or sticks, recheck that the track is level and the carriers are seated.
Wall vs Ceiling vs Frame Mount
Pick the mount that fits your opening and look.
| Mount | Best for | How brackets attach |
|---|---|---|
| Wall (outside) | Most installations | Brackets screw to the wall above the opening |
| Ceiling | Tall windows, room dividers, no wall space | Brackets screw up into the ceiling or joists |
| Frame (inside) | Deep frames only | Brackets screw inside the top of the frame |
Wall mounting above the opening is the most common and most forgiving, leaving room for the panels to stack off the glass. Ceiling mounting gives a clean floor-to-ceiling look and is how panel track works as a room divider. Frame mounting is possible only when the frame is deep enough for the track.
Bracket Spacing Guide
Enough brackets to keep the track straight.
| Track width | Typical brackets |
|---|---|
| Up to about 4 feet | 2 (one near each end) |
| About 4 to 6 feet | 3 |
| About 6 to 8 feet | 4 |
| About 8 feet and wider | 5 or more |
The rule of thumb is a bracket about four inches from each end, with intermediate brackets so none sit more than roughly four feet apart. Wide tracks sag and bind without enough support, so when in doubt, add a bracket. Always anchor into studs or use anchors rated for the load.
Joining Wide Tracks
Very wide openings may ship in sections.
For very wide openings, panel track systems sometimes come with the track in two sections that join with a connecting plate, since a single track over roughly eight feet can be unwieldy to ship and handle. If yours arrives this way, join the sections on the connecting plate so the seam is smooth and the carriers pass over it without catching, then mount the joined track as one. Make sure a bracket supports the joint or sits close to it so the track does not flex where the sections meet.
Troubleshooting the First Glide
If the panels do not move smoothly, start here.
| Symptom | Likely cause | Fix |
|---|---|---|
| Panels drag at one end | Track not level | Re-level and reseat the track |
| Panels stick mid-track | Debris in track or a misaligned carrier | Clear the track, reseat the carrier |
| A panel hangs crooked | Panel pressed on unevenly | Peel it off and reattach straight |
| Stack will not move together | Lead carrier not engaged | Reconnect the lead carrier |
| Track flexes or sags | Too few brackets | Add a bracket for support |
Most first-glide problems trace back to a track that is not quite level or a carrier that is not fully seated, both quick to correct. For persistent sliding problems after install, the full diagnostic is in how to fix panel track blinds that will not slide.
From Install to Everyday Use
Mounted and gliding, they are easy to live with.
Once your panel track blinds are installed and gliding smoothly, they need very little upkeep: an occasional dusting of the panels and a clean track keep them moving well, with the full method in how to clean panel track blinds. To see the full range of fabrics and configurations, or to add panel track to other openings, visit our best panel track blinds guide.
Best Sources
- Levolor — on marking a level line, spacing brackets near the ends and at intervals across the track, and clipping the headrail into the brackets.
- SelectBlinds — on attaching the control wand or cord and pressing the fabric panels onto their hook-and-loop carriers in order.
- Blinds To Go — on wall, ceiling, and inside-frame mounting options and confirming a level, secure track before hanging panels.
- GoDear Design — on no-tools and adjustable-width panel track kits, cordless wand operation, and testing the glide after assembly.
- The Shade Store — on bracket placement, supporting wide tracks, and joining track sections for very wide openings.
Related Guides
- Best Panel Track Blinds Buying Guide
- How to Measure for Panel Track Blinds
- How to Fix Panel Track Blinds That Will Not Slide
- How to Clean Panel Track Blinds
Frequently Asked Questions
How do you install panel track blinds?
To install panel track blinds, first mark a dead-level line above the opening where the track will sit. Fasten the brackets about four inches from each end and add brackets so none are more than roughly four feet apart, using anchors rated for the load. Clip the track into the brackets and confirm it is level and secure. Attach the control wand or cord, then press each fabric panel onto its hook-and-loop carrier in the correct order. Finally, slide the panels fully open and closed to test the glide, adjusting if anything drags.
Why is leveling the track so important?
Leveling the track is the most important step because panel track blinds glide along that track, and any tilt makes the panels drift, drag, or refuse to slide. Even a small slope causes the panels to slide open or closed on their own or to bind at one end. That is why you mark the bracket line with a level before drilling and confirm the mounted track is level across its full length. Getting this right is the difference between panels that glide effortlessly and ones that stick, so it is worth taking extra time.
Can you install panel track blinds yourself?
Yes, installing panel track blinds is a DIY-friendly job that most people can complete in about an hour with basic tools. You need a drill, a level, a tape measure, and the right anchors for your wall or ceiling. The main thing to get right is a level, well-supported track, and a second person makes handling a wide track much easier and more accurate. Many ready-made kits are even designed for tool-light, no-drill, or tension installation, simplifying the process further for renters.
How far apart should panel track brackets be?
Place a bracket about four inches in from each end of the track, then add intermediate brackets so that no two are more than roughly four feet apart. A track up to about four feet usually needs two brackets, four to six feet needs three, six to eight feet needs four, and wider tracks need five or more. Adequate bracket spacing keeps the track straight and prevents the sag that causes panels to bind, so when in doubt, add a bracket rather than risk a flexing track.
How do the panels attach to the track?
The fabric panels attach to the carriers on the track using hook-and-loop, or Velcro, strips. Each carrier has one side of the hook-and-loop, and the top of each panel has the other, so you simply align the panel straight and press it on, and it grips instantly. The panels must go on in the correct order from one end so they overlap properly and stack the right way. Because they are attached this way, the panels are also easy to remove for cleaning or replacement, just peel and reattach.
