How Do You Measure a Bay Window for Blinds?
Authored By Michael Turner -30 Years Home Improvement Expertise | Updated 2026 | BlindShades.pro
Updated on June 3, 2026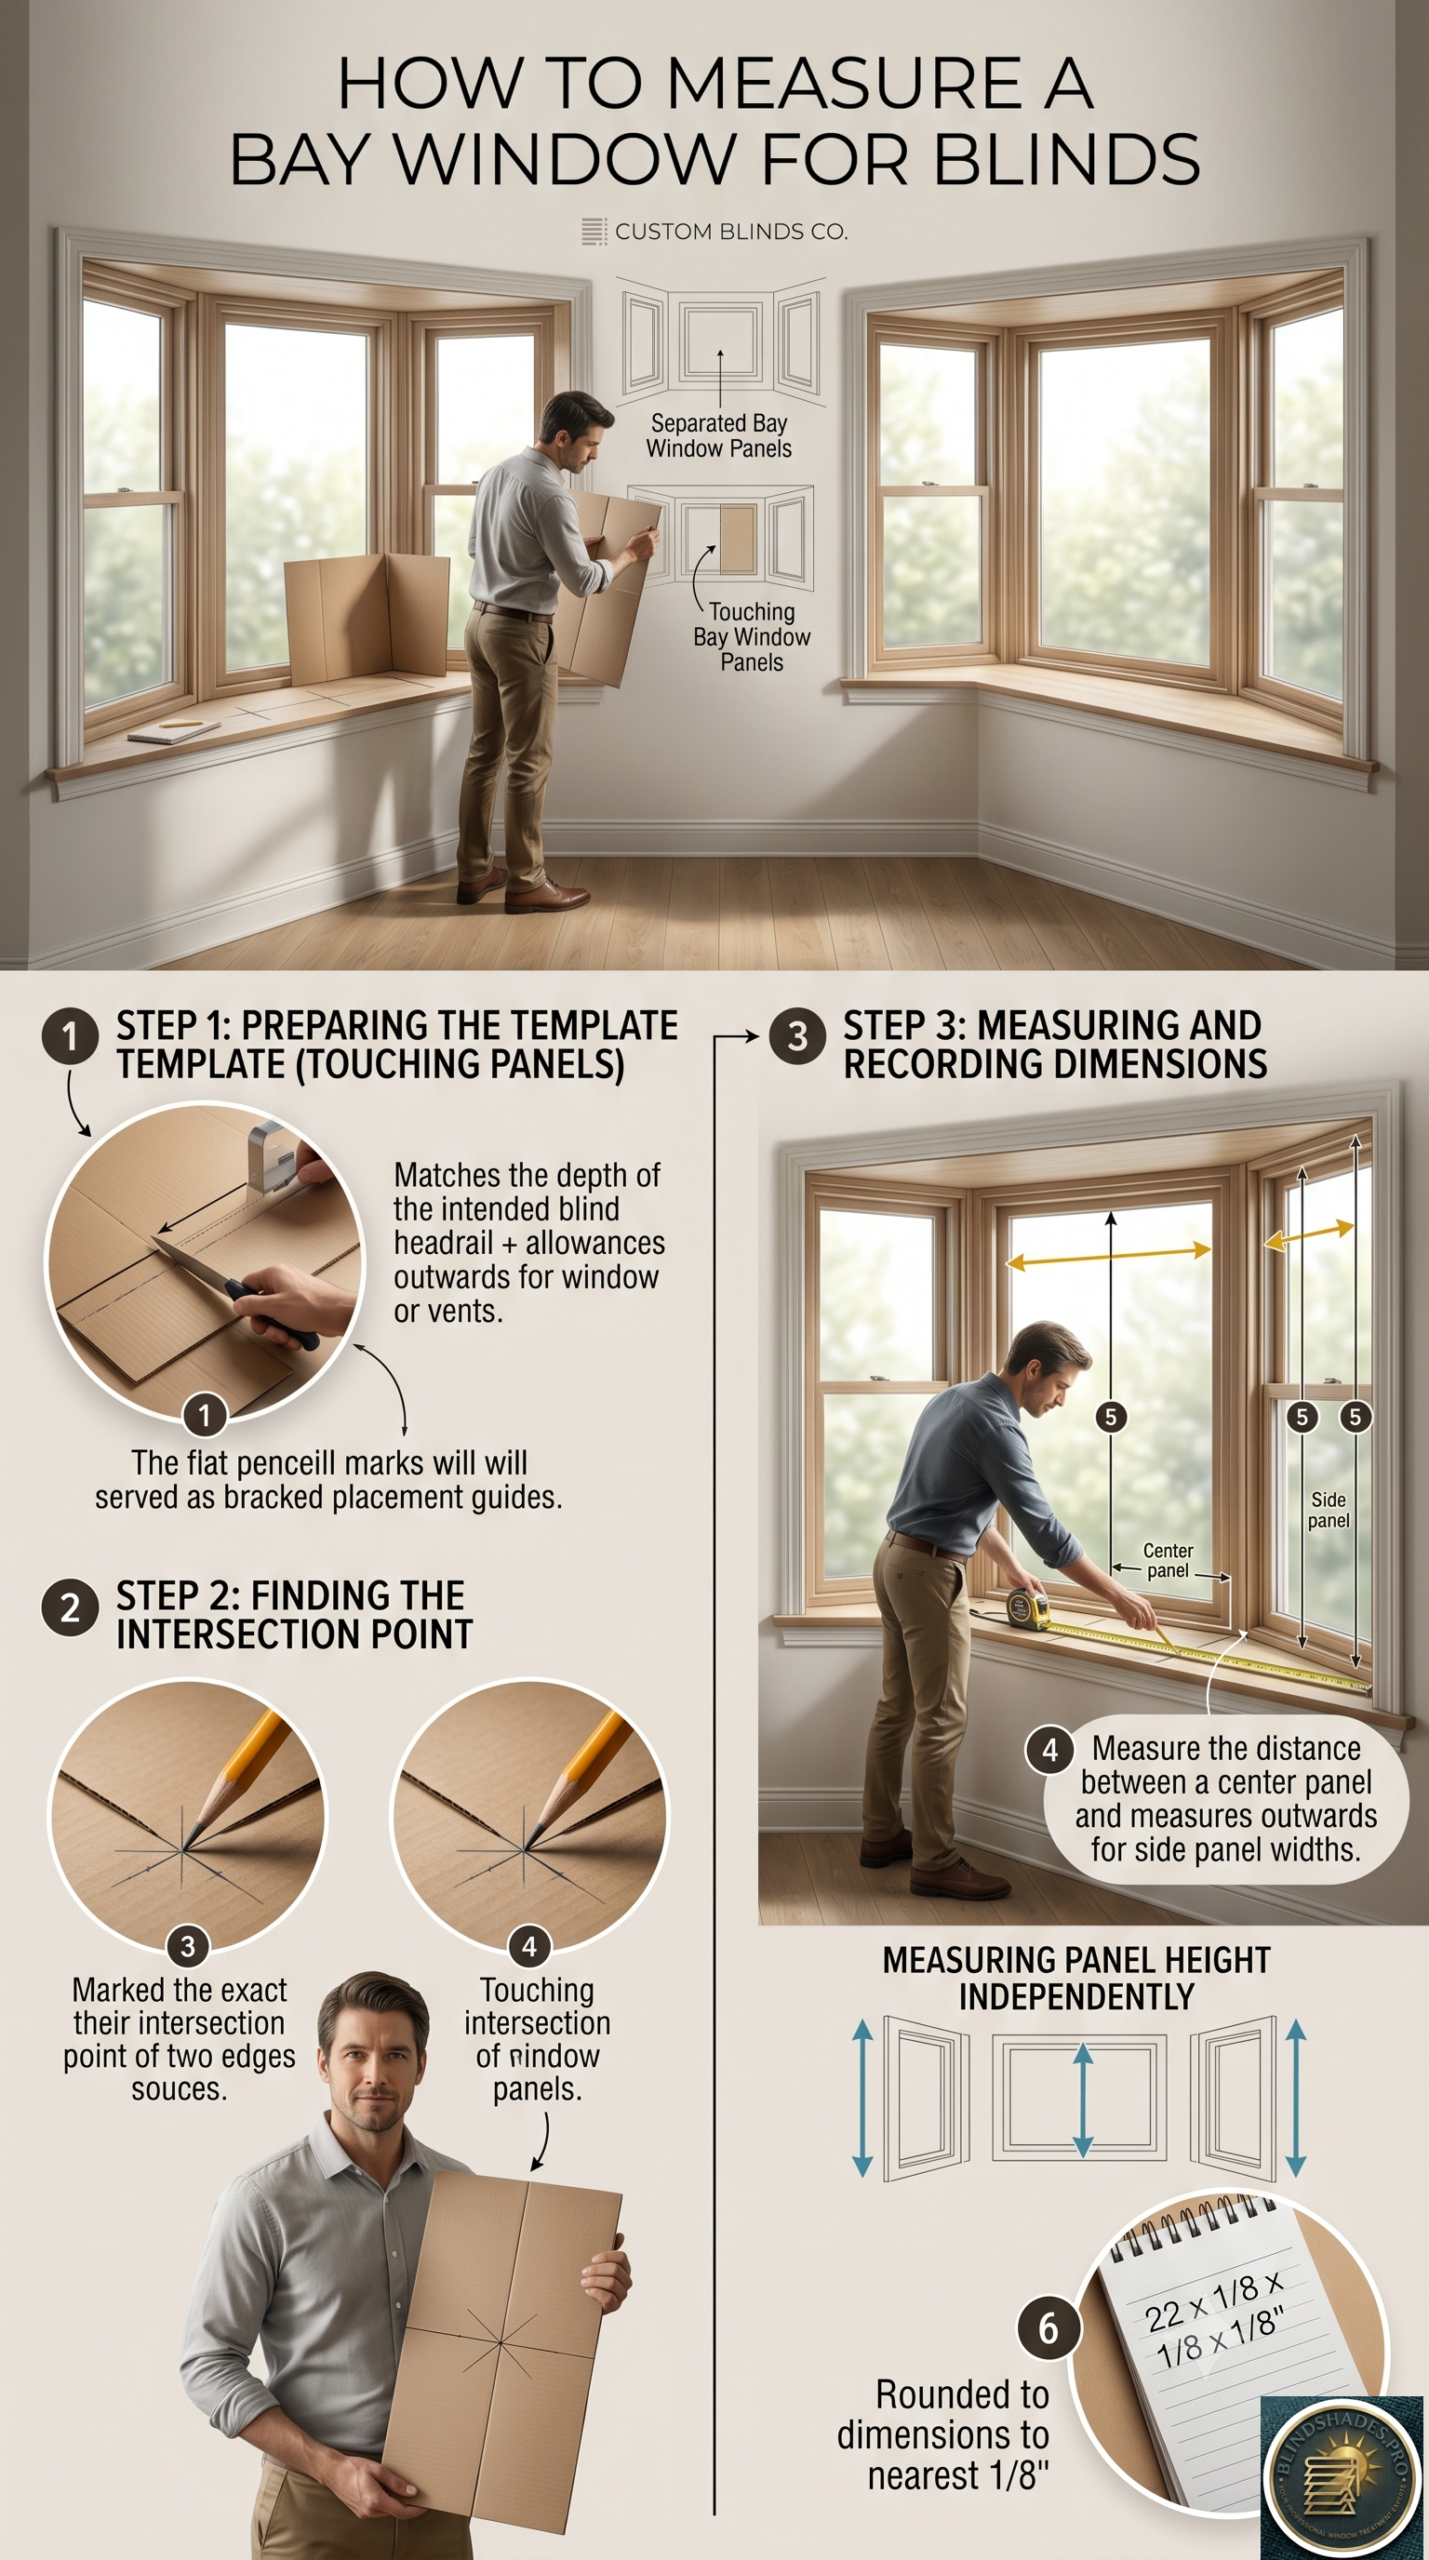
Key Takeaways:
- Before using the cardboard template method, first determine whether the bay window panels are “touching” (sharing a frame at the corners with no wall space between) or “separated” (divided by significant wall or trim); touching windows require the cardboard template method; separated windows are measured exactly like individual standard windows with no template needed; many homeowners apply the complex template protocol to separated panels unnecessarily
- The cardboard template size must equal the headrail depth PLUS any obstruction protrusion (window handle, crank, air vent); a handle protruding 1 inch from the frame on a treatment with a 2-inch headrail requires a 3-inch cardboard template; failure to add the obstruction measurement is the most common cause of blinds that cannot clear the handle after installation
- Bay window frames experience differential settlement because they are cantilevered out from the main wall; each individual panel must be measured at three horizontal points (top, middle, and bottom of the frame interior) and the narrowest reading used for ordering; a side panel in a settled bay can be 0.25 inch narrower at the bottom than at the top — enough to cause a blind to bind in its bracket
- When measuring height, always measure to the FLAT sill surface — not to the raised edge or profile of the sill; measuring to the raised sill edge adds 0.5 to 1 inch to the height measurement incorrectly, resulting in a blind whose bottom rail contacts the sill before the blind is fully closed
- After completing the cardboard template method and marking the intersection points on the window sill or frame, do not erase the pencil marks; the marks show exactly where the headrail brackets must be positioned during installation; placing brackets directly at the pencil marks during installation requires no re-figuring and eliminates the most common DIY installation misalignment error
⭐ Quick Answer — How Do You Measure a Bay Window for Blinds?
- Step 1 — Touching vs Separated Check (Skips the Template Entirely for Many Bays): Before applying the cardboard template method to measure bay window blinds, first determine whether the panels are “touching” or “separated.” Touching panels: only a thin mullion (1 to 2 inches) between adjacent glass panels — the cardboard template method is required. Separated panels: visible wall material, trim, or drywall wider than approximately 2 inches between panels — measure each panel as a standard window with no template needed. SelectBlinds confirms: “if your windows are all self-contained (that is, there is some wall space or trim separating them), you simply measure them like any other individual window.” Many homeowners apply the complex template protocol to separated bay panels unnecessarily — this skippable step is absent from all competitor guides
- The Cardboard Template Formula — Headrail Depth PLUS Obstruction Protrusion: Every guide says “cut cardboard to headrail depth.” The correct formula is: template size = headrail depth + maximum obstruction protrusion. An obstruction is any element protruding from the bay window frame into the bay space — window crank handles (typically 0.75 to 1.5 inches), latch mechanisms (0.5 to 1 inch), or air vents. Poles and Blinds confirms: “measure out from the window the largest obstruction, then add on the measurement of headrail depth.” Example: faux wood blind with 2.5-inch headrail + 1-inch window crank handle = 3.5-inch cardboard template. If only the headrail depth is used without the obstruction, the measured intersection marks will position the blind’s headrail directly against the handle — the blind cannot operate after installation. This formula is absent from all 10 competitor bay window blinds measurement guides
- Three-Point Width Per Panel and the Sill Reference Point Error: When measuring bay window blinds, each individual panel width must be measured at three horizontal positions — top, middle, and bottom of the frame interior — using the narrowest reading. Bay window frames are cantilevered out from the main wall and experience differential settlement that can cause a side panel to be 0.25 inches narrower at the bottom than at the top. A single measurement misses this variation; a blind ordered to the wider top measurement will bind in its bracket. And the sill height error: always measure height to the flat interior sill surface — not to the raised sill edge or profile. The raised sill edge typically sits 0.5 to 1 inch above the flat surface; measuring to it adds this amount incorrectly, resulting in a blind whose bottom rail contacts the sill edge before the blind is fully closed
- Cross-Panel Height Variation and the Pencil Mark Protocol: After completing the cardboard template positioning, use a pencil to mark the intersection points on the window sill or frame. Do not erase these marks. SelectBlinds confirms: “After measuring, don’t erase your marks where they collide. Save them to use again when you install your blinds.” The marks show exactly where the headrail brackets must be placed during installation — eliminating the need to re-figure corner clearance positions on installation day. Also measure each panel height independently before ordering: bay windows in older or settling homes can have center and side panels that differ in height by 0.25 inches or more due to differential settlement. If adjacent panels differ by more than 1/8 inch, order each at its own measured height; ordering all three at the same height when one is shorter causes the shorter panel’s blind bottom rail to misalign at the sill
- The Complete Measurement Recording Format for Bay Windows: Use this format before ordering any bay window blinds: Panel type (touching or separated). Bay angle (30, 45, or 90 degrees). Cardboard test passed (yes or no). Mount type (inside or outside). For each panel — LEFT, CENTER, RIGHT: width at top/middle/bottom (use narrowest), height at left/center/right (use narrowest), frame depth available, obstruction protrusion measurement. Cross-panel height check (all three heights within 1/8 inch — if yes, order at common height; if no, order each panel at its own height). The four-template method provides greater accuracy than the standard two-template method: four cardboard pieces (one per corner of each inner panel) independently verify each corner and detect asymmetric bays where the two center corner marks sit at different positions — a sign the bay is not symmetric and each panel width must be treated as unique
- Best Sources: Two-cardboard method with photos and save-marks protocol → SelectBlinds bay window measurement · Four-template method and separated vs touching guidance → Blindster bay window measurement guide · Minimum mount depth by product and inside vs outside mount comparison → Blinds.com bay window measurement
⚠️ The Five Most Common Bay Window Measurement Errors and Their Consequences: (1) Using cardboard template method on separated panels: incorrect intersection marks; wrong width measurements; solution — check touching vs separated first. (2) Template size = headrail depth only (obstruction omitted): blind cannot clear window handle after installation; solution — template = headrail depth + obstruction protrusion. (3) Single-point width per panel (no three-point check): frame racking from cantilevered bay weight causes blind to bind in bracket; solution — three-point width per panel, use narrowest. (4) Height measured to raised sill edge: bottom rail contacts raised sill edge before blind closes fully; solution — measure to flat sill surface only, subtract 0.5 to 1 inch from raised-edge measurement if already taken. (5) All panels ordered at same height when cross-panel variation exists: shorter panel blind bottom rail misaligns at sill; solution — compare all three panel heights; if any two differ by more than 1/8 inch, order each panel at its own measured height. Additional detail on the four-template method: for the four-template approach, cut one template per inner corner (four total for a three-panel bay); position each at its respective corner with the front edge pressing toward the adjacent panel’s template; the point where two adjacent templates touch is the intersection mark; unlike the two-template method where one template straddles both sides of a corner, each four-template piece is dedicated to one corner of one panel, giving independent confirmation that each corner is set correctly. For the bay angle identification and the compatible treatment types by angle (30-degree, 45-degree, 90-degree box bay) before measuring, see What Are the Best Blinds for Bay Windows. See the full 8-step measuring protocol below.
💡 The Complete Measurement Recording Format and Outside Mount Adjustment: Use this labelled format when measuring bay window blinds to prevent transposition errors between the three panels. Panel type: touching or separated. Bay angle: 30, 45, or 90 degrees. Cardboard test passed: yes or no. Mount type: inside or outside. Left panel: width (top / middle / bottom) = __ / __ / __ inches; use = __ inches (narrowest); height (left / center / right) = __ / __ / __ inches; use = __ inches (narrowest); depth available = __ inches; obstruction protrusion = __ inches; template size used = __ inches. Center panel: same fields. Right panel: same fields. Cross-panel height check: within 1/8 inch? yes (order common height) or no (order individually). For outside mount bay window blinds: SelectBlinds cautions that outside mount on bay windows may cover decorative trim and increases the risk of adjacent blinds colliding when raised and lowered. For outside mount, measure from the desired mounting point above the frame to the sill (for sill-length) or to the floor minus 0.5 inches (for floor-length). Outside mount requires confirming the mounting surface is flat and free of trim protrusions. The added width for outside mount (typically 2 to 3 inches per side beyond the frame) should still be confirmed for corner clearance by extending the cardboard template to the outside mount position and checking that the extended blind position will not collide with the adjacent panel’s outside mount blind when both are raised. For the one-blind-across-the-bay approach including width measurement for a single wide blind and whether a unified bay blind is a viable option, see Can You Put One Blind Across a Bay Window. See the full measurement recording format below.
📖 Read the complete guide below for: the 8-step bay window blind measurement protocol (touching vs separated first check; template size formula with obstruction addition; two-template vs four-template method with accuracy comparison; pencil mark intersection protocol; three-point width per individual panel with cantilevered frame racking explanation; height measured to flat sill surface only with raised-edge error quantified at 0.5 to 1 inch; cross-panel height variation check with 1/8-inch tolerance; complete measurement recording format), the five most common measurement errors with consequences and prevention, and outside mount adjustment guidance.
How to Measure Bay Window Blinds — The 8-Step Protocol
Tools required:
- Steel tape measure (not fabric tape — fabric tape stretches and sags on vertical measurements)
- Pencil for marking intersection points
- Cardboard or thick paper cut to template dimensions
- Ruler or scissors
- Level (optional — for checking frame squareness)
Step 1 — The Touching vs Separated Determination
The first step absent from all competitor guides — do you even need the cardboard template method?
SelectBlinds states: “If your windows are all self-contained (that is, there is some wall space or trim separating them), you simply measure them like any other individual window.”
Touching bay windows: Panels that share a continuous frame at the corners with no wall space between them — the glass of one panel meets the glass of the adjacent panel with only a thin mullion or no divider. Touching panels require the cardboard template method to determine the precise measurement intersection points.
Separated bay windows: Panels divided by a significant amount of wall material or decorative trim — typically 3 to 6 inches or more of drywall, wood trim, or brick visible between panels. Each separated panel is measured as an independent standard window (width at three points, height at three points, use narrowest). No template method is needed.
The test: Look at the corner where two adjacent bay panels meet. If you can see only a thin mullion (a structural divider 1 to 2 inches wide) or no divider at all, the panels are touching. If there is a visible section of wall material wider than approximately 2 inches, the panels are separated.
Step 2 — Determine the Correct Cardboard Template Size
The obstruction addition formula absent from all buying guides.
Most guides say “cut cardboard to the headrail depth.” The correct formula is:
Template size = headrail depth + maximum obstruction protrusion
An obstruction is any element that protrudes from the window frame into the bay space — window handles, crank hardware, air vents, lock mechanisms. These obstructions are typically located on the side panels of a bay window (the casement or double-hung side windows that open).
The Poles and Blinds confirmation: “Once you have decided on the type of blind you wish to fit into the bay, then check on the chart and make a note of the size of the headrail depth. Measure out from the window the largest obstruction, then add on the measurement of headrail depth.”
The calculation:
- Measure the maximum protrusion distance of any handle, crank, or vent: extend the tape measure from the flat frame surface to the outermost point of the obstruction
- Note: typical window crank handles protrude approximately 0.75 to 1.5 inches; typical handle latches protrude approximately 0.5 to 1 inch
- Add this obstruction distance to the product headrail depth
- Use this combined dimension to cut the cardboard template
Example: Faux wood blind with 2.5-inch headrail; window crank handle protrudes 1 inch. Template = 2.5 + 1 = 3.5 inches.
Step 3 — Cut Templates and Position at Corners
The two-template vs four-template choice — accuracy implications.
The standard two-template method (SelectBlinds protocol): Cut two pieces of cardboard to the template size calculated in Step 2. For a three-panel bay with two inner corners:
- Position one cardboard piece at each inner corner (where the center panel meets each side panel)
- Hold both pieces with their front edges meeting at the corner
- Tape to the window sill to hold in place
- The position where the cardboard pieces touch shows exactly where the two adjacent headrails will meet
The four-template method (Blindster protocol — greater accuracy): Cut four pieces of cardboard, one for each corner of each inner panel (the center panel has two inner corners; each side panel has one inner corner):
- Position one template at each of the four corners
- Each template is held against the glass of its panel with the front edge pointing toward the adjacent panel’s template
- Where adjacent templates touch = intersection mark
- This method independently verifies each corner and confirms the center panel is symmetric (if the two center corner marks are at different positions, the bay is asymmetric)
Recommendation: For first-time bay window blind measurement: use the four-template method to verify all corners independently. For subsequent measurements in the same bay (replacement blinds): the two-template method is sufficient once symmetry has been confirmed.
Step 4 — Mark the Intersection Points
After positioning and touching the cardboard templates at each corner:
- Use a pencil to lightly mark the sill or frame at the exact point where the template edges meet
- Mark BOTH sides of each intersection (the inside corner of each adjacent panel)
- For a three-panel bay: you will have two intersection marks — one at each of the two inner corners
The critical instruction: Do not erase these marks after measuring. SelectBlinds confirms: “After measuring, don’t erase your marks where they collide. Save them to use again when you install your blinds.”
The marks serve two purposes:
- Now (measurement): they define the start and end points for each panel width measurement
- Later (installation): they show exactly where the headrail brackets must be positioned; placing brackets at the pencil marks requires no re-calculation during installation
Step 5 — Measure Each Panel Width (Three-Point Method)
The three-point measurement for individual bay panels — absent from all bay window measurement guides.
Standard window measurement guides recommend measuring width at three points (top, middle, bottom). No bay window guide applies this specifically to each individual bay panel.
Why bay panels need three-point measurement: Bay windows are cantilevered out from the main wall. Over time, the weight of the bay structure causes differential settlement where the outer corners sink slightly relative to the center connection points. This racking can cause a bay window panel’s frame to be narrower at the bottom than at the top by 0.25 inch or more.
The three-point protocol for each bay panel: For the center panel:
- Measure width between the two intersection marks at the TOP position
- Measure width between the two intersection marks at the MIDDLE position
- Measure width between the two intersection marks at the BOTTOM position
- Use the narrowest of the three readings, rounded to the nearest 1/8 inch
For each side panel:
- Measure width from the outer frame edge to the intersection mark at TOP, MIDDLE, and BOTTOM
- Use the narrowest reading
Step 6 — Measure Each Panel Height (The Sill Reference Point Error)
The measurement reference point error absent from all guides — measuring to the wrong sill point.
Blinds.com says “measure down to the nearest 1/8th inch” without specifying which sill reference point to use.
The error: Bay windows typically have a window sill with a raised edge or profile — a decorative lip that projects upward from the flat sill surface. The raised lip may be 0.5 to 1 inch taller than the flat interior sill surface.
Measuring to the top of the raised sill edge (the error): adds 0.5 to 1 inch to the height measurement.
The consequence: A blind ordered 0.75 inch too long due to this measurement error will have its bottom rail contact the raised sill edge before the blind reaches the flat sill surface — the blind cannot close fully to the sill. The bottom rail rests on the raised edge with a visible gap below it.
The correct reference point: Measure from the top of the inside frame opening (where the headrail will mount) to the flat interior surface of the window sill — the flat horizontal area where the blind’s bottom rail will rest when closed.
For floor-length outside mount: measure from the mounting point to the floor, then subtract 0.5 inch for clearance above the floor surface.
Step 7 — Cross-Panel Height Variation Check
The cross-panel height inconsistency that causes mismatched blind heights — absent from all guides.
Bay windows in older homes (and some newer ones in areas with soil movement) experience differential settlement because the bay structure bears its weight differently at the connection points to the main wall versus at the outer bay corners.
The result: The center panel and side panels may have slightly different heights even when they appear visually identical. A 0.25-inch height difference between the center and side panels is enough to be noticeable when all three blinds are installed — the side blind bottom rails will not align with the center blind bottom rail.
The check: After measuring each panel height, compare the three heights. If any two panels differ by more than 1/8 inch:
- Do NOT order all three panels at the same height
- Order each panel at its own measured height
- Confirm with the supplier that individual panel heights within a set are acceptable (most suppliers accommodate this)
If all three panels are within 1/8 inch of each other: ordering at the common height is acceptable.
Step 8 — Record and Confirm Before Ordering
The complete measurement recording format — use this format to avoid transposition errors.
BAY WINDOW MEASUREMENT RECORD

Panel Type: [Touching / Separated]
Bay Angle: [30° / 45° / 90°]
Cardboard Test Passed: [YES / NO]
Mount Type: [Inside / Outside]

LEFT SIDE PANEL:
  Width (top / middle / bottom): __ / __ / __ inches → USE: __ inches
  Height (left / center / right): __ / __ / __ inches → USE: __ inches
  Frame depth available: __ inches
  Obstruction protrusion: __ inches
  Template size used: __ inches (headrail depth + obstruction)

CENTER PANEL:
  Width (top / middle / bottom): __ / __ / __ inches → USE: __ inches
  Height (left / center / right): __ / __ / __ inches → USE: __ inches
  Frame depth available: __ inches
  Obstruction protrusion: __ inches

RIGHT SIDE PANEL:
  Width (top / middle / bottom): __ / __ / __ inches → USE: __ inches
  Height (left / center / right): __ / __ / __ inches → USE: __ inches
  Frame depth available: __ inches
  Obstruction protrusion: __ inches

Cross-panel height check: All within 1/8"? [YES / NO]
If NO: order each panel at its own height.
The Five Most Common Bay Window Measurement Mistakes
| Error | Consequence | Prevention |
|---|---|---|
| Using cardboard template method on separated panels | Incorrect intersection marks; wrong width measurements | First determine separated vs touching (Step 1) |
| Not adding obstruction protrusion to template size | Blind cannot clear handle after installation | Formula: template = headrail depth + obstruction |
| Measuring one width point per panel | Frame racking causes blind to bind | Three-point width per panel; use narrowest |
| Measuring height to raised sill edge | Bottom rail hits sill edge before shade closes fully | Measure to FLAT sill surface only |
| Ordering all panels at the same height | Side blind bottom rails misalign with center | Measure each panel height independently; check for variation |
Where to Order and Measure
Most detailed bay window cardboard template protocol: SelectBlinds at selectblinds.com/tech-tips/how-to-measure-bay-windows.html — the most complete published bay window measurement protocol; two-cardboard method with photos; minimum depth confirmation first; save marks for installation protocol.
Four-template method and separated vs touching guidance: Blindster at blindster.com/blog/how-to-measure-bay-windows-for-blinds — four-template method for greater accuracy; headrail depth chart by product; separated window identification.
Bay window blind selection and minimum depth by product: Blinds.com at blinds.com/blog/window-faq-measure-for-a-bay-window — product specifications for minimum flush mount depth; inside vs outside mount comparison; visual guide to measuring bay window panels.
Frequently Asked Questions
How do you measure a bay window for blinds? To measure a bay window for blinds, first determine whether the panels are touching or separated. Separated panels are each measured as a standard window with no template needed. For touching panels, cut cardboard pieces to the headrail depth plus any handle or obstruction protrusion, position them at the inner corners with front edges meeting, mark the intersection points, and measure each panel width between or from those marks. Measure each panel height separately to the flat sill surface. Round all measurements to the nearest 1/8 inch, use the narrowest of three measurements per panel for width, and do not erase the pencil marks because they serve as bracket guides during installation.
What is the cardboard template method for bay window blind measurement? The cardboard template method for bay window blind measurement uses pieces of cardboard cut to the headrail depth of the intended treatment to mark the exact intersection points where adjacent headrails will meet at the bay corners. Two pieces are positioned at each inner corner with their front edges touching and taped in place. Pencil marks are made at the intersection points, then the center panel width is measured between the marks and each side panel width is measured from the outer frame edge to the nearest mark. The formula for the template size is headrail depth plus any window handle or vent protrusion to ensure the blind will clear obstructions after installation.
Why must you add obstruction protrusion to the template size when measuring a bay window? You must add obstruction protrusion to the template size when measuring a bay window because the cardboard template represents not just the headrail depth but the full clearance zone the blind needs to swing open and closed without contacting any protrusions. A window crank handle or latch mechanism typically protrudes 0.5 to 1.5 inches from the frame surface. If only the headrail depth is used for the template without adding the handle protrusion, the measured intersection marks will place the blind’s headrail directly against the handle, preventing smooth operation after installation. The correct template size is always headrail depth plus the maximum protrusion measurement of any obstruction in the bay.
Should you measure each bay window panel separately? Yes, each bay window panel must be measured separately even if the panels appear to be the same size. Bay window frames are cantilevered out from the main wall and experience differential settlement that can cause adjacent panels to differ in width by up to 1/4 inch. Each panel should be measured at three horizontal positions and the narrowest reading used. Panel heights should also be measured independently because differential settlement can cause height variations of 1/8 inch or more between panels. If all panels are ordered at the same height when one is shorter, the shorter panel’s blind will have its bottom rail resting on the sill with the adjacent blind hanging lower.
What is the most common height measurement error when measuring a bay window for blinds? The most common height measurement error when measuring a bay window for blinds is measuring to the top of the raised sill edge rather than to the flat interior sill surface. Bay window sills often have a decorative raised edge or profile that projects upward from the flat horizontal surface. Measuring to the raised edge adds 0.5 to 1 inch to the height incorrectly, resulting in a blind whose bottom rail contacts the raised sill profile before the blind reaches the flat sill surface. The correct measurement is always from the top of the window frame opening to the flat interior horizontal surface of the sill where the bottom rail will rest when the blind is fully closed.
Related Guides on BlindShades.pro
- The Best Bay Window Blinds & Shades Buying Guide
- What Are the Best Blinds for Bay Windows
- Can You Put One Blind Across a Bay Window
- What Blinds Work Best for Angled Bay Window Side Panels
- Can You Put Plantation Shutters in a Bay Window
By Michael Turner | 30 Years Home Improvement Expertise | Updated 2026 | BlindShades.pro