How Do You Measure Sidelights for Blinds?

Authored By Michael Turner -30 Years Home Improvement Expertise | Updated 2026 | BlindShades.pro
Updated on May 29, 2026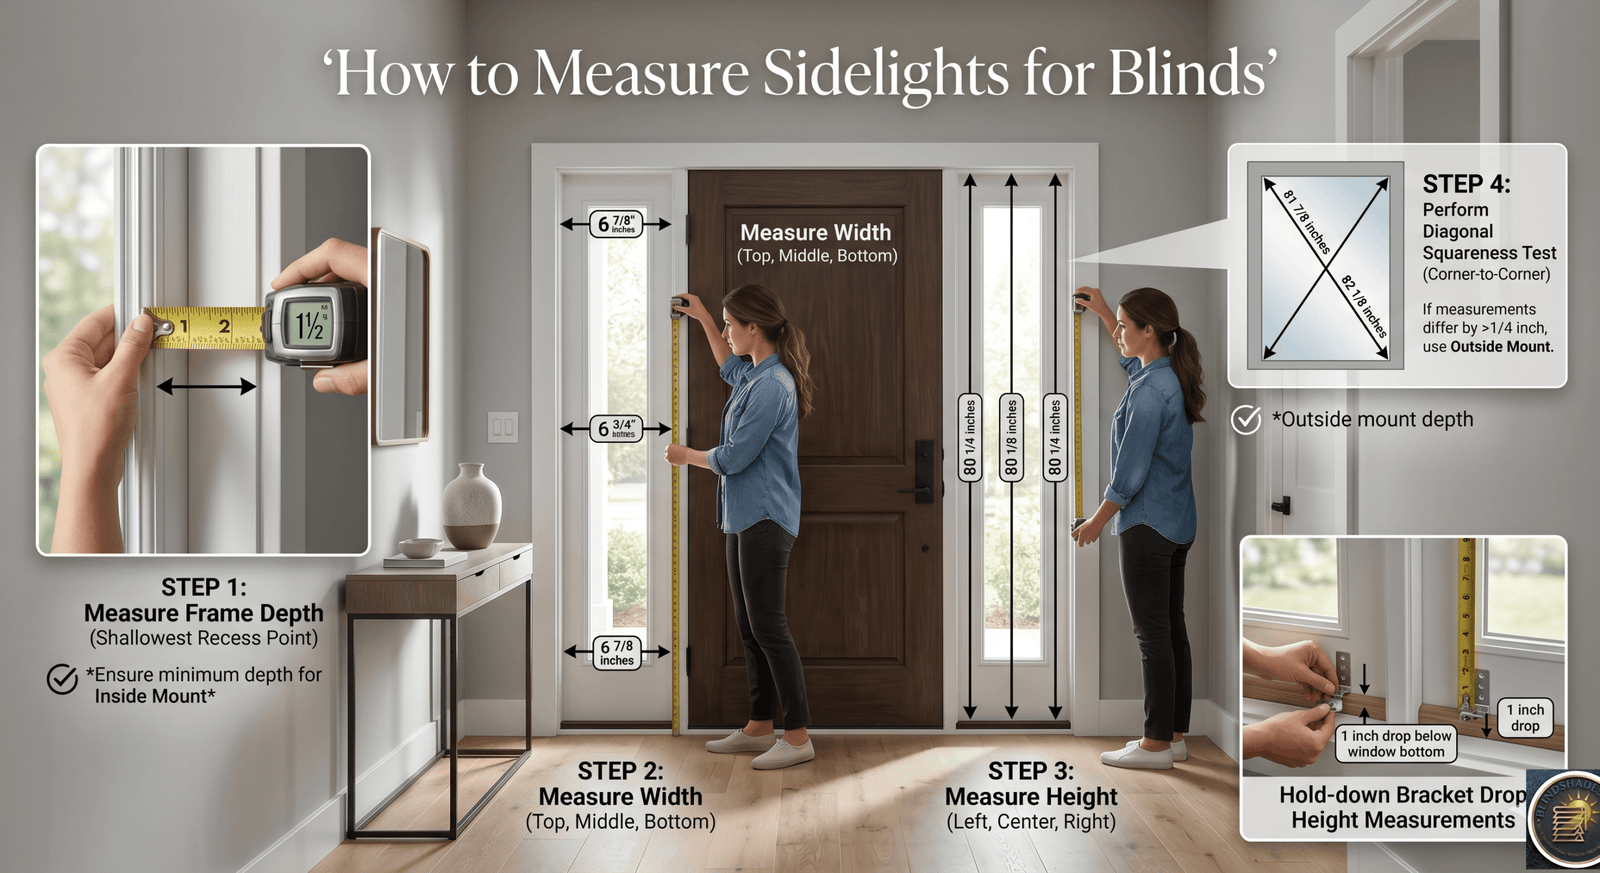
Key Takeaways:
- Measure frame depth at the SHALLOWEST point inside the sidelight recess – decorative moulding or trim details inside the frame can reduce usable depth by 1/4 to 1/2 inch; a frame that measures 1.5 inches from wall to glass may have only 1 inch of usable mounting depth after moulding protrusions are accounted for
- Run the diagonal squareness test before ordering: measure corner-to-corner diagonally in both directions; if the two measurements differ by more than 1/4 inch, the sidelight frame is out of square and outside mount is strongly recommended regardless of frame depth
- For paired sidelights (one each side of the door), measure both sidelights independently and record all measurements – never assume they are the same size; order both at the narrower width measurement to maintain visual symmetry from outside
- For sidelights with hold-down brackets, measure the drop height at BOTH the left and right side of the frame – if the left and right drops differ (out-of-level sill), the blind drop must accommodate the longer measurement and the hold-down brackets must be shimmed or positioned accordingly
- Round DOWN to the nearest 1/8 inch for inside-mount narrow sidelights under 10 inches wide – the manufacturer’s clearance deduction of 1/4 to 1/2 inch brings the actual blind face close to minimum manufacturing width on very narrow sidelights; conservative rounding prevents the ordered width from falling below minimum after deduction
⭐ Quick Answer — How Do You Measure Sidelights for Blinds?
- Step 1 — Frame Depth at the Shallowest Point (Not Wall-to-Glass): The first step to measuring sidelights for blinds is measuring frame depth — and the critical detail most guides miss is to measure at the shallowest point inside the recess, not from the wall surface to the glass. Decorative moulding or trim details inside the sidelight frame can protrude 1/4 to 1/2 inch into the mounting zone, reducing usable depth from 1.5 inches to 1 inch or less. Use a flashlight to inspect the recess. If usable depth is below 3/4 inch: outside mount only. Between 3/4 and 1.5 inches: 1-inch mini blind inside mount only; all other treatments outside mount. Above 1.5 inches: cellular shade inside mount viable
- Steps 2 and 3 — Width and Height at Three Points Each: For sidelight blind measurements: measure width at the top, middle, and bottom of the opening; measure height at the left, center, and right. For inside mount: order the narrowest width and smallest height. For outside mount: use the narrowest width as your reference then add 1.5 to 2 inches per side for sidelights under 12 inches wide (NOT the standard 2-4 inches per side for regular windows — this oversizes the treatment disproportionately on a narrow sidelight); use the largest height for full coverage. Record to the nearest 1/8 inch. For narrow sidelights under 10 inches inside mount: round DOWN to the nearest 1/8 inch — the manufacturer’s clearance deduction (1/4 to 1/2 inch) brings the blind face close to the minimum manufacturing width
- Step 4 — The Diagonal Squareness Test: Before ordering any inside-mount blind for a sidelight, run the diagonal squareness test: measure from top-left corner to bottom-right corner (Diagonal A), then from top-right to bottom-left (Diagonal B). If the two measurements are within 1/4 inch: the frame is square; inside mount viable. If they differ by 1/4 to 1/2 inch: minor racking; inside mount may bind; proceed with caution. If they differ by more than 1/2 inch: the sidelight frame has settled significantly — specify outside mount; an inside-mount blind will bind on one side. This test is especially important for sidelights in homes 15+ years old where door frame settlement is common
- Step 5 — Hold-Down Bracket Drop at BOTH Left and Right: For measuring sidelight blinds that will use hold-down brackets: measure the drop height from the headrail mounting position to the sill level at both the left and right sides of the opening independently. The sill may not be perfectly level — a 1/4 to 1/2 inch difference from left to right is common in older homes. Order the blind drop at the longer of the two measurements so the bottom rail reaches the sill on both sides. Use a shim or adjustable bracket to position the hold-down clip on the shorter-drop side. If the difference exceeds 1/4 inch, inform the supplier when ordering
- Steps 6 and 7 — Paired Sidelight Comparison and Obstruction Check: For homes with two sidelights: measure both independently — never assume they are the same size. Compare all measurements side by side; order both at the narrower width for visual symmetry from outside. If heights differ by more than 1/4 inch, investigate before ordering. And the obstruction check: inspect the door hinge-adjacent sidelight for hinge hardware protruding into the frame; check the latch-side sidelight for strike plate protrusion; and allow 1/4 inch additional clearance from any weatherstripping that extends into the frame zone between the door and the sidelight
- Best Sources: 3-point measurement protocol → Blinds.com measuring guide · Outside mount calculation → Factory Direct Blinds outside mount guide · Custom sidelight ordering → Blindsgalore sidelights
⚠️ The Measurement Card and the Inside-Mount Deduction Warning: Before placing any sidelight blind order, complete a measurement card with every recorded dimension. The most common ordering mistake: submitting measurements with your own deductions already applied. Do not subtract anything from your measured dimensions when ordering. Blind manufacturers apply their own standard clearance deductions (typically 1/4 to 1/2 inch for cellular shades; 1/8 to 1/4 inch for mini blinds) to ensure the blind fits without binding. If you make your own deduction AND the manufacturer applies theirs, the blind will be undersized — potentially below the minimum manufacturing width for very narrow sidelights. Submit the exact measured opening dimensions and let the manufacturer’s system apply the appropriate deductions. The one exception: for outside mount, submit the full intended coverage width (your measured window width plus your overlap additions) — manufacturers do not add overlap for outside mount, they build to your submitted dimensions. A sample measurement card: Depth (shallowest point); Width Top / Middle / Bottom; Narrowest Width; Height Left / Center / Right; Smallest Height (inside mount) or Largest (outside mount); Diagonal A; Diagonal B; Drop Left (hold-down); Drop Right (hold-down); Mount Type. For the full treatment range available at each sidelight width from 6 inches to 16 inches, see What Are the Best Blinds for Sidelights. See the full 7-step measuring protocol below.
💡 The Outside-Mount Sidelight Calculation and the Paired Comparison Table: The standard advice to “add 2 to 4 inches per side” for outside mount is correct for standard 36-inch windows but oversizes narrow sidelights. Adding 3 inches per side to a 10-inch sidelight creates a 16-inch blind — 60% wider than the window — which looks disproportionate relative to the door system. The sidelight-specific calculation: sidelights under 12 inches wide: add 1.5 to 2 inches per side (total width = window width + 3 to 4 inches). Sidelights 12 to 16 inches wide: add 2 to 2.5 inches per side (total width = window width + 4 to 5 inches). Height addition for outside mount: add 1 inch above the frame head for the headrail mounting space plus 1 inch below the sill if a bottom light gap is a concern. For paired sidelights, record measurements in this comparison format: Left sidelight width at top / middle / bottom; Right sidelight width at top / middle / bottom; Record the narrower minimum of both as the order width; Record the matching height as the order height; flag any depth difference (shallower depth determines mount type for both). For the full narrow sidelight treatment selection by width category (6 to 8 inches / 8 to 10 inches / 10 to 14 inches / 14 to 16 inches), see What Are the Best Window Treatments for Narrow Sidelights. See the full paired sidelight comparison below.
📖 Read the complete guide below for: Step 1 frame depth at shallowest point with flashlight (moulding protrusions reduce usable depth 1/4 to 1/2 inch), Step 2 width at three heights (narrowest for inside mount; narrowest plus 1.5 to 2 inches per side for outside mount), Step 3 height at three widths (smallest for inside mount; largest for outside mount), Step 4 diagonal squareness test (within 1/4 inch = square; more than 1/2 inch = outside mount required), Step 5 hold-down bracket drop at left AND right (order at longer; shim at shorter), Step 6 paired sidelight comparison protocol, Step 7 obstruction check (hinge / latch / weatherstripping), the measurement card template, the conservative rounding rule for under-10-inch inside mount, and the outside-mount addition calculation specifically for narrow sidelights.
How to Measure Sidelights for Blinds – The Complete Protocol
Tools needed:
- Steel tape measure (not fabric — steel maintains accuracy on 72-inch heights)
- Pencil
- Notepad or phone for recording
- Flashlight (for depth measurement in recessed sidelights)
What to measure:
- Frame depth (determines inside or outside mount)
- Width at three heights
- Height at three widths
- Squareness (diagonal test)
- Hold-down bracket drop (if applicable)
Step 1 — Measure Frame Depth (the Critical First Step)
This measurement determines whether inside or outside mount is possible.
Where to measure: Place the end of a steel tape measure at the inside face of the sidelight frame — not at the wall surface, but at the face of the moulding or trim that forms the inside edge of the opening. Extend the tape to the glass surface and record the measurement.
The moulding protrusion problem: Many sidelights have decorative moulding profiles on the inside of the frame. This moulding may protrude 1/4 to 1/2 inch into the recessed mounting space, reducing the usable depth available for bracket installation.
Measure at the SHALLOWEST point: Look inside the frame recess with a flashlight. Identify any protruding moulding details, decorative trim, or frame corner elements. Measure the depth at this shallowest point — not at the average depth of the recess.
The inside mount depth thresholds:
| Product Type | Minimum Depth Required | Most Sidelights Have |
|---|---|---|
| 1-inch aluminium mini blind | 3/4 inch | Possible (barely) |
| Cellular shade (standard hardware) | 1.5 to 2 inches | Rarely — outside mount typical |
| Roller shade (standard hardware) | 1.5 to 2 inches | Rarely — outside mount typical |
| Plantation shutter (standard U-frame) | 2.5 to 3.5 inches | Almost never |
| Plantation shutter (batten-back) | 3/4 inch | Usually possible |
The decision:
- Below 3/4 inch: outside mount only — no inside-mount treatment fits
- 3/4 inch to 1.5 inches: 1-inch mini blind inside mount possible; all other treatments outside mount
- Above 1.5 inches: cellular or roller inside mount viable (confirm with supplier’s specific product depth requirement)
Record the depth measurement and note whether inside or outside mount is possible before proceeding to width and height.
Step 2 — Measure the Width
Measure at three heights: near the top, at the middle, and near the bottom of the sidelight opening.
For inside mount: Measure the clear width inside the frame — from the inner edge of the left frame member to the inner edge of the right frame member. Record three measurements (top, middle, bottom). Use the NARROWEST of the three measurements when ordering.
Why the narrowest: A blind ordered to the widest measurement will bind at the narrow point and cannot be raised or lowered. A blind ordered to the narrowest measurement will operate smoothly throughout its full range.
For outside mount: Measure the width of the treatment you want, not the window width. For sidelights:
- Sidelights under 12 inches wide: add 1.5 to 2 inches to each side of the frame — the headrail should extend 1.5 to 2 inches beyond the frame edge on each side
- Sidelights 12 to 16 inches wide: add 2 to 2.5 inches to each side
Why smaller outside-mount additions for sidelights than for standard windows: Standard measuring guides recommend adding 2 to 4 inches per side for outside mount. For a 36-inch window, adding 3 inches per side creates a 42-inch blind — 17% wider than the window. For a 10-inch sidelight, adding 3 inches per side creates a 16-inch blind — 60% wider than the opening. This oversized proportion looks disproportionate relative to the narrow door system. Limit outside-mount additions to 1.5 to 2 inches per side for narrow sidelights to maintain visual proportion.
Record the measurement: Note the width to the nearest 1/8 inch. For sidelights under 10 inches inside mount: round DOWN to the nearest 1/8 inch (see Conservative Rounding section below).
Step 3 — Measure the Height
Measure at three positions across the width: at the left edge, at the center, and at the right edge of the sidelight.
For inside mount: Measure from the inside top of the frame (inner face of the head jamb) to the inside bottom of the frame (inner face of the sill). Record three measurements. Use the SMALLEST height when ordering.
For outside mount: Determine where the headrail will be mounted — typically 1 to 2 inches above the top of the frame (to cover the frame head) but this can be adjusted for aesthetic preference. Measure from the headrail mounting point to where the bottom rail will rest. Add the appropriate amount:
- To cover the frame completely: measure from 2 inches above the frame head to 2 inches below the frame sill
- To stop at the sill: measure from the headrail mounting point to the sill level
Use the LARGEST of the three height measurements when ordering outside mount to ensure full coverage even at the tallest point of the frame.
Step 4 — The Diagonal Squareness Test
The test that determines whether inside mount is feasible — absent from all competitor sidelight guides.
A front door sidelight frame that has been in place for 15-30 years may have experienced settlement that causes the frame to rack slightly — one side of the frame shifts, making the opening non-rectangular.
The test:
- Measure from the top-left corner of the sidelight opening to the bottom-right corner (diagonal A)
- Measure from the top-right corner to the bottom-left corner (diagonal B)
- Record both measurements
The interpretation:
- If diagonal A and B are within 1/4 inch of each other: the frame is square; inside mount is viable if depth allows
- If diagonal A and B differ by 1/4 to 1/2 inch: the frame has minor racking; inside mount may bind at the non-square corners; proceed with caution
- If diagonal A and B differ by more than 1/2 inch: the frame is significantly out of square; outside mount is strongly recommended; an inside-mount blind will bind on one side and may not operate correctly
The settled frame scenario for sidelights: A sidelight that measures 11 inches wide at the top and 10.5 inches wide at the bottom (1/2-inch difference) is racked. A blind ordered at 10.5 inches (the narrowest) will fit through the narrow bottom but may feel slightly loose at the wider top — this is acceptable. A blind ordered at 11 inches will bind at the 10.5-inch bottom — not acceptable. For outside mount, the racking is irrelevant — the blind covers the outside of the frame and operates without contact with the frame sides.
Step 5 — The Hold-Down Bracket Drop Measurement
The measurement step unique to sidelights — absent from all competitor measuring guides.
Sidelights adjacent to a front entry door require hold-down brackets at the bottom rail to prevent the blind from swinging when the door opens. The hold-down bracket clip must be positioned at the correct drop height for the blind to engage it correctly.
How to measure for hold-down brackets:
- Determine the headrail mounting position (this is the top reference point)
- Measure from the headrail mounting position to the sill level on the LEFT side of the sidelight — record as Drop-Left
- Measure from the headrail mounting position to the sill level on the RIGHT side of the sidelight — record as Drop-Right
Why left and right drops may differ: If the sidelight sill is not perfectly level (one side slightly higher or lower), the drop distance from headrail to sill will differ from left to right. The difference may be 1/4 to 1/2 inch across a 10-inch wide sidelight.
The ordering implication: Order the blind drop at the LONGER of the two drop measurements to ensure the bottom rail reaches the sill on both sides. Position the hold-down bracket clip on the shorter drop side with a small shim or use a bracket with adjustable height. If the difference is larger than 1/4 inch, specify this to the supplier when ordering — they may be able to account for the variation.
Step 6 — The Sidelight Obstruction Check
The clearance check specific to door-adjacent sidelights — absent from all measuring guides.
Before confirming the inside-mount depth as adequate, check for these sidelight-specific obstructions:
Door hinge zone: The sidelight immediately adjacent to the door hinge side may have hinge hardware that protrudes toward the sidelight frame. On some door systems, the hinge plate extends partially into the sidelight frame space. Measure the width specifically at the hinge height to confirm no protrusion reduces the clearance.
Door latch and strike plate zone: On the lock side, the strike plate and latch bolt assembly may protrude slightly toward the sidelight. Check for any metal elements extending from the door frame into the sidelight opening zone.
Weatherstripping: The door’s perimeter weatherstripping on the sidelight-adjacent side extends 1/4 to 1/2 inch into the zone between the door and the sidelight frame. An inside-mount blind whose mounting bracket extends to the edge of the frame may contact the weatherstripping. For sidelights directly beside the door:
- Add 1/4 inch clearance to the outside of the inside-mount width specification (i.e., if the inside measurement is 11 inches, specify 10.75 inches inside mount)
- Or specify outside mount to avoid the weatherstripping clearance issue entirely
Step 7 — The Paired Sidelight Comparison and Final Record
The verification step before ordering for homes with two sidelights.
If the home has two sidelights (one on each side of the door):
- Complete all measurements for BOTH sidelights independently
- Record depth, width (3 measurements), and height (3 measurements) for each
- Compare the measurements side by side
If measurements differ:
- Width difference of 1/4 inch or less: order both at the narrower width — difference will not be visible from outside
- Width difference of more than 1/4 inch: investigate the cause (settlement, different frames, different installation dates) before ordering — confirm outside mount is appropriate for both
- Height difference: acceptable if both are outside mount; investigate if both are inside mount (different sill heights suggest different installation conditions)
- Depth difference: order for the shallower depth — if one sidelight cannot accommodate inside mount, specify outside mount for BOTH to maintain consistent appearance
The order record: Before submitting the order, complete this measurement card:
| Measurement | Left Sidelight | Right Sidelight | Ordered |
|---|---|---|---|
| Depth (shallowest point) | |||
| Width at top | |||
| Width at middle | |||
| Width at bottom | |||
| Width to order | (narrower of both) | ||
| Height at left | |||
| Height at center | |||
| Height at right | |||
| Height to order | |||
| Drop-Left (hold-down) | |||
| Drop-Right (hold-down) | |||
| Mount type | |||
| Diagonal A | |||
| Diagonal B |
The Conservative Rounding Rule for Narrow Sidelights
Why rounding matters more on 8–10 inch sidelights than on standard windows.
Standard measuring guidance: round measurements to the nearest 1/8 inch.
For narrow sidelights under 10 inches wide with inside mount: round DOWN to the nearest 1/8 inch.
Why: Most blind manufacturers apply a clearance deduction to inside-mount orders to ensure the blind fits without binding. The deduction is typically 1/4 to 1/2 inch for cellular shades and 1/8 to 1/4 inch for mini blinds.
For a 10-inch inside-mount measurement with a 1/4-inch deduction: the actual blind face will be 9.75 inches wide. If the measurement was rounded UP from 9.9 inches to 10 inches and then deducted to 9.75 inches — the effective blind width is 9.75 inches in a 9.9-inch opening, leaving 0.075 inches of clearance per side. This is very tight.
For a 10-inch inside-mount measurement rounded DOWN from 9.9 inches to 9.875 inches and then deducted: the effective blind width is 9.625 inches in a 9.9-inch opening — 0.14 inches per side. More comfortable.
Practical rule:
- Inside mount, sidelight under 10 inches wide: if the measurement falls exactly between 1/8-inch marks, round DOWN
- Inside mount, sidelight 10 inches and above: standard rounding to nearest 1/8 inch is acceptable
- Outside mount: rounding direction does not matter — the blind is mounted on the wall and does not contact the frame
Where to Order
After completing measurements: Blinds.com measuring guide at blinds.com/measure provides the most complete online measuring tool including room for entering 3-point width and height measurements with automatic calculation of the recommended order dimension.
Factory Direct Blinds outside mount measuring at factorydirectblinds.com covers the outside mount measurement calculation in detail — the correct guide for the majority of sidelights that require outside mount.
Blindsgalore sidelight guide at blindsgalore.com/sidelights takes custom measurements for sidelights and builds the blind to exact dimensions; their ordering system handles all manufacturer deductions.
Frequently Asked Questions
How do you measure sidelights for blinds? To measure sidelights for blinds, complete six measurements in sequence. First, measure frame depth at the shallowest point in the recess to determine whether inside or outside mount is possible. Second, measure width at the top, middle, and bottom of the opening and use the narrowest for inside mount. Third, measure height at the left, center, and right and use the smallest for inside mount or largest for outside mount. Fourth, run the diagonal squareness test from corner to corner in both directions – if the two diagonals differ by more than 1/4 inch, outside mount is recommended. Fifth, for hold-down bracket installations measure the drop height at both left and right sides. Sixth, for paired sidelights measure both independently and record all measurements to the nearest 1/8 inch.
What frame depth is needed for inside-mount sidelight blinds? Most inside-mount blind hardware requires a minimum frame depth of 1.5 to 2 inches for cellular shades and roller shades, and a minimum of 3/4 inch for 1-inch aluminium mini blinds. Most front door sidelights have a frame depth of only 1/2 to 1.5 inches because the frame is the door casing surround rather than a full window box. Always measure depth at the shallowest point inside the recess, including any decorative moulding details that protrude into the mounting space. If the measured depth is below 1.5 inches, outside mount is typically the correct specification for cellular shades and roller shades regardless of the overall frame dimensions.
Why should I measure both sidelights separately even if they look the same size? Paired sidelights on either side of a front door frequently have slightly different actual dimensions due to settlement, different installation tolerances, or minor framing variations. A difference of 1/4 to 1/2 inch in width is common in homes with settled frames. If both treatments are ordered at the same measurement and one opening is narrower, the blind will bind at the narrowest point. Measure both sidelights independently at three heights for width and three widths for height, then order both at the narrower width measurement to ensure both operate correctly and appear visually symmetrical from outside.
What is the diagonal squareness test for sidelight measurement? The diagonal squareness test measures the sidelight opening from top-left to bottom-right and from top-right to bottom-left. If the two diagonal measurements are within 1/4 inch of each other, the frame is square and inside mount is viable where frame depth allows. If the diagonals differ by more than 1/4 inch, the frame has racked due to settlement and is no longer square. A non-square frame can cause an inside-mount blind to bind on one side, preventing smooth operation. Outside mount is strongly recommended for sidelight frames where the diagonal test shows more than 1/4 inch difference between the two diagonal measurements.
How do I measure for hold-down brackets on sidelight blinds? To measure for hold-down brackets on sidelight blinds, determine the headrail mounting position at the top of the sidelight and measure from that point to the sill level on both the left and right sides of the sidelight independently. The two drop measurements may differ if the sill is not perfectly level – this is common in older homes where the door frame has settled. Order the blind drop length at the longer of the two drop measurements so the bottom rail reaches the sill on both sides. Position the hold-down bracket clip on the shorter drop side using a shim or an adjustable-height bracket to accommodate the level difference.
Related Guides on BlindShades.pro
- The Best Sidelights and Front Door Blinds Buying Guide
- What Are the Best Blinds for Sidelights
- What Are the Best Window Treatments for Narrow Sidelights
- Can You Put Plantation Shutters on Sidelights
- Is Frosted Film Better Than Blinds for Sidelights
By Michael Turner | 30 Years Home Improvement Expertise | Updated 2026 | BlindShades.pro
