How to Restring Mini Blinds

Authored By Michael Turner -30 Years Home Improvement Expertise | Updated 2026 | BlindShades.pro
Updated on June 25, 2026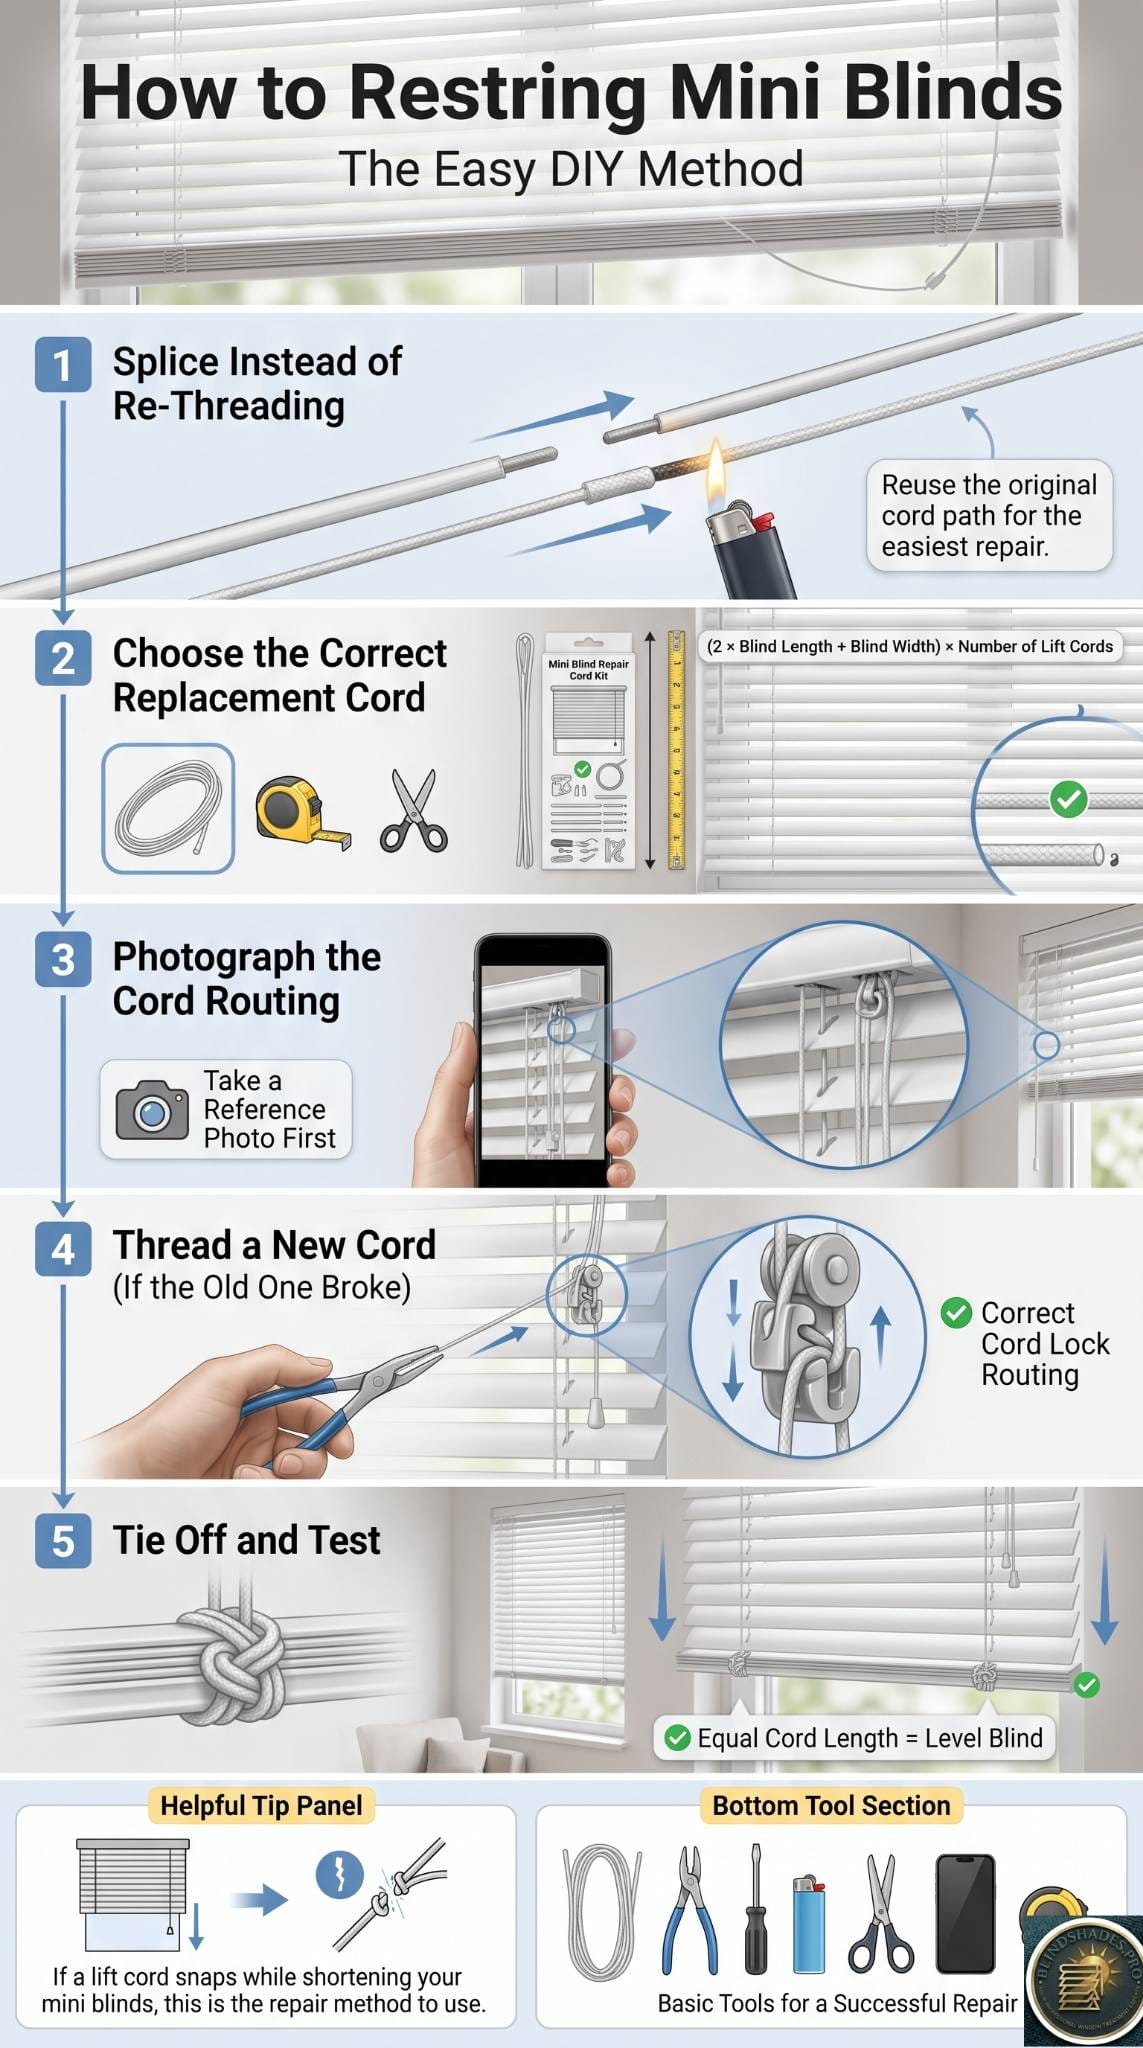
Authored by Michael Turner — 30 Years of Home Improvement Expertise | BlindShades.pro
The easy way to restring mini blinds is to splice the new cord onto the old one and pull the old cord through, letting it guide the new cord along the exact path through the slats and headrail. That is why you should fix a lift cord at the first sign of fraying rather than waiting for it to snap: once it breaks, you lose the guide and have to thread a new cord from scratch through the cord lock, which is much harder. Buy a cord kit, measure how much you need, photograph the routing first, and replace all the strings for even tension. The job takes patience but no special skill. This guide covers both the splice method and threading from scratch, plus how to get even tension and when to upgrade to safer cordless blinds.
Child safety note: Corded blinds are a strangulation hazard for young children and pets. Keep cords out of reach, secure any cord loops, and strongly consider switching to cordless when a cord fails. See best cordless mini blinds.
Key Takeaways
- Splice the new cord to the old one and pull it through. The old cord is the best threading guide you will ever have, routing the new cord through the slats and headrail automatically. Fuse the tips with a lighter or hot glue and tape.
- Fix it at the first fray, not after it snaps. A frayed-but-intact cord can still guide the new one; a fully broken cord forces you to thread from scratch through the cord lock, a far harder job.
- Thread the cord lock between the roller and latch. If a restrung blind will not hold its position, the cord almost certainly missed the friction point inside the cord lock; route it exactly as the old cord ran.
- Keep all lift cords equal length, or the blind hangs crooked. Check that the cords are even when the blind is fully lowered before tying off, and replace all the strings at once for matched tension.
- A failed cord is the moment to consider cordless. Restringing restores a cord that is also a child hazard, so weigh upgrading to a safer cordless blind instead.
⭐ Quick Answer
The easy way to learn how to restring mini blinds is to splice the new cord onto the old one and let the old cord pull it through, rather than threading blind.
- Splice, do not thread: while the old cord is still intact, fuse the new cord to its end with a lighter and pull the old cord through to draw the new one along the exact path, the method Family Handyman recommends.
- Fix it at the first fray, not after it snaps: an intact cord guides the new one, while a broken cord forces harder threading from scratch.
- Buy a matching cord kit: use two times the length plus the width, times the number of lift strings, as Fix My Blinds sets out.
- Thread the cord lock correctly: the cord must pass between the roller and latch or the blind will not hold, a point Engineer Fix stresses.
- Keep cords equal length so the blind hangs level, replace all strings, and tie a large knot under the rail. A failed cord is also a good moment to switch to safer cordless mini blinds. If you snapped a cord while shortening a blind, this is the fix, or replace it from our best mini blinds guide.
Why Splice Instead of Thread, and Fix at the First Fray
The old cord is your threading guide — so use it before it breaks.
The hardest part of restringing is navigating the new cord through the narrow, hidden path of slat holes, ladder strings, and headrail mechanisms. The clever shortcut is to avoid that path-finding entirely: while the frayed old cord is still in one piece, fuse the new cord to its end and pull the old cord out, and the new cord follows the exact route the old one took. This is dramatically easier than threading blind. It is also why timing matters: the moment you notice a cord fraying, restring it, because a frayed cord still works as a guide, whereas a snapped cord leaves you threading from scratch through the cord lock. Catching it early turns a fiddly job into a quick one.
Splice or Thread From Scratch?
Your method depends on whether the old cord is still intact.
| Situation | Method | Tool | Difficulty |
|---|---|---|---|
| Cord frayed but still in one piece | Splice new to old, pull through | Lighter or hot glue and tape | Easy |
| Cord fully broken or missing | Thread from scratch | Wire restring tool or 18-gauge wire | Harder |
If the old cord is intact, always splice. Only thread from scratch when the cord has already snapped and there is nothing left to guide the new one.
What You’ll Need and How Much Cord
A short kit, and a simple formula for cord length.
You need a blind cord kit, ideally matching the original color, scissors, a lighter to fuse and seal the ends, and a wire restring tool (or inexpensive 18-gauge craft wire) for any from-scratch threading. Keep a cup of water nearby when melting cord. Here is the basic kit and the cord-length formula:
| Item | Purpose |
|---|---|
| Blind cord kit | New lift cord, matched to color |
| Lighter | Fuse cords together, seal ends |
| Wire restring tool | Thread tight headrail channels |
| Scissors and tape measure | Cut and measure cord |
To work out how much cord to buy, use this formula per the cord supplier: take two times the blind’s length, add the width, and multiply by the number of lift strings. The table shows a few worked examples:
| Blind size | Lift strings | Cord needed (approx.) |
|---|---|---|
| 36 in W x 48 in L | 2 | (2 x 48 + 36) x 2 = 264 in |
| 36 in W x 60 in L | 2 | (2 x 60 + 36) x 2 = 312 in |
| 60 in W x 72 in L | 3 | (2 x 72 + 60) x 3 = 612 in |
Buy a little extra beyond the figure for tying knots and trimming.
How to Restring Mini Blinds by Splicing
Let the old cord pull the new one into place.
- Photograph the cord routing through the headrail, cord lock, and slats while the blind is still strung, so you have a reference.
- Draw the slats together by pulling the frayed cord, then remove the blind and lay it on a workbench.
- Splice the new cord to the old one above the bottom rail, since the splice will not fit through the small hole in the rail: melt both tips with a lighter and roll them together, or hot-glue the tips and wrap tightly in a few inches of electrical tape.
- Cut the old cord free at the fray below the splice, leaving the splice connecting old to new.
- Pull the old cord through from the other end, drawing the new cord along the exact path through the slats, ladder strings, and headrail hardware.
- Anchor the new cord at the bottom rail with a large double overhand knot under the plug, big enough not to slip through the hole, reusing any safety washers.
- Trim, seal, and test: cut the pull cord to a safe length, melt the end to stop fraying, reinstall the blind, and raise and lower it to confirm it works.
Threading From Scratch: Getting the Cord Lock Right
If the cord already snapped, the cord lock is where most restrings fail.
When there is no old cord to guide you, thread the new cord from scratch using a wire restring tool. Start at the headrail, feed the cord through the cord guide and around the cradle, and route it through the cord lock, the friction mechanism that holds the blind at a set height. This is the critical part: the cord must pass between the roller and the latch inside the cord lock, exactly as the original did, because that is what creates the locking friction when you pull the cord to the side. Then run the cord down through the center hole of each slat and into the bottom rail. If a restrung blind raises and lowers but will not stay up, the cord almost always missed this roller-and-latch path, or the cord is the wrong diameter, so recheck the cord lock routing first.
Getting Even Tension and Straight Slats
Equal-length cords keep the blind level; alternating the threading keeps slats aligned.
Two threading details prevent a sloppy result. First, all the lift cords must be the same length when the blind is fully lowered, or the blind will hang tilted when you raise it, so hold the blind vertically and even up the cords before tying the final knots. Second, as the cord runs down through the slats, alternate which side of the ladder strings it passes on every three slats or so; this keeps the slats from shifting sideways during operation and holds them in even alignment. Take the time to get both right before sealing everything up.
Why Replace All the Strings
Replace every lift cord, not just the broken one.
It is tempting to replace only the cord that failed, but it is better to replace all of the lift strings at once. The remaining old cords have the same age and wear and are likely to be the next to fray, and mixing a new cord with old ones gives uneven tension and operation. Replacing them all at once ensures the blind raises evenly and saves you repeating the job in a few months. Since you already have the blind down and a cord kit open, doing them all together costs little extra effort.
Troubleshooting After Restringing
The common faults all trace back to a few specific causes.
| Problem | Likely cause | Fix |
|---|---|---|
| Blind will not stay up | Cord missed the roller-and-latch path | Rethread through the cord lock correctly |
| Blind hangs crooked | Lift cords are uneven lengths | Even up the cords before re-knotting |
| Slats shift sideways | Cord did not alternate ladder sides | Rethread, alternating every few slats |
| Cord slips back through rail | Knot too small | Tie a larger knot, add a washer |
| Cord frays again quickly | End not sealed, or rough cord guide | Melt the end; check the guide for burrs |
Restring or Upgrade to Cordless?
A failed cord is a natural moment to remove the hazard for good.
Before you restring, it is worth pausing on safety. Corded blinds are a recognized strangulation risk for young children and pets, which is why the industry has moved toward cordless designs. If the blind is in a child’s room, a nursery, or any space where children spend time, a broken cord is the ideal moment to switch to a cordless blind rather than restore the cord. At minimum, when you restring, cut the pull cord to a safe reach, generally well above a child’s height, and secure any cord loops. To weigh the safer option, see best cordless mini blinds.
When to Replace Instead of Restring
Some blinds are not worth the effort.
Restringing makes sense for a custom-sized or good-quality blind, especially an aluminum one in a standard color you cannot easily match. But for a cheap, stock-size vinyl mini blind, the honest answer is often to replace it, since a new one costs little and a restring takes real time. Weigh the value of the blind against the effort: if it is inexpensive and easily replaced, buy new; if it is custom, quality, or hard to match, restring it. For a replacement, see our best mini blinds guide, or consider other styles in alternatives to mini blinds.
Best Sources
- Family Handyman — on splicing the new cord to the old and pulling it through, fixing the cord at the first fray, splicing above the bottom rail, and when a cheap blind is not worth restringing.
- Fix My Blinds — on the cord-length formula, replacing all the lift strings, alternating ladder sides every few slats, fusing cord ends, and child cord safety.
- Engineer Fix — on threading the cord lock between the roller and latch, keeping equal tension to avoid a crooked blind, and using a wire restring tool.
- Factory Direct Blinds — on the lift strings being the same cord as the pull cord, and sealing the cut end with a lighter.
- BlindShadeParts — on using a wire restring tool through the cord guide and cradle and threading between the roller and latch.
- AtoZ Blinds — on buying a matching cord kit, using 18-gauge wire as a threader, and keeping water nearby when melting cord.
Related Guides
- Best Mini Blinds Buying Guide
- How to Shorten Mini Blinds
- How to Fix Bent Mini Blind Slats
- Best Cordless Mini Blinds
Frequently Asked Questions
What is the easiest way to restring mini blinds?
The easiest way is to splice the new cord onto the old one while the old cord is still intact, then pull the old cord out so it draws the new cord through the exact path. Fuse the tips together by melting them with a lighter and rolling them, or hot-glue and tape them, making the splice above the bottom rail so it clears the small hole. This avoids threading the new cord blindly through the slats and headrail.
How much cord do you need to restring a blind?
Use the formula of two times the blind’s length, plus the width, multiplied by the number of lift strings. For example, a blind 60 inches long and 36 inches wide with two lift strings needs about 312 inches of cord. Buy a little extra for tying knots and trimming, and choose a cord kit that matches the original color and thickness so the cord lock grips correctly.
Why won’t my blinds stay up after restringing?
If the blind raises but drifts back down, the lift cord almost certainly missed the friction path inside the cord lock. The cord must pass between the roller and the latch in the cord lock, exactly as the original did, to create the locking grip when you pull it to the side. Rethread through the cord lock correctly. If it still slips, the cord may be the wrong diameter for the lock and need replacing with the correct size.
Should you replace all the strings or just the broken one?
Replace all the lift strings at once rather than just the one that broke. The remaining cords are the same age and wear and are likely to fray next, and mixing a new cord with old ones causes uneven tension, making the blind raise crookedly. Since the blind is already down and the cord kit is open, replacing them all together is little extra work and saves repeating the job soon after.
Is it worth restringing mini blinds or should I replace them?
It depends on the blind. Restringing is worthwhile for a custom-sized or good-quality blind, especially an aluminum one in a color you cannot easily match. For a cheap, stock-size vinyl mini blind, replacing it is often the better choice, since a new one costs little and restringing takes real time. Also consider that a failed cord is a good moment to switch to a safer cordless blind, particularly in a child’s room.
