How to Restring Pleated Blinds

Authored By Michael Turner -30 Years Home Improvement Expertise | Updated 2026 | BlindShades.pro
Updated on June 30, 2026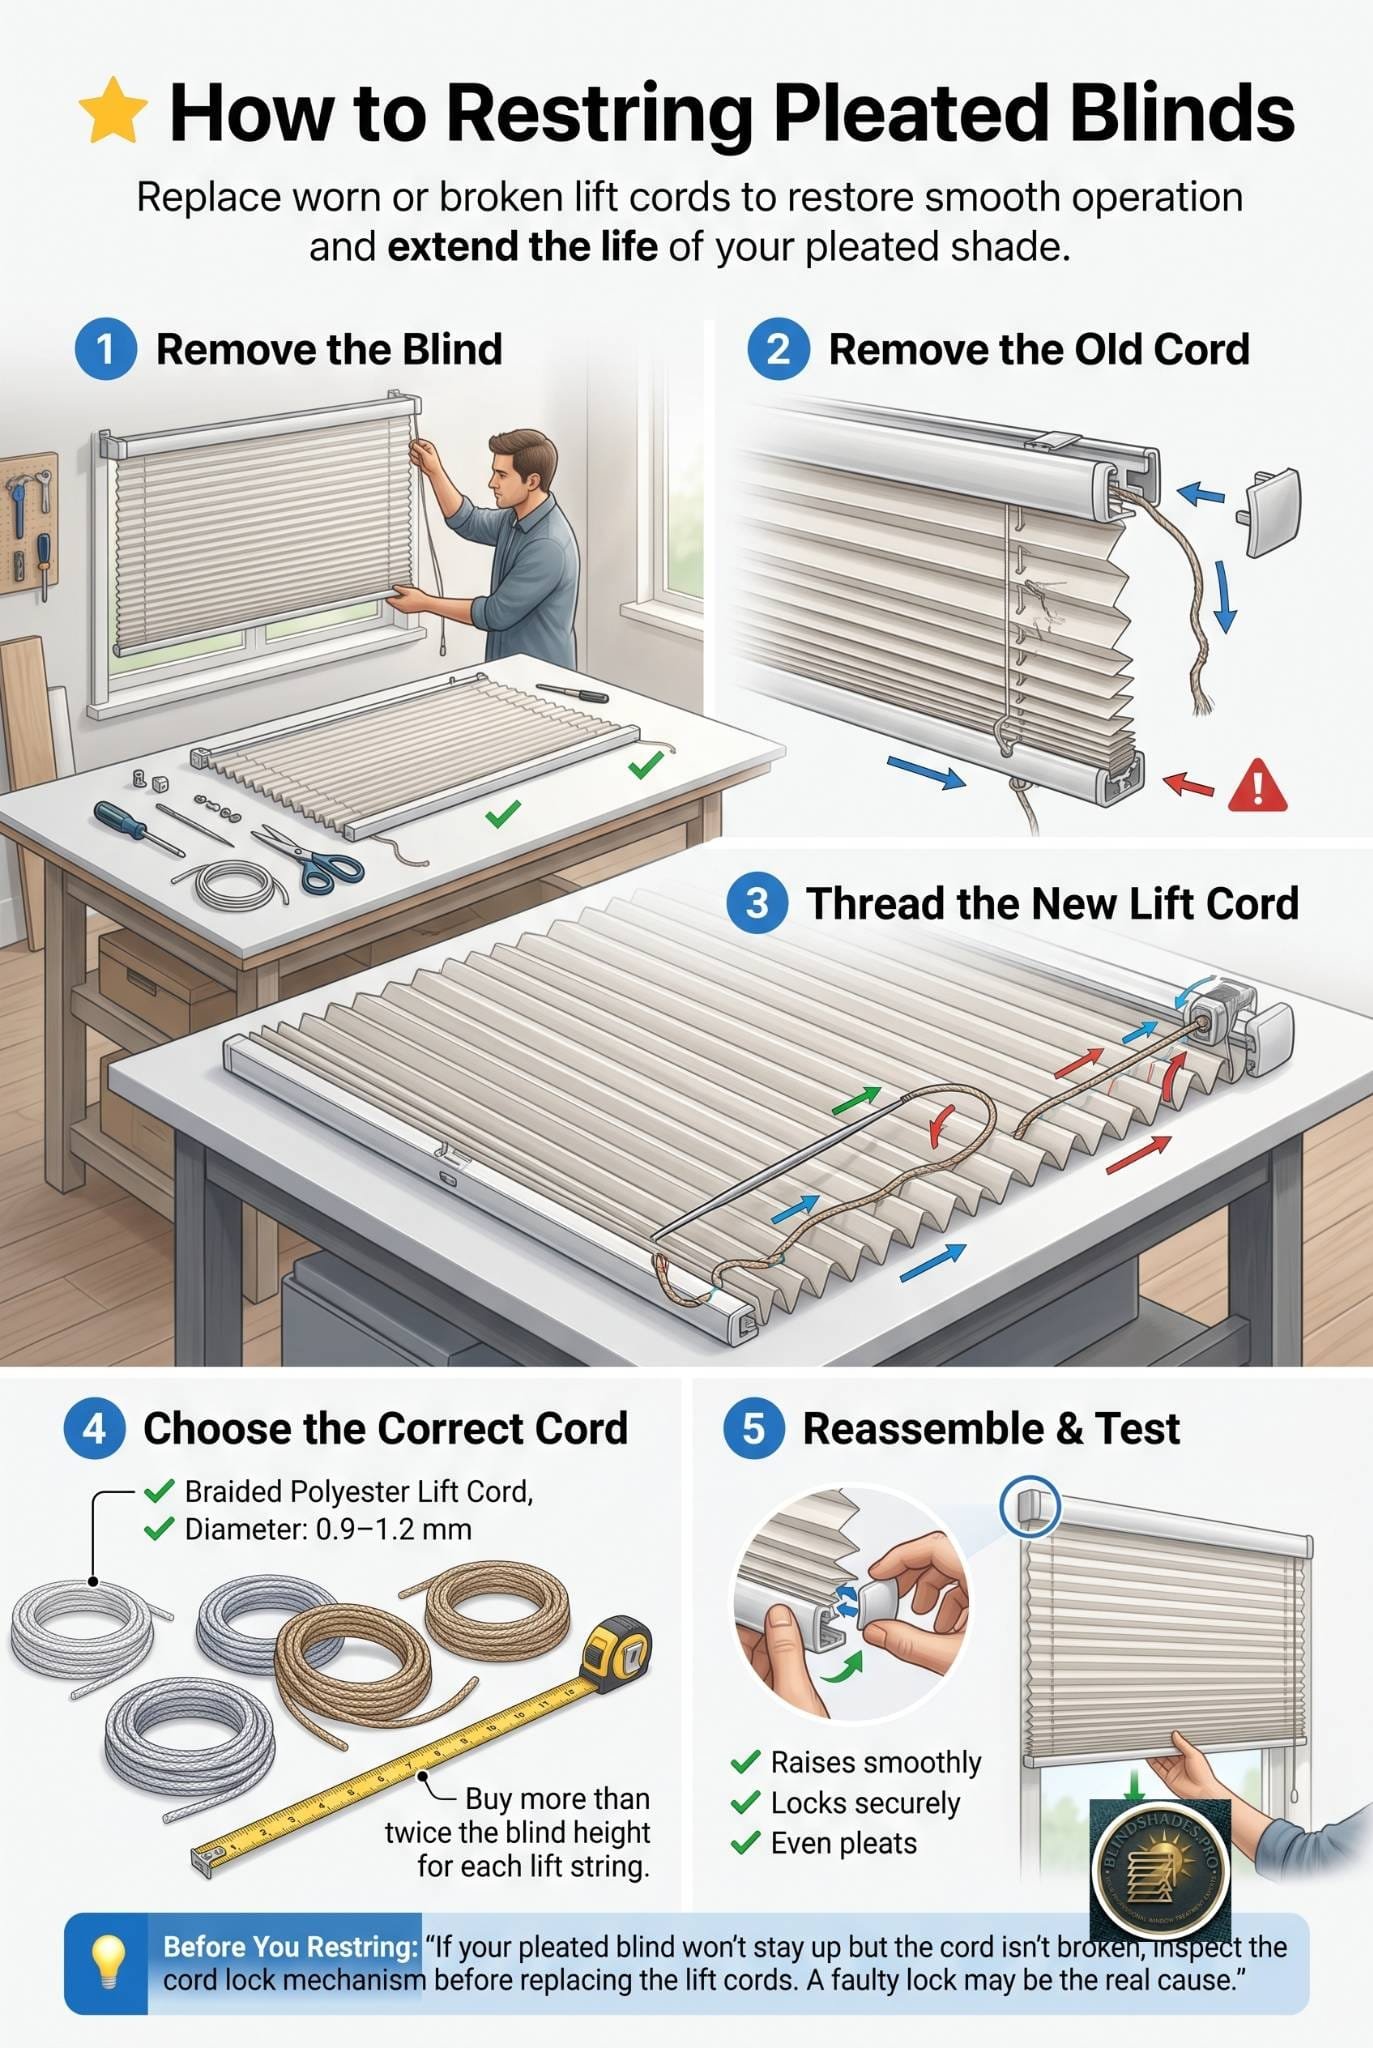
Authored by Michael Turner — 30 Years of Home Improvement Expertise | BlindShades.pro
To restring pleated blinds, take the shade down and lay it flat, remove the end caps and the old broken cord, then thread new lift cord up through the pleats with a restring needle, anchoring it at the bottom rail and feeding it to the cord lock in the headrail. Use braided polyester lift cord in the size your shade takes, commonly around 0.9 to 1.2 millimeters, and buy more than double the shade’s height per string so you never run short mid-repair. Seal each cut end by melting it lightly so it will not fray, then reassemble, tension the cords evenly, and test that the shade raises and lowers smoothly. Most people can restring a pleated shade at home in under an hour with a restring kit, a small screwdriver, and a lighter. This guide covers every step, plus how much cord to buy and how to handle cordless and multi-string shades.
Key Takeaways
- Buy more than double the height in cord. Get more than twice the shade’s height per lift string so you never run short partway through the restring.
- Use the right cord. Pleated shades use braided polyester lift cord, commonly around 0.9 to 1.2 millimeters; match your shade’s size or use a restring kit.
- Anchor at the bottom, thread up. Anchor the new cord at the bottom rail, then thread it up through the pleats to the cord lock with a restring needle.
- Seal the ends so they don’t fray. Melt each cut cord end lightly with a lighter so it passes through cleanly and will not unravel.
- Tension evenly and test. Balance the cords so the shade hangs level, then test that it raises, lowers, and locks smoothly.
⭐ Quick Answer
Here is how to restring pleated blinds: take the shade down, remove the old cord, and thread new lift cord up through the pleats to the cord lock. Most people finish in under an hour.
- Take the shade down and lay it flat, then remove the end caps and old broken cord, noting its path, as Fix My Blinds shows.
- Thread new lift cord up through the pleats with a restring needle, anchoring at the bottom rail and feeding to the cord lock, the method DoItYourself describes.
- Use braided polyester cord in your shade’s size, commonly about 0.9 to 1.2 mm, and buy more than double the height per string.
- Seal the cut ends with a lighter so they will not fray, then reassemble, tension evenly, and test, care Bali details.
- If the shade merely won’t hold its height, see pleated blinds won’t stay up, or how to install pleated blinds and our best pleated blinds guide.
Tools and Materials
A restring kit covers most of this.
| Item | Use |
|---|---|
| Braided polyester lift cord (about 0.9 to 1.2 mm) | The new lift string; match your shade’s size |
| Restring needle (long flexible wire) | Thread the cord up through the pleats |
| Small flathead screwdriver | Pry off end caps and release the cord lock |
| Washers or cord anchors | Anchor the cord at the bottom rail |
| Lighter | Melt-seal the cut cord ends to stop fraying |
| Scissors | Cut the cord to length |
Most of these come together in a pleated or cellular shade restring kit, which is the easiest way to get the correct cord and needle. If you buy cord separately, match the diameter your shade uses, since cord that is too thick will not feed through the guide holes and too thin can slip in the cord lock. Have a large, clean, flat surface ready, a dining table works well, since laying the shade out flat is what makes threading manageable.
How Much Cord Do You Need?
Buy generously; running short mid-restring means starting over.
| Shade size | Cord to buy per lift string |
|---|---|
| Any height | More than double the shade’s height |
| Wider shades | Add extra for the horizontal run across the headrail |
| Multiple strings | Multiply by the number of lift strings |
The single most common restring mistake is buying too little cord. A lift string does not just run the height of the shade once; it travels down and back up and across to the cord lock, so experienced repairers recommend buying more than double the shade’s height for each lift string. On a wide shade, add extra for the run across the headrail to the cord lock, and remember to multiply by the number of lift strings your shade has. It is far cheaper to have cord left over than to run out halfway and have to unthread and start again, so err generously.
How to Restring Pleated Blinds: Step by Step
Anchor at the bottom, thread up, seal the ends.
- Take the shade down and lay it flat. Remove the shade from its brackets with a small flathead screwdriver, then lay it fully extended on a large flat surface.
- Open the rails and remove the old cord. Pry off the end caps on the top and bottom rails, release the cord lock, and pull out the old, broken lift cord, noting the path it took through the pleats.
- Cut and seal the new cord. Cut the new cord to length, more than double the shade height per string, and melt one end lightly with a lighter so it will not fray as it feeds.
- Thread the new cord up through the pleats. Attach the cord to the restring needle and pass it up through the cord guide holes in the pleats, following the original path, from the bottom rail to the cord lock in the headrail.
- Anchor at the bottom and feed to the lock. Secure the cord at the bottom rail with a washer or anchor, then route it through the cord lock, leaving enough length to operate the shade.
- Seal, reassemble, and test. Melt-seal the ends, snap the end caps back on, tension the cords so the shade hangs level, rehang it, and test that it raises, lowers, and locks smoothly.
Corded vs Cordless vs Multi-String Restring
The basics are the same; the details differ by shade type.
| Shade type | What’s different |
|---|---|
| Single lift string | Simplest; one cord anchored at the bottom to the cord lock |
| 4-string pleated shade | Four cords to route and tension evenly; work one at a time |
| Cordless | No pull cord, but an internal spring cord; often better as a kit or pro repair |
| Top-down/bottom-up | Two sets of cords for the two rails; more complex threading |
A standard single-string corded pleated shade is the most straightforward restring and the one these steps describe. Wider shades often use multiple lift strings, and a common one is the 4-string pleated shade, where you route and tension each of the four cords one at a time so the shade rises evenly. Cordless pleated blinds use an internal spring mechanism rather than a pull cord, so a broken internal cord is trickier, often a job for a restring kit made for cordless shades or a professional. Top-down/bottom-up shades have two sets of cords for the two moving rails, so trace the original threading carefully before you remove it. If your issue is a shade that drops or will not hold rather than a snapped cord, see pleated blinds won’t stay up.
Restring Troubleshooting
Fixes for the snags that come up mid-repair.
| Problem | Cause | Fix |
|---|---|---|
| Cord won’t feed through the pleats | Cord too thick, or frayed end | Use the right diameter; melt-seal the end |
| Shade hangs unevenly after | Cords tensioned unequally | Re-balance the cord lengths at the bottom rail |
| Cord lock won’t hold | Cord too thin, or worn lock | Use correct cord size; replace the cord lock |
| New cord frays | Ends not sealed | Melt each cut end lightly with a lighter |
| Ran out of cord partway | Bought too little | Buy more than double the height per string |
| Lost the threading path | Old cord removed before noting it | Photograph the path before removing old cord |
Almost every restring snag traces back to cord size, sealing, or threading path. Using the correct cord diameter and sealing the ends solves feeding and locking problems; balancing the cord lengths solves an uneven hang; and photographing the original threading before you pull the old cord out saves you from guessing the path later. Take a photo at the start, it is the single best insurance for a smooth restring.
Restring vs Replace: Which Makes Sense?
Restring a good shade; replace a worn or cheap one.
Restringing is worth it when the shade itself is in good condition and only the cord has failed, which is common, since cords wear out long before the fabric does. A restring kit and an hour of work is far cheaper than a new custom shade. However, if the fabric is stained, faded, or sagging, if multiple mechanisms have worn out, or if the shade was inexpensive to begin with, replacement often makes more sense than repeated repairs. Cordless mechanisms in particular can be fiddly enough that on a low-cost shade, replacing it is the better use of time. Weigh the cost and effort of the repair against a fresh shade from our best pleated blinds guide, and if you are reconsidering the type entirely, compare pleated blinds vs cellular shades.
Best Sources
- Fix My Blinds — on pleated shade repairs, restringing broken lift cords, restring needles and kits, and replacing worn cord lock mechanisms.
- Bali — on the task of restringing or replacing the cord lock for cellular and pleated shades, removing the shade from its brackets, and rail disassembly.
- DoItYourself — on using a restring needle to thread the cord through the cord guide and fabric stack of a pleated shade.
- Owner repair communities — on the practical rule of buying more than double the shade’s height in cord per string so you do not run short mid-repair.
Related Guides
- Best Pleated Blinds Buying Guide
- Pleated Blinds Won’t Stay Up
- How to Install Pleated Blinds
- Pleated Blinds vs Cellular Shades
Frequently Asked Questions
How do you restring pleated blinds?
Take the shade down and lay it flat, pry off the end caps, and remove the old broken cord, noting its path through the pleats. Cut new braided polyester lift cord to more than double the shade’s height per string, seal one end with a lighter, and thread it up through the cord guide holes in the pleats with a restring needle, anchoring it at the bottom rail and feeding it to the cord lock. Seal the ends, reassemble the rails, tension the cords so the shade hangs level, then rehang and test. Most people finish in under an hour with a restring kit.
What cord do you use to restring a pleated shade?
Pleated shades use braided polyester lift cord, commonly around 0.9 to 1.2 millimeters in diameter, though the exact size varies by shade, so match what your shade currently uses. Cord that is too thick will not feed through the small guide holes in the pleats, and cord that is too thin can slip in the cord lock and fail to hold the shade. The easiest way to get the right cord is a pleated or cellular shade restring kit, which includes matched cord and a restring needle. Buy more than double the shade’s height per lift string so you do not run short.
How much cord do I need to restring a pleated blind?
Buy more than double the shade’s height for each lift string. A lift cord travels down the shade and back up, plus across the headrail to the cord lock, so it needs far more length than the shade’s height alone. On wider shades, add extra for the horizontal run, and multiply by the number of lift strings, since many shades have several. Running out of cord partway through means unthreading and starting over, so it is always better to buy generously and have some left over than to come up short.
Can you restring cordless pleated blinds yourself?
You can, but it is trickier than a corded shade. Cordless pleated blinds raise and lower using an internal spring mechanism rather than a pull cord, so a broken internal cord involves working with that spring system, which is more delicate. A restring kit made specifically for cordless shades makes it more manageable, but many people find cordless mechanisms fiddly enough that professional repair or replacement is the better choice, especially on a lower-cost shade. If a cordless shade simply will not hold its position, the spring often just needs resetting, which is covered in our won’t-stay-up guide.
Is it worth restringing pleated blinds or should I replace them?
Restringing is worth it when the shade is otherwise in good shape and only the cord has broken, which is common, since cords wear out well before the fabric does. A kit and an hour of work costs far less than a new custom shade. Replacement makes more sense if the fabric is stained, faded, or sagging, if several mechanisms have failed, or if the shade was inexpensive, where repeated repairs are not worth the effort. Cordless mechanisms in particular can tip the balance toward replacing a budget shade rather than repairing it.
