How to Install Pleated Blinds

Authored By Michael Turner -30 Years Home Improvement Expertise | Updated 2026 | BlindShades.pro
Updated on June 30, 2026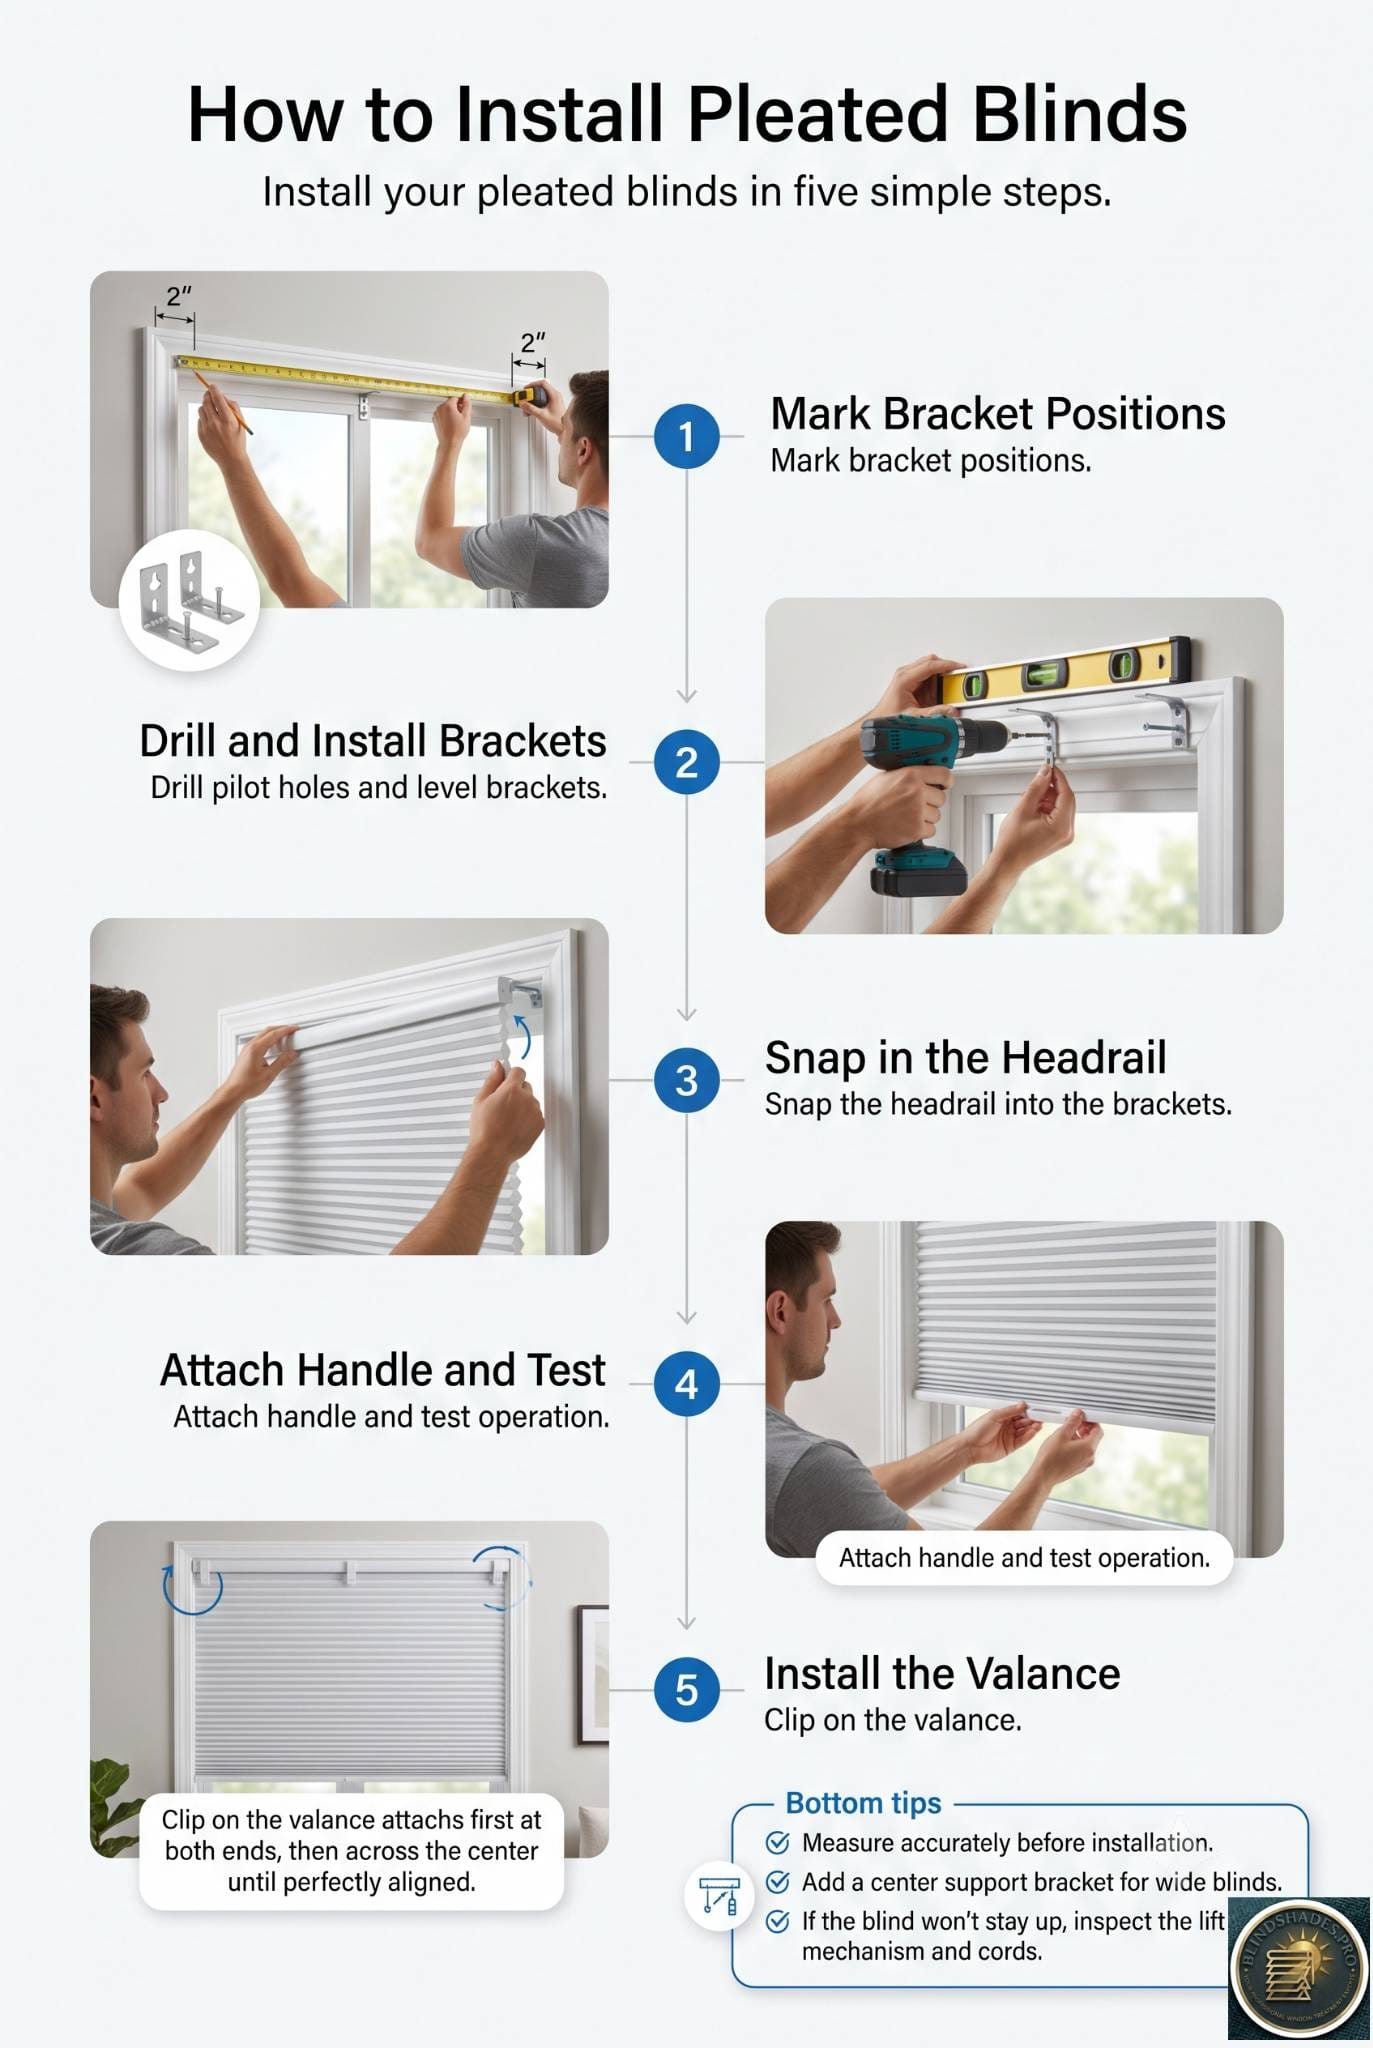
Authored by Michael Turner — 30 Years of Home Improvement Expertise | BlindShades.pro
To install pleated blinds, mount the brackets level and correctly spaced, then snap in the headrail. Mark the bracket positions, placing the end brackets about two inches in from each end of the headrail and adding a center support bracket for wider shades, drill pilot holes, and screw the brackets in, using a level, especially on an outside mount. Then snap the headrail into the brackets by tilting its front up, sliding the front groove onto the bracket’s ridge, and rotating it back until it locks. Finally, attach the handle to the bottom rail, test by raising and lowering slowly so the pleats stack neatly, and clip on the valance if you have one. The whole job takes most people well under an hour with a drill, a level, a pencil, and a screwdriver. This guide walks through each step.
Key Takeaways
- Level and spacing are the whole job. Get the brackets level and correctly spaced and the rest is easy; the headrail simply snaps in.
- Space the end brackets about two inches in. Place end brackets roughly two inches from each end of the headrail, and add a center support bracket for wide shades.
- Snap the headrail in by tilting and rotating. Slide the front groove onto the bracket’s ridge, then rotate the headrail back until it clicks and locks.
- Use a level, especially outside mount. An unlevel headrail makes the pleats sit crooked, so check with a level before drilling.
- Test slowly. Raise and lower the shade slowly the first few times so the pleats learn to stack neatly.
⭐ Quick Answer
Here is how to install pleated blinds: mount the brackets level and correctly spaced, then snap in the headrail. Most people finish in under an hour.
- Mark the bracket positions: end brackets about two inches in from each end, plus a center support bracket for wide shades, as JustBlinds advises.
- Drill pilot holes and screw the brackets in, checking they are level with a level tool, especially on an outside mount, a step Affordable Blinds stresses.
- Snap in the headrail: tilt its front up, slide the front groove onto the bracket ridge, and rotate back until it locks, the method Bali shows.
- Attach the handle to the bottom rail and test by raising and lowering slowly so the pleats stack neatly.
- Clip on the valance if included. Measure first with how to measure for pleated blinds; if it later will not hold its height, see pleated blinds won’t stay up, or our best pleated blinds guide.
Tools and What’s in the Box
A short tool list and a quick parts check.
| Item | Use |
|---|---|
| Power drill or screwdriver | Drive the bracket screws |
| Level | Keep the headrail straight |
| Pencil | Mark bracket and screw positions |
| Tape measure | Position the brackets evenly |
| Mounting brackets (in the box) | Hold the headrail |
| Screws (in the box) | Fix the brackets |
| Valance and clips (if included) | Conceal the headrail |
Before starting, open the box and confirm you have the headrail with fabric attached, the mounting brackets, screws, the handle or wand, and, if ordered, the valance and its clips. Read the instructions that came with your specific blind, since bracket styles vary slightly by brand, then gather a drill or screwdriver, a level, a pencil, and a tape measure. That is all most pleated blinds need.
How to Install Pleated Blinds: Step by Step
Brackets level and spaced, then snap and test.
- Choose inside or outside mount. Decide whether the brackets go inside the window frame or on the wall or molding above it, since this sets where you mark.
- Mark the bracket positions. Hold the headrail in place and mark where the brackets go: an end bracket about two inches in from each end, plus a center support bracket for wide shades. Keep the line level.
- Drill pilot holes. Mark the screw holes at each bracket position and drill pilot holes to make driving the screws easier and to prevent splitting.
- Screw the brackets in. Fix each bracket with the provided screws, checking with a level as you go, this matters most on an outside mount.
- Snap in the headrail. Tilt the front of the headrail up, slide its front groove onto the front ridge of the brackets, then rotate the headrail back toward the glass until it clicks and locks.
- Attach the handle and test. Fit the handle to the bottom rail, then raise and lower the shade slowly a few times so the pleats stack neatly. Clip on the valance last if you have one.
Inside vs Outside Mount Install
The steps are the same; where the brackets go differs.
| Step | Inside mount | Outside mount |
|---|---|---|
| Bracket location | Inside the top of the frame | On the wall or molding above the frame |
| Leveling | Frame usually guides it | Check carefully with a level |
| Screw surface | Frame or opening | Wall, trim, or molding (use anchors if needed) |
| Coverage | Sits within the frame | Extends past the opening for more light block |
The installation process is the same for both mounts, mark, drill, screw, snap, but the brackets go in different places. For an inside mount, the brackets fix inside the top of the window frame, and the frame itself helps keep things square. For an outside mount, the brackets fix to the wall or molding above the window, so leveling is more important, use your level, and you may need wall anchors if you are not screwing into solid trim. Outside mount is the choice for covering more of the window and blocking more light, as covered in our best blackout pleated blinds guide.
Bracket Spacing and Center Support
Space the brackets right so the shade hangs straight and does not sag.
| Shade width | Brackets |
|---|---|
| Narrow to average | Two end brackets, about two inches in from each end |
| Wider shades | Two end brackets plus a center support bracket |
| Very wide shades | End brackets plus extra brackets spaced roughly every 25 inches |
Bracket spacing is where guidance online often conflicts, so here is the clear version. Place the two end brackets about two inches in from each end of the headrail. On wider shades, add a center support bracket in the middle to stop the headrail sagging, and on very wide shades, add more brackets, spaced roughly every 25 inches, so the whole headrail is supported evenly. A shade that sags in the middle almost always needs another support bracket, so err toward one more rather than one fewer on a wide window. Make sure no bracket interferes with the internal cord or lift mechanism.
Snapping the Headrail Into the Brackets
Tilt, slide, and rotate until it locks.
Once the brackets are level and secure, mounting the headrail is quick. Tilt the front edge of the headrail upward, slide the front groove of the headrail onto the front ridge or hook of each bracket, then rotate the headrail back toward the window until the back edge snaps into the bracket and locks. You should feel and hear it click into place. Give the headrail a gentle tug to confirm it is secure in every bracket. If it does not snap in cleanly, the brackets are usually spaced slightly unevenly or not aligned, so recheck their positions rather than forcing the rail.
Attach the Handle and Test
Fit the handle, then break the pleats in gently.
With the headrail mounted, attach the handle to the bottom rail as shown in your instructions; it is designed to sit where it minimizes contact with the fabric. Wide shades often come with two handles, and there is a simple rule for placing them: divide the total shade width by four, and set one handle that distance in from each edge, then always lift and lower using both handles together so the shade rises evenly. For the first few operations, raise and lower the shade slowly, this lets the pleats learn to fold and stack neatly rather than bunching. If the pleats do stack unevenly at first, running the shade fully up and down a few times usually settles them.
Add the Valance
Optional, and it just clips on.
Many pleated blinds include a valance that conceals the headrail for a finished look. To fit it, clip a valance clip near each end of the headrail first, then space the remaining clips evenly across the front, snapping each clip’s two parts together. Once the clips are on, press the valance onto them until it snaps into place. The valance is purely decorative, so this step is optional, but it hides the brackets and hardware and gives the installation a cleaner, more built-in appearance.
Install Troubleshooting
Quick fixes for the few things that can go wrong.
| Problem | Cause | Fix |
|---|---|---|
| Headrail won’t snap in | Brackets uneven or misaligned | Recheck bracket spacing and level |
| Shade hangs crooked | Brackets not level | Re-level and re-drill the brackets |
| Sags in the middle | Missing center support | Add a center support bracket |
| Pleats bunch or stack unevenly | New shade, or operated too fast | Raise and lower slowly to train the pleats |
| Headrail loose in brackets | Too much play between brackets | Adjust bracket spacing or bend the end tab per instructions |
| Won’t screw into a vinyl frame | Vinyl too weak to hold screws | Screw into the surrounding trim or opening instead |
Most installation problems trace back to bracket placement, so when something is off, the brackets are the first thing to check. An unlevel or unevenly spaced set of brackets causes a crooked shade or a headrail that will not seat, and both are fixed by re-marking and re-drilling. A sagging middle needs another support bracket. If the shade later will not hold its raised position, that is a different issue covered in pleated blinds won’t stay up, and if a lift string breaks, see how to restring pleated blinds.
Best Sources
- JustBlinds — on bracket placement about two inches in from each end, spacing added brackets no more than about 25 inches apart, and snapping the headrail groove onto the bracket ridge.
- Affordable Blinds — on end box and center support brackets, using a level to align brackets, and installing valance clips at the ends and evenly across.
- Bali — on tilting the front of the headrail up and sliding the bracket hook into the headrail groove to mount the shade.
- Family Handyman — on choosing inside versus outside mount, drilling pilot holes, and using projection or anchor hardware where needed.
- Blinds.com — on leveling the headrail, center support brackets on wider shades, and adjusting bracket play if the headrail is loose.
Related Guides
- Best Pleated Blinds Buying Guide
- How to Measure for Pleated Blinds
- How to Clean Pleated Blinds
- Pleated Blinds Won’t Stay Up
Frequently Asked Questions
How do you install pleated blinds?
Mount the brackets level and correctly spaced, then snap in the headrail. Mark the bracket positions with the end brackets about two inches in from each end and a center support bracket for wide shades, drill pilot holes, and screw the brackets in, checking with a level. Then tilt the front of the headrail up, slide its front groove onto the bracket ridge, and rotate it back until it locks. Finally, attach the handle to the bottom rail, test by raising and lowering slowly so the pleats stack neatly, and clip on the valance if included. Most people finish in under an hour.
How far apart should pleated blind brackets be?
Place the two end brackets about two inches in from each end of the headrail. For wider shades, add a center support bracket in the middle to prevent the headrail sagging, and for very wide shades, add more brackets spaced roughly every 25 inches so the headrail is supported evenly. Guidance online varies on the exact figures, but the principle is consistent: support the ends and add center support as the shade gets wider. If a shade sags in the middle after installation, the fix is almost always an additional support bracket.
How do you attach a pleated shade to its brackets?
Tilt the front edge of the headrail upward, slide the front groove of the headrail onto the front ridge or hook of each bracket, then rotate the headrail back toward the window until it snaps in and locks. You should feel it click into place; give it a gentle tug to confirm it is secure. If the headrail will not seat cleanly, the brackets are usually spaced unevenly or are not aligned, so recheck their positions and level rather than forcing the rail, which can bend the headrail or bracket.
Can I install pleated blinds myself?
Yes, installing pleated blinds is a beginner-friendly DIY job that most people finish in under an hour. You need only a drill or screwdriver, a level, a pencil, and a tape measure, plus the brackets and screws included with the blind. The steps are simple: mark and level the bracket positions, drill pilot holes, screw the brackets in, snap the headrail into place, then attach the handle and test. The main things to get right are level brackets and correct spacing, including a center support on wider shades. No special skills are required.
Why won’t my pleated blind headrail snap into the brackets?
If the headrail will not snap in, the brackets are almost always spaced unevenly, mounted at slightly different heights, or not aligned front to back. Remove the headrail, check that all brackets are level with each other and correctly spaced, about two inches in from each end with even spacing across, and re-drill any that are off. Also confirm you are tilting the front of the headrail up and sliding the groove onto the ridge before rotating back. Forcing the rail can bend it, so fix the bracket alignment instead.
