How to Measure for Pleated Blinds

Authored By Michael Turner -30 Years Home Improvement Expertise | Updated 2026 | BlindShades.pro
Updated on June 30, 2026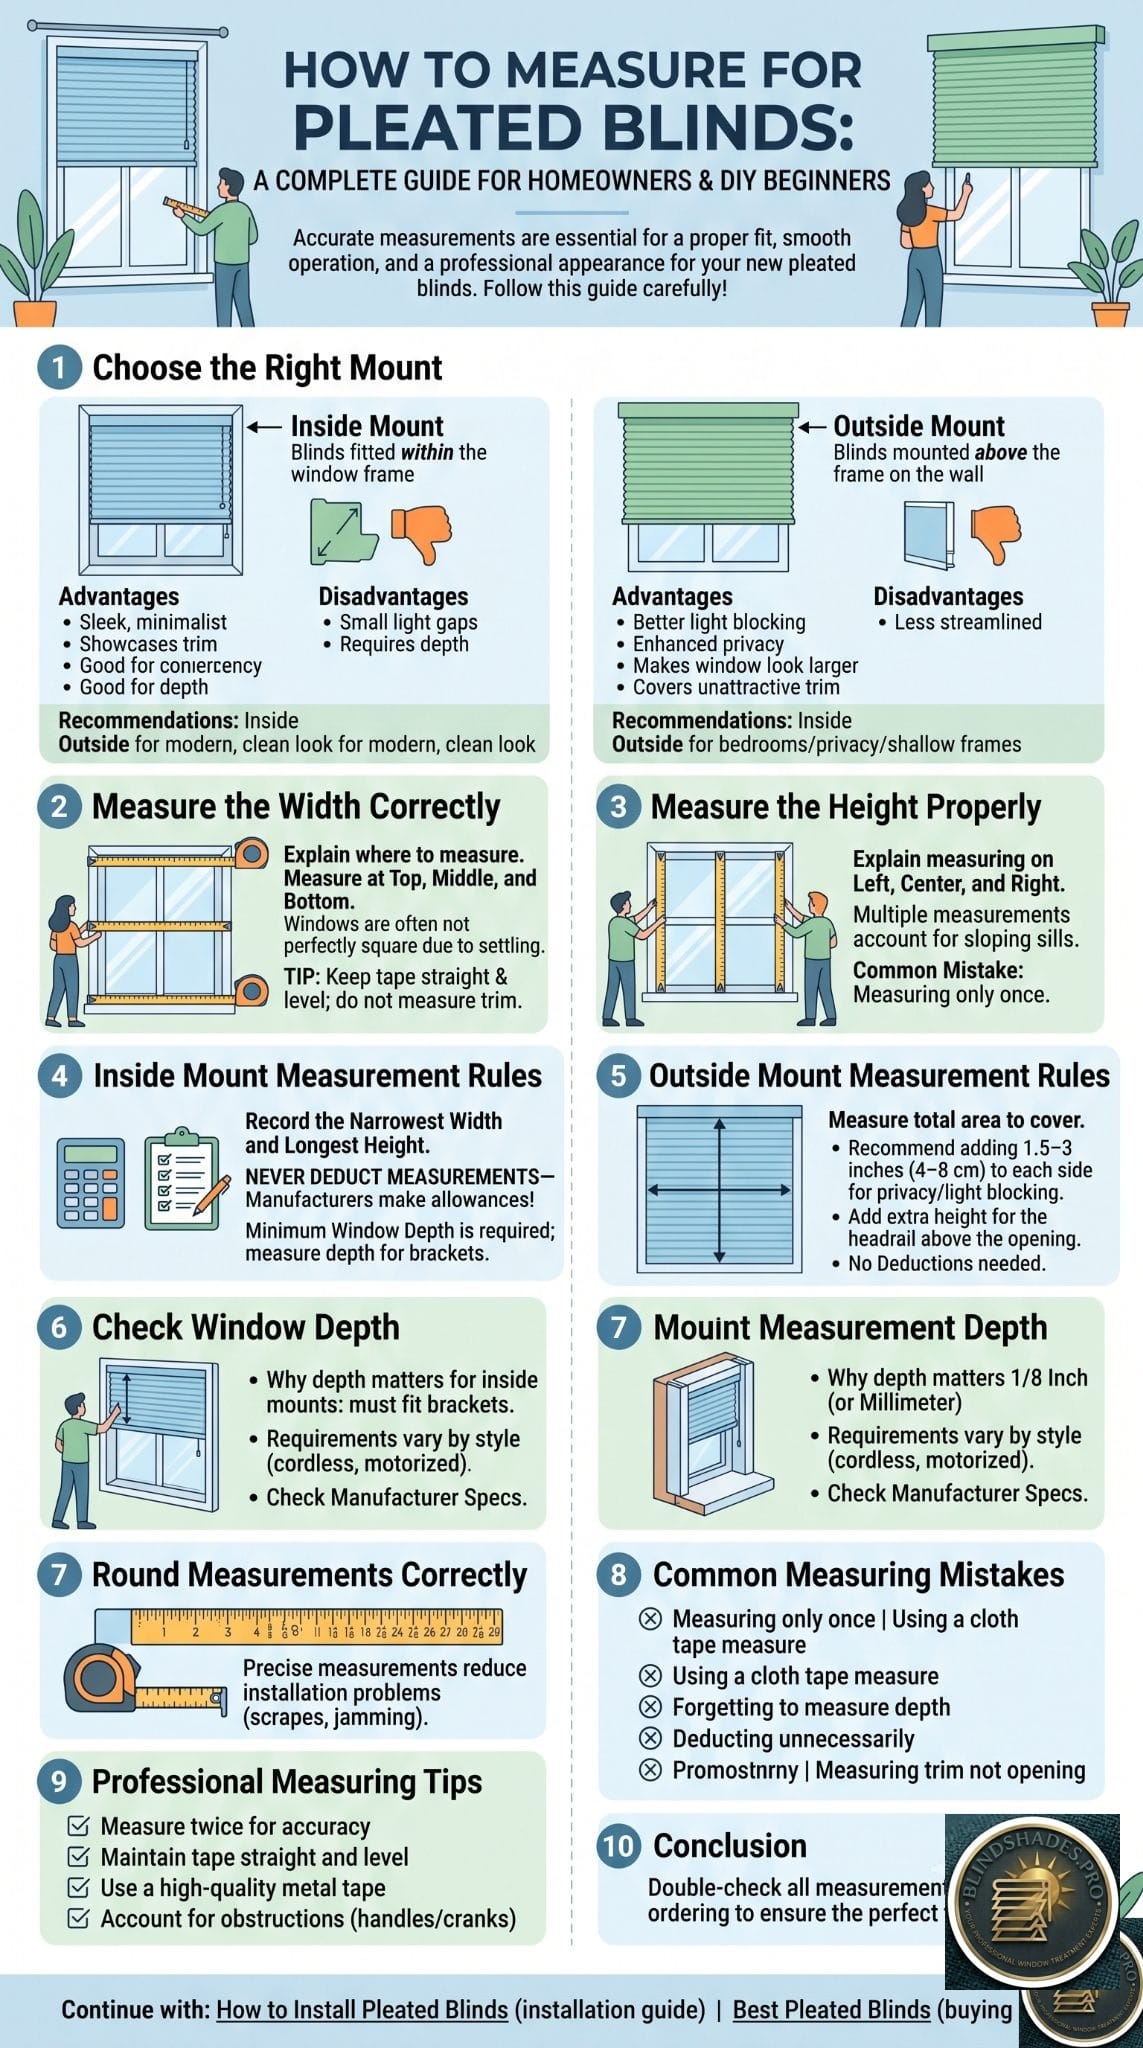
Authored by Michael Turner — 30 Years of Home Improvement Expertise | BlindShades.pro
To measure for pleated blinds, first decide on an inside or outside mount, then measure with the three-point method: width at the top, middle, and bottom, and height at the left, middle, and right. For an inside mount, record the narrowest width and the longest height, and do not subtract anything, the manufacturer applies its own deduction, so deducting yourself makes the blind too small. For an outside mount, measure the area you want to cover and add overlap, commonly about 1.5 to 3 inches per side, plus extra height for the headrail, with no deductions. Always check the frame depth against your chosen lift, since cordless and looped lifts often need more room than corded, round to the nearest one-eighth inch, and measure the window opening rather than an existing blind. This guide walks through each step.
Key Takeaways
- Decide the mount first. Inside mount sits in the frame for a clean look and needs enough depth; outside mount covers the opening and blocks more light.
- Use the three-point method. Measure width at the top, middle, and bottom, and height at the left, middle, and right, since few windows are perfectly square.
- Never deduct on an inside mount. Record the narrowest width and longest height exactly; the factory takes its own deduction, so deducting yourself makes the blind too small.
- Add overlap for an outside mount. Measure the area to cover and add roughly 1.5 to 3 inches per side, plus height for the headrail, with no deductions.
- Check the depth for your lift. Inside mounts need enough frame depth, and cordless or looped lifts often need more than corded, so confirm against the product spec.
⭐ Quick Answer
Here is how to measure for pleated blinds: decide the mount, measure width and height in three places, and record the right figures for inside or outside mount.
- Choose the mount: inside (clean, needs frame depth) or outside (covers more, blocks more light), a choice American Blinds explains for pleated shades.
- Measure three points: width at the top, middle, and bottom; height at the left, middle, and right, the method JustBlinds uses.
- Inside mount: record the narrowest width and longest height, and never deduct yourself, the factory takes its own deduction.
- Outside mount: add about 1.5 to 3 inches of overlap per side plus height for the headrail, with no deductions.
- Check the depth for your lift type and round to the nearest one-eighth inch, per Bali. Then install your pleated blinds, plan an outside mount for blackout, or see our best pleated blinds guide.
Decide Inside or Outside Mount First
The mount changes how you measure, so choose it before you start.
| Choose | When |
|---|---|
| Inside mount | You want a clean, built-in look and the frame is deep enough |
| Outside mount | You want to block more light, the frame is shallow, or the window is out of square |
Pleated blinds can mount inside the window frame for a clean, recessed look, or outside it, above and wider than the opening, to cover more and block more light. Inside mount needs enough frame depth to hold the headrail; outside mount is the better choice for a dark bedroom, for shallow frames, or for windows that are out of square. Decide this first, because the measurements you take and how you record them differ between the two. For a darker result, an outside mount is covered further in our best blackout pleated blinds guide.
How to Measure for Pleated Blinds: Step by Step
Measure the opening accurately, the same careful way every time.
- Gather your tools. Use a steel tape measure, never a cloth one, plus a pencil and paper. Measure the window opening itself, not any existing blind.
- Choose inside or outside mount. This sets how you record the numbers, so decide before measuring.
- Measure the width in three places. Measure the width at the top, middle, and bottom of the opening, and note all three.
- Measure the height in three places. Measure the height at the left, middle, and right, and note all three.
- Record the right figures for your mount. For inside mount, take the narrowest width and longest height, with no deductions. For outside mount, take the area to cover plus overlap, plus height for the headrail.
- Check the depth and square. Confirm the frame is deep enough for your lift, and check the window is square. Round everything to the nearest one-eighth inch.
The Three-Point Method
Windows are rarely perfectly square, so measure three times.
| Mount | Width to record | Height to record |
|---|---|---|
| Inside | The narrowest of the three widths | The longest of the three heights |
| Outside | The full area to cover plus overlap | Headrail position down to the sill plus overlap |
The reason you measure in three places is that almost no window is perfectly square, especially in older homes. For an inside mount, you record the narrowest width so the blind clears the frame all the way down, and the longest height so it covers fully. For an outside mount, you are measuring the area you want covered rather than the opening itself, so you take the full width plus overlap. Always round to the nearest one-eighth inch and label each number clearly as width or height, since mixing them up is a common and costly mistake.
Inside Mount: Don’t Deduct Yourself
The factory takes the deduction, so you never should.
This is the single most important rule for inside mounts, and the most common mistake. When you order an inside-mount pleated blind, the manufacturer automatically subtracts a small amount from your width, often around three-eighths of an inch, so the blind glides freely without binding against the frame. That means you record your exact measured width with no deduction of your own. If you subtract for clearance yourself, the factory deducts again, and the finished blind comes out too narrow with light gaps down the sides. Record the narrowest width exactly as measured, and let the manufacturer do the rest.
Outside Mount: Add Overlap
Cover more than the opening for the best light control.
An outside mount is measured differently: instead of the opening, you measure the area you want the blind to cover. Start by deciding how far past the window the blind should extend, then add overlap on each side, commonly about 1.5 to 3 inches per side, for better light blocking and privacy. For height, mark where the headrail will sit, usually a couple of inches above the frame to leave room for the brackets, and measure from there down to the sill or as low as you want for extra coverage. Outside-mount blinds take no factory deductions, so they are made to your exact numbers. The more overlap you allow, the fewer light gaps at the edges, which matters most for bedrooms.
Check the Mounting Depth
Inside mounts need enough frame depth, and the lift type changes how much.
| Lift type | Depth need (general) |
|---|---|
| Corded | Least depth |
| Cordless | More than corded |
| Continuous loop | More than corded |
| Motorized | Most, for the motor housing |
For an inside mount, the window frame must be deep enough to hold the headrail, and how much depth you need depends on the lift you choose. As a general pattern, corded lifts need the least depth, while cordless, continuous-loop, and especially motorized lifts need more to house their mechanisms. Exact figures vary by brand and product, so always check the minimum depth listed in the product’s specifications before ordering, and measure your frame depth from the glass to the front edge. If your frame is too shallow for your chosen lift, switch to an outside mount.
Check the Window for Square
An out-of-square window is a reason to mount outside.
Before you commit to an inside mount, check whether the window is square by measuring the two diagonals, corner to corner, in both directions. If the two diagonal measurements differ by more than about a quarter to a half inch, the window is out of square, and an inside-mount blind will leave uneven gaps that a rectangular shade cannot follow. In that case, an outside mount is the better choice, since it covers the whole area and hides the irregular frame. This quick check takes seconds and saves you from ordering a blind that never fits cleanly.
Common Measuring Mistakes
Avoid the errors that lead to a poor fit.
| Mistake | Fix |
|---|---|
| Deducting width yourself on an inside mount | Record the exact narrowest width; the factory deducts |
| Measuring an existing blind, not the opening | Always measure the window opening itself |
| Using a cloth tape | Use a steel tape for accuracy |
| Mixing up width and height | Label every measurement clearly |
| Ignoring frame depth | Check depth against your lift before ordering |
| Too little outside-mount overlap | Add about 1.5 to 3 inches per side |
Most measuring failures come down to these few errors, and every one is avoidable. The biggest by far is self-deducting on an inside mount, which makes the blind too small. Measuring the opening rather than an old blind, using a steel tape, labeling width versus height, checking depth, and allowing enough overlap handle the rest. A few careful minutes here are the difference between a crisp fit and a blind that gaps or will not install.
What to Record When Ordering
Write down everything the order needs.
When you place the order, you will need: the mount type (inside or outside), the ordering width and height for that mount, the frame depth (for inside mount), the pleat size, the fabric and opacity, and the lift type. Having all of these recorded and clearly labeled avoids mistakes at checkout. With your measurements ready, you can choose your blind from our best pleated blinds guide, and when it arrives, fit it with how to install pleated blinds. If you are still weighing pleated against an insulated option, see pleated blinds vs cellular shades.
Best Sources
- American Blinds — on measuring pleated shades for inside and outside mount, recording to the nearest one-eighth inch, and the automatic factory deduction on inside mounts.
- JustBlinds — on the three-point width and height method for pleated shades and marking the headrail position for outside mounts.
- Bali — on measuring guides for cellular and pleated shades, mount-depth requirements that vary by lift type, and specialty-shape templates.
- Blinds.com — on circling the narrowest inside-mount width, depth requirements in the product specifications, and not taking deductions yourself.
- Blindsgalore — on the three-place measuring method, rounding rules, adding overlap above the frame for outside mounts, and noting obstructions.
Related Guides
- Best Pleated Blinds Buying Guide
- How to Install Pleated Blinds
- Best Blackout Pleated Blinds
- Pleated Blinds vs Cellular Shades
Frequently Asked Questions
How do you measure for pleated blinds?
Decide on an inside or outside mount first, then use the three-point method: measure the width at the top, middle, and bottom of the opening, and the height at the left, middle, and right. For an inside mount, record the narrowest width and the longest height, with no deductions, since the manufacturer applies its own. For an outside mount, measure the area you want to cover and add overlap of about 1.5 to 3 inches per side, plus height for the headrail. Round every measurement to the nearest one-eighth inch and check the frame depth against your chosen lift.
Should I deduct anything from my inside-mount measurement?
No, never deduct anything yourself on an inside mount. The manufacturer automatically subtracts a small amount, often around three-eighths of an inch, from your width so the blind operates smoothly without binding against the frame. If you also deduct for clearance, the factory deducts again and the blind comes out too narrow, leaving light gaps down the sides. Record the exact narrowest width you measured and let the manufacturer apply the deduction. This is the most common measuring mistake, so it is worth repeating: measure exactly, deduct nothing.
How much overlap should an outside-mount pleated blind have?
For an outside mount, add roughly 1.5 to 3 inches of overlap on each side of the window opening, and a similar amount above for the headrail and brackets. More overlap means better light blocking and privacy, with fewer gaps at the edges, which matters most for bedrooms and any room you want to darken. Measure the full area you want covered rather than the opening itself, since outside-mount blinds take no factory deductions and are made to your exact numbers. Decide how far past the frame to extend based on how much light you want to block.
How much frame depth do I need for inside-mount pleated blinds?
Enough to hold the headrail, with the exact amount depending on the lift type and brand. As a general pattern, corded lifts need the least depth, while cordless, continuous-loop, and motorized lifts need more to house their mechanisms. Because figures vary by product, always check the minimum mounting depth listed in the product’s specifications before ordering, and measure your frame depth from the glass to the front edge of the opening. If your frame is too shallow for the lift you want, choose an outside mount instead, which has no depth requirement.
Can I measure for pleated blinds myself?
Yes, measuring for pleated blinds is a simple DIY job that needs only a steel tape measure, a pencil, and paper. Decide your mount, measure the width and height in three places each, record the right figures for inside or outside mount, and check the depth and squareness. The main rules are to measure the opening rather than an old blind, never deduct on an inside mount, add overlap on an outside mount, and round to the nearest one-eighth inch. Take your time and label each number clearly, and you will get an accurate, well-fitting result.
