How Do You Install Blinds on French Doors?
Authored By Michael Turner -30 Years Home Improvement Expertise | Updated 2026 | BlindShades.pro
Updated on June 12, 2026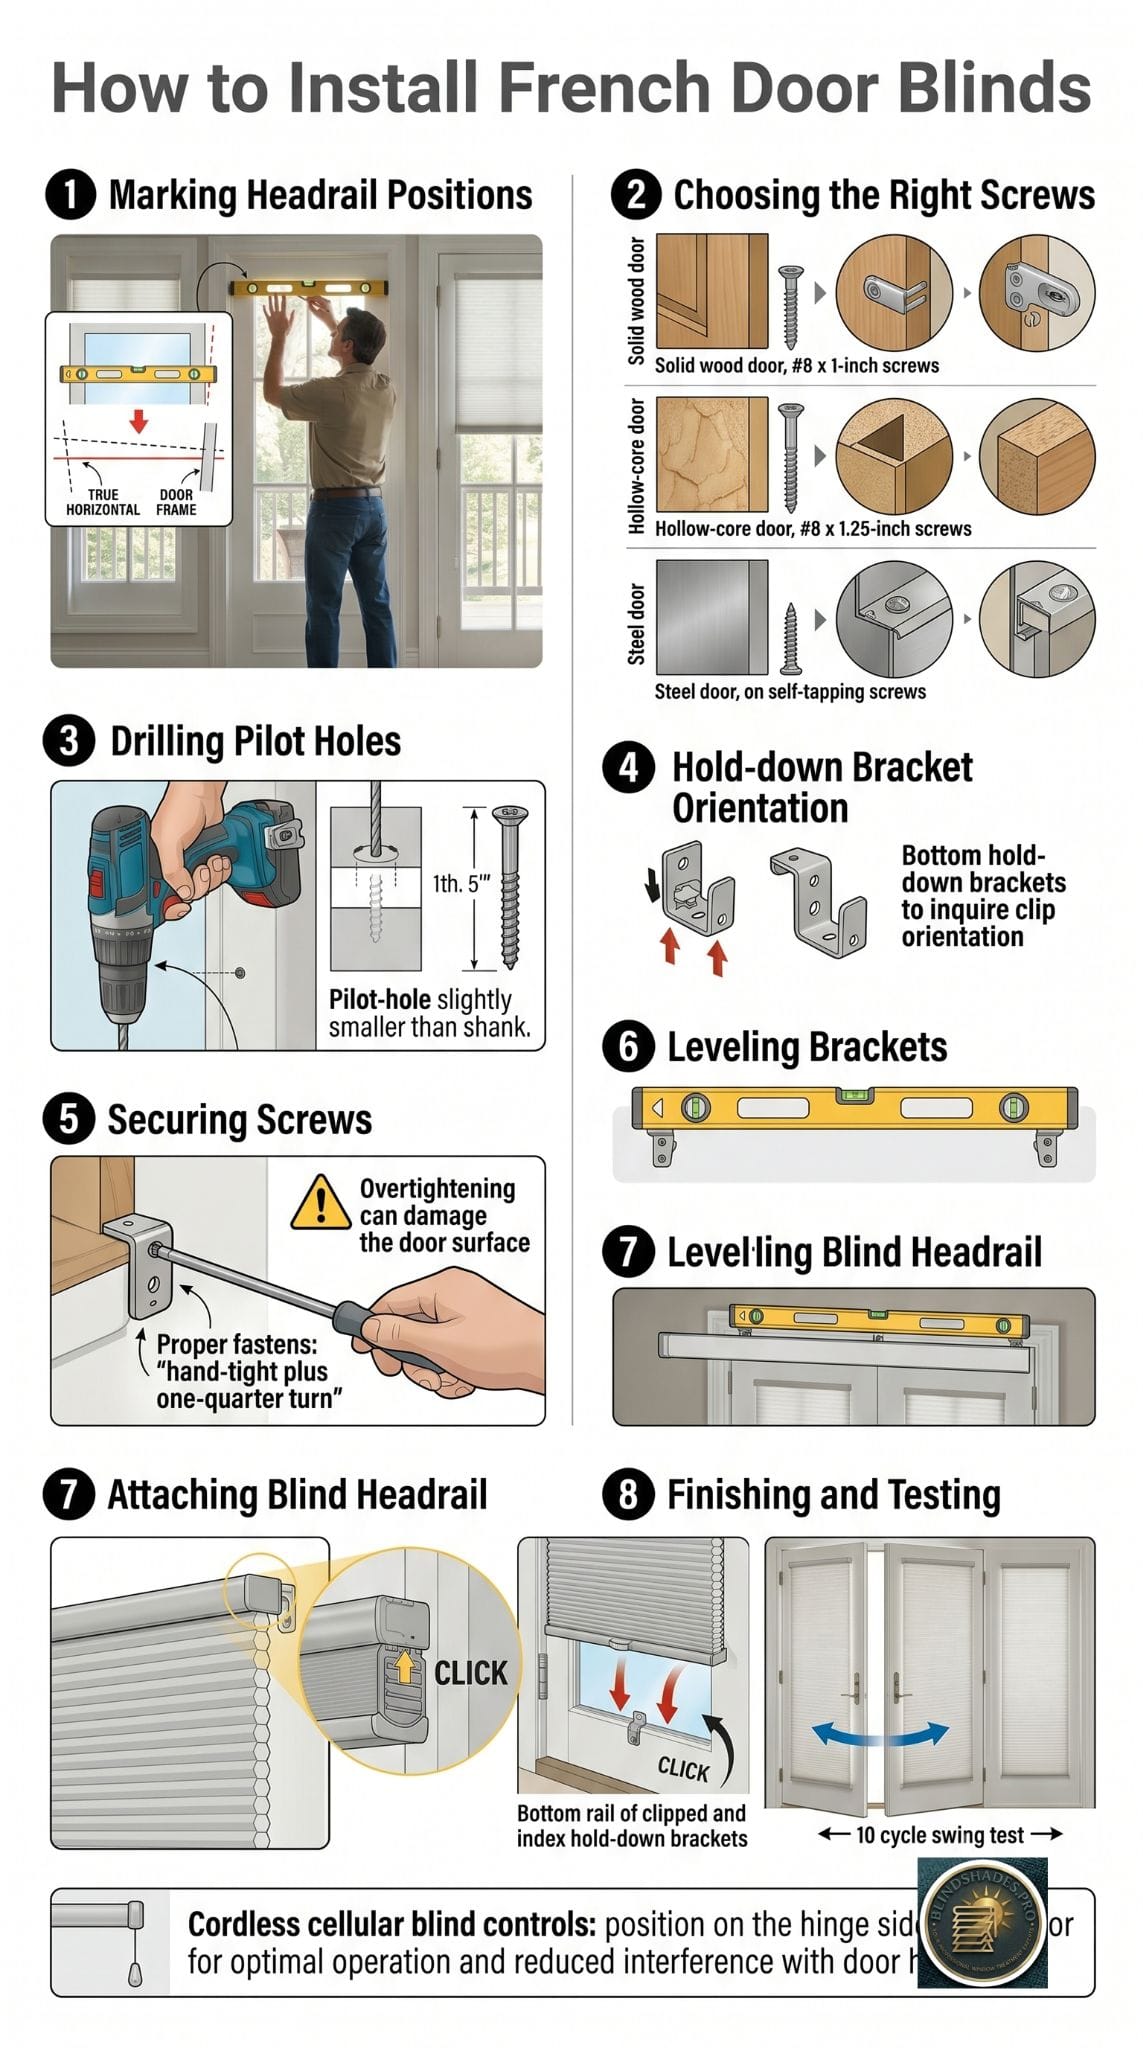
Key Takeaways:
- The four non-negotiable rules for installing blinds on French doors: (1) mount the headrail bracket on the door face (outside mount), not on the wall or ceiling — the blind must travel with the door; (2) hold-down brackets at the bottom corners of the glass panel are essential — any blind without them will swing and knock against the glass on every door opening; (3) use a spirit level for TRUE horizontal when positioning headrail brackets — do not use the door frame as a reference, as settled doors may not be perfectly level, and even a 1-degree angle produces a visibly descending blind; (4) run the swing test after installation — open and close the door 10 times observing the blind, listen for knocking and watch for swing, because static checks (door closed) do not reveal French door installation problems
- Most French doors are hollow-core construction even when they appear solid: steel doors have 24-26 gauge steel skin over polyurethane foam; many wood French doors have hollow-core stave construction with thin face veneer; standard 1-inch screws in hollow-core wood may have less than 0.25 inches of thread engagement with actual wood; for solid wood French doors use #8 x 1 inch minimum; for hollow-core wood doors use #8 x 1.25 to 1.5 inch to reach internal frame members; for steel doors use self-tapping screws that engage the steel skin with a minimum of 3 thread revolutions; never use standard wood screws in the foam fill of steel or fiberglass doors
- Do not overtighten bracket screws on French doors: overtightening compresses and potentially deforms the door face material, especially fiberglass skin and hollow-core wood veneer; it also creates a rigid stress point that concentrates door slam impact energy at the screw hole rather than distributing it through the door structure; the correct tightness is hand-tight plus a quarter turn — the bracket should not move when firmly pressed with a finger but no additional force should be applied
- The hold-down bracket clip direction must be confirmed before installation: most French door hold-down brackets have a clip that opens toward the room (away from the door face); the bottom rail is pushed flat against the door and the clip snaps shut from the room side; if a bracket is installed upside-down or facing the wrong direction, the bottom rail will push the clip aside rather than engaging; always test the clip mechanism with the bottom rail in hand before screwing the bracket into the door
- After installation, run the swing test: fully open the door and close it 5 to 10 times at normal operating speed; listen for knocking (blind contacting door hardware); look for swinging (blind moving away from door face); check that the hold-down brackets remain clipped on both corners through every open-close cycle; a blind that passes all static checks (door closed) but fails the swing test needs hold-down bracket repositioning or additional bracket weight
⭐ Quick Answer — How Do You Install Blinds on French Doors?
- The 8-Step Protocol and the Four Non-Negotiable Rules: The four rules that separate a successful French door blind installation from one that fails within weeks: (1) Mount on the door face — outside mount directly on the door, not on the wall or ceiling; the blind must travel with the door. (2) Hold-down brackets at both bottom corners — any blind without them will swing and knock against the glass on every door opening. (3) Spirit level for TRUE horizontal — do not use the door frame as the level reference; settled French door frames can be 1/4 inch off-level across a 36-inch panel, producing a visibly descending blind if the frame is used as the reference. (4) Run the swing test after installation — open and close the door 10 times at normal speed and observe; problems that are invisible with the door closed (blind swing, bracket pop-off, hardware contact) reveal themselves immediately in the swing test. eHow confirms: “Install the blinds so the tilt and lift controls are on the side next to the door hinges and away from the handle.” Engineer Fix (December 2025) confirms: “Stabilizing the bottom rail is necessary to counteract the force generated by opening and closing the door”
- The Press Test and Screw Selection — Run This Before Drilling Anything: Before marking a single bracket position for French door blind installation, press firmly on the door face with your thumb (approximately 20 to 30 lbs of pressure) in the area where the headrail bracket will mount. Surface resists firmly = solid wood: use #8 × 1 inch wood screws; pilot hole with 5/32-inch drill bit. Surface flexes slightly = hollow-core construction: thin face veneer over hollow stave or foam fill; standard 1-inch screws have less than 0.25 inches of thread engagement with actual wood; use #8 × 1.25 to 1.5 inch to reach internal frame members. Surface feels rigid but you know the door is steel: use #8 self-tapping metal screws — they must engage the 24 to 26 gauge steel skin with a minimum of 3 thread revolutions; the foam fill provides zero grip; for no-drill steel doors see [Are Magnetic Blinds Good for French Doors](/guide/magnetic-blinds-for-french-doors/). Fiberglass door: use #8 × 1.25 inch coarse-thread or self-tapping. The Houzz community forum documents the hollow-core failure mode directly: a buyer drilled standard screws into a French door and found them spinning — “I think it’s a shallow door, maybe foam or something — is there something I can use to strengthen the screws?” The press test takes 5 seconds and prevents this
- The Bracket Angle Check Before the Headrail Snaps In — The Step Every Guide Skips: The critical sequence for installing French door blinds straight: check BOTH headrail bracket positions with a spirit level BEFORE drilling pilot holes. Hold the first bracket at the marked position and place the spirit level on top — adjust until the bubble is centred; mark the adjusted screw hole positions. Repeat for the second bracket on the other side of the glass. Sight across both brackets — they should appear at the same height. AAA Blind and Shutter Factory (June 2025) confirms: “For outside mounts, rely on the spirit level to establish true horizontal and vertical lines rather than using the window frame as a reference.” On a 32-inch-wide French door blind, a 1-degree bracket angle produces a 0.56-inch height difference between the two headrail ends — immediately visible when the blind is partially lowered. Correcting this after the headrail has snapped in requires removing the headrail, loosening one bracket, shimming, and re-testing. Making this check before drilling takes 60 seconds and is the most efficient use of that 60 seconds in the entire installation
- The Hold-Down Clip Direction and the Do-Not-Overtighten Rule: Two French door blind installation details that determine long-term reliability. (1) Hold-down bracket clip direction: most French door hold-down brackets have a clip that opens toward the room (away from the door face); the bottom rail is pressed flat against the door and the clip snaps shut from the room side; if the bracket is installed upside-down, the bottom rail pushes the clip against the door face rather than engaging — the rail appears clipped but pops free at the first door opening; test the clip mechanism with the bottom rail in hand before screwing any hold-down bracket into the door; mark the top face with a pencil before setting aside. (2) Do not overtighten: Blinds.com confirms: “tighten the screws enough to hold the brackets securely, but don’t over-tighten to avoid damaging the wall or the brackets.” For French doors specifically, overtightening compresses or cracks the door face material (fiberglass skin or hollow-core wood veneer) and creates a rigid stress concentration point where door slam impact energy focuses at the screw hole rather than distributing through the door; correct tightness = hand-tight plus a quarter turn; the bracket should not move when firmly pressed with a finger, and no additional force beyond this point should be applied. Weffort (March 2025) confirms roller shades are preferred because they “weigh significantly less, which puts less strain on the mounting screws”
- The Swing Test — The Only Check That Reveals French Door Installation Problems: After snapping in the headrail, attaching the blind, and clipping the bottom rail into both hold-down brackets, run the swing test before declaring installation complete. Close the door. Open it to approximately 45 degrees and close it at normal operating speed. Repeat 10 times. After each cycle observe: blind stays flat against door face and brackets stay clipped = pass. If the blind swings away from the door face = hold-down brackets not engaging correctly; recheck clip direction and reposition. If a knocking sound occurs on closing = blind contacting door hardware; recheck width clearance from handle. If one hold-down bracket pops free repeatedly = that bracket not aligned with the bottom rail; reposition 0.25 inches vertically. If the blind sags to one side = headrail not level; remove headrail, shim low bracket, re-test. Weffort confirms: “motorized shades require bottom hold-down brackets or magnetic catches to prevent them from swinging when the door opens” — this swing test applies to all French door blind types, not just motorized. For ongoing swinging issues after installation see [How Do You Stop French Door Blinds From Swinging](/guide/french-door-blinds-swinging/)
- Best Sources: Motorized French door installation, slim cassette specification, hold-down bracket requirement, real-world 8-month installation experience → Weffort smart French door retrofit guide · Solid timber door drilling, top-centre structural strength, electric drill + anchor + mallet protocol → Complete Blinds French door installation guide · Pilot hole sizing, snap-lock headrail, level confirmation, bottom rail stabilization → Engineer Fix door blind installation guide
⚠️ The Complete Pilot Hole and Screw Specification Table for French Door Blind Installation: Correct screw and pilot hole selection for French door blind bracket installation by door type: Solid wood (oak, cedar, pine): screw = #8 × 1 inch wood screw; pilot hole = 5/32-inch bit (0.156 inch); depth = full screw length; Complete Blinds confirms top-centre position for maximum structural strength on solid timber. Hollow-core wood door: screw = #8 × 1.25 to 1.5 inch; pilot hole = 5/32-inch; drill through face veneer only (0.25 to 0.5 inches); longer screw reaches internal stave frame members. Steel door: screw = #8 self-tapping metal screw × 1 inch; starter hole = 5/64-inch (0.078 inch); self-tapping screw creates its own thread in steel skin; must achieve minimum 3 complete thread revolutions in steel skin; foam fill provides zero grip; for no-drill alternative see magnetic blind guide. Fiberglass door: screw = #8 × 1.25 inch coarse-thread or self-tapping; pilot hole = 5/32-inch; prevents gel coat cracking on surface. Raised moulding (any door type): add spacer blocks equal to moulding projection height before mounting brackets; see How Do You Measure French Doors for Blinds for spacer block sizing. Tape depth-stop technique: wrap tape around the drill bit at the desired pilot hole depth; when the tape touches the door face, the correct depth has been reached. Standard pilot hole size rule: for #6 screw (shank 0.138 inch) use 7/64-inch bit; for #8 (0.164 inch) use 5/32-inch; for #10 (0.190 inch) use 11/64-inch. See the full pilot hole protocol in Step 3 below.
💡 Motorized French Door Blind Installation Specifics and the Swing Test Diagnostic Table: Three additional steps for motorized blind French door installation. (1) Motor end bracket placement: most motorized headrails have a heavier motor end and a lighter idle end; identify which end is which before mounting; the motor end bracket must be positioned so the battery compartment or USB charging port faces toward the room for access after installation; if the headrail end is installed very close to the door stile, battery replacement may be impossible without removing the headrail. (2) USB charging cable clearance: before finalising bracket positions, plan the charging cable path from the headrail charging port to a power source; the cable must not droop through the door’s operational arc (where it would catch on hinges or handles). (3) Magnetic hold-down auto-release: some premium motorized systems include magnetic hold-down brackets that auto-release when the motor signals upward; confirm the hold-down bracket included with the blind is compatible with the motor’s bottom rail release mechanism before installation. The complete swing test diagnostic table for all French door blind types: blind swings away from door = hold-down brackets not engaging; recheck clip direction and reposition vertically. Knocking on close = hardware contact; recheck blind width vs handle clearance. One bracket pops free = misalignment; reposition 0.25 inches vertically. Blind sags to one side = headrail not level; shim low bracket. Bottom rail too tight in hold-downs = brackets too close together; reposition outward 0.25 inches. All five of these failure modes are invisible with the door closed; only the swing test (10 open-close cycles at normal speed) reveals them before they become a daily frustration. For the complete swinging blind troubleshooting guide, see How Do You Stop French Door Blinds From Swinging. See the full swing test diagnostic in Step 8 below.
📖 Read the complete guide below for: the 8-step installation protocol (press test for door core; mark with spirit level for TRUE horizontal; pilot holes by door type; hold-down clip direction test before screwing; brackets at hand-tight + quarter turn; level check before headrail snaps in; swing test 10 open-close cycles), the press test for hollow-core doors (soft surface = thin veneer over foam; longer screws needed; standard 1-inch screws have under 0.25-inch grip in hollow-core), the screw selection table by door type (solid wood, hollow-core, steel, fiberglass), the do-not-overtighten rule (compresses door face; creates rigid stress concentration at screw; hand-tight + quarter turn only), the bracket angle check before headrail (1-degree angle = 0.56-inch visible difference on 32-inch door), the hold-down bracket clip direction (opens toward room; test before screwing; upside-down = bottom rail pushes clip aside), and the motorized installation specifics (motor end bracket; battery access planning; magnetic hold-down auto-release compatibility).
How to Install French Door Blinds — The Complete 8-Step Protocol
The critical difference from window blind installation: French door blinds mount on a moving surface that creates dynamic loads not present in fixed window installations.
Before starting: confirm your blind type and door material. For steel French doors where drilling is not possible, see Are Magnetic Blinds Good for French Doors for the no-drill installation protocol. For all drill-mount applications, continue below.
Tools Required
| Tool | Purpose |
|---|---|
| Metal tape measure | Marking bracket positions accurately |
| Pencil | Marking bracket hole positions on door face |
| Spirit level (torpedo or standard) | Ensuring TRUE horizontal — not using door frame |
| Electric drill | Pilot holes and bracket screw driving |
| Drill bits — pilot (see Step 3) | Matching screw shank diameter minus 1/64 inch |
| Drill bit — clearance (#6 or #8) | Optional: creates clearance hole through door face |
| Screwdriver (flathead and Phillips) | Final bracket tightening |
| Pencil-tip awl or nail | Confirming door core type before drilling |
Step 1 — Confirm Door Core Type With the Press Test
Before marking a single bracket position, confirm what is inside your French door — this determines which screws to use.
The press test: Press firmly with your thumb on the door face in the area where the headrail bracket will mount (typically 1 to 2 inches above the glass top edge). Press hard — approximately 20 to 30 lbs of pressure.
- Surface resists pressure firmly: solid wood at this location; standard wood screws will grip well
- Surface flexes or gives slightly: hollow-core construction; thin face veneer over hollow stave or foam; use longer screws to reach internal frame members
- Surface is completely rigid with no flex: could be solid wood OR could be steel or fiberglass with foam fill — use the magnet test to distinguish (see Are Magnetic Blinds Good for French Doors)
Screw specification by door type:
| Door Type | Correct Screw | Notes |
|---|---|---|
| Solid wood (timber) | #8 × 1 inch wood screw | Standard; pilot hole prevents splitting |
| Hollow-core wood | #8 × 1.25 to 1.5 inch | Longer bite reaches internal stave members |
| Steel door | #8 self-tapping metal screw × 1 inch | Must engage steel skin with 3+ thread revolutions; foam fill provides no grip |
| Fiberglass | #8 × 1.25 inch | Self-tapping or coarse wood thread; pilot hole prevents gel coat cracking |
| uPVC-framed | Adhesive mount or no-drill | Hollow sections provide no screw grip — do not drill |
The Houzz forum documents the classic hollow-core failure: a buyer drilled standard screws into a French door and found them loose — “I think it’s a shallow door, maybe foam or something. Is there something I can use to strengthen the screws?” The answer for hollow-core: longer screws reaching the internal frame members, or spring-toggle bolts for true hollow sections.
Step 2 — Mark the Headrail Bracket Positions
eHow confirms the standard position: “Mount the blinds 2 inches above the glass to ensure privacy.”
For standard headrail bracket placement:
- Mark a horizontal reference line 1 to 2 inches above the top edge of the glass panel
- The exact distance depends on your headrail height — the bottom edge of the headrail bracket should clear the glass top edge by 0 to 0.5 inches; a headrail mounted 2 inches above glass provides coverage without exposing a gap above the glass when the blind is raised
Position the brackets:
- Hold the first bracket at the marked position, against the flat door face (or on top of spacer blocks if raised molding requires them)
- Mark each screw hole with a pencil
- Move to the second bracket position (the other side of the glass, same height)
- Mark each screw hole
Do NOT use the door frame as your level reference yet — that comes in Step 5.
Step 3 — Drill Pilot Holes With the Correct Bit
The pilot hole rule: A pilot hole diameter = screw shank diameter minus 1/64 inch.
| Screw Size | Shank Diameter | Correct Pilot Hole Bit |
|---|---|---|
| #6 | 0.138 inch | 7/64 inch (0.109 inch) |
| #8 | 0.164 inch | 5/32 inch (0.156 inch) |
| #10 | 0.190 inch | 11/64 inch (0.172 inch) |
Engineer Fix (December 2025) confirms: “Use a drill bit slightly smaller than the mounting screws. This step prevents the material from splitting and ensures the screws hold firmly.”
Complete Blinds (September 2025) adds: “The ideal spot to install blinds on French doors is the top centre of the door. This area offers the most structural strength, reducing the risk of splintering or damage, especially important with solid wood doors like oak or cedar, which can split if drilled in weaker spots.”
Pilot hole depth: Drill to the full screw length minus the thread engagement depth you want to leave in the material:
- Solid wood: drill 1 × screw shank length
- Hollow-core wood: drill through the face layer only (0.25 to 0.5 inches); let the screw find the internal members as it drives
- Steel/fiberglass: use a starter hole only — 1/4 to 3/8 inch depth; the self-tapping screw creates its own thread in the material
Stop-depth tip: Wrap a piece of tape around the drill bit at the desired pilot hole depth — when the tape touches the door face, the hole is deep enough.
Step 4 — Test the Hold-Down Bracket Clip Direction
Before screwing any hold-down bracket into the door, test the clip mechanism with the bottom rail in hand.
Hold-down brackets for French door blinds have a clip that receives the bottom rail of the blind. The clip opens in a specific direction — almost always toward the room (away from the door face).
The correct clip engagement sequence:
- The blind is lowered to the bottom position
- The bottom rail is pressed flat against the door face
- The clip snaps shut from the room side, around the bottom rail
- The bottom rail is now secured flush against the door
The upside-down bracket failure: If the bracket is installed with the clip opening toward the door face instead of toward the room, the bottom rail will push the clip against the door face when engaged — the clip will not lock. The bottom rail will appear to be clipped in (it looks engaged) but will pop free immediately when the door opens and the blind swings.
The test: Hold the bracket at the marked position with the bottom rail against the door face. Attempt to clip the rail in. If it clips cleanly, the bracket is correctly oriented. If the rail pops back out, flip the bracket 180 degrees and re-test. Mark the bracket with a pencil arrow pointing toward the room before setting it aside.
Step 5 — Check BOTH Brackets Are Level Before Screwing
The bracket angle check — the step most DIY guides skip for French doors.
After marking the screw hole positions for both brackets but BEFORE drilling any pilot holes:
- Hold the first headrail bracket at its marked position
- Place a spirit level on top of the bracket
- Adjust the bracket position until the bubble is centred — TRUE horizontal, independent of the door frame
- Mark the adjusted screw hole positions
- Repeat for the second bracket on the other side of the glass
- Hold both brackets at their final marked positions and sight across them — they should appear at the same height
Why the door frame is the wrong reference: AAA Blind and Shutter Factory (June 2025) confirms: “For outside mounts, rely on the spirit level to establish true horizontal and vertical lines rather than using the window frame as a reference.”
French door frames that have settled (common in homes over 10 years old) can be off-level by 1/4 inch or more across a 36-inch door panel. If you use the door frame top edge as your leveling reference and the frame is off by 1/4 inch, the installed blind will descend 1/4 inch from one side to the other — immediately visible when the blind is partially lowered.
Consequence of a 1-degree bracket angle: On a 32-inch-wide French door blind, a 1-degree angle produces a 0.56-inch height difference between the two ends of the headrail. This is highly visible with the blind lowered. Correcting it after the headrail is installed requires removing the headrail, loosening one bracket, shimming, and re-testing.
Step 6 — Install Brackets — Do Not Overtighten
Install both headrail brackets and all hold-down brackets following this sequence:
- Drill pilot holes at all marked positions
- Position each bracket over its pilot holes
- Drive screws by hand (not power driver) to maintain feel for resistance
- Stop tightening when the bracket is firmly against the door face and does not move under firm thumb pressure
- Add one quarter-turn past this point — no more
The do-not-overtighten rule for French doors: Blinds.com confirms: “tighten the screws enough to hold the brackets securely, but don’t over-tighten to avoid damaging the wall or the brackets.”
For French doors specifically, overtightening causes two additional problems not present in wall mounting:
- Deformation of door face material: the fiberglass skin or hollow-core wood veneer compresses under the bracket, creating a slight depression that concentrates the bracket contact force; over time this depression can crack the material around the screw hole
- Rigid stress concentration under door slam: a properly tightened bracket allows the door to flex microscopically under slam impact; an overtightened bracket creates a rigid anchor point where all slam energy concentrates at the screw hole
Weffort (March 2025) confirms roller shades are preferable specifically because they “weigh significantly less, which puts less strain on the mounting screws.”
Step 7 — Snap In Headrail and Attach Blind
- Hold the headrail over both mounted brackets with the cord/wand control side on the hinge side of the door
- Engage the back edge of the headrail into the bracket’s rear groove first
- Press the front edge of the headrail down until it snaps or clips into the bracket’s front groove
- Verify the headrail is seated evenly across both brackets with no gaps or rocking
- Place the spirit level on top of the headrail and confirm it is true horizontal
Engineer Fix confirms: “A final check with a level confirms the headrail is perfectly horizontal, distributing the blind’s weight evenly.”
- If the headrail rocks or shows a gap at one bracket, remove it, loosen the lower bracket screw by one turn, use a thin card shim between the bracket and door face on the low side, and re-tighten before replacing the headrail
Step 8 — Clip Bottom Rail Into Hold-Down Brackets and Run the Swing Test
The final step — and the most important one for French door installation.
Lower the blind completely. Press the bottom rail flat against the door face. Clip the bottom rail into both hold-down brackets simultaneously — both corners should engage with an audible click.
The swing test: Close the door. Open it to approximately 45 degrees and close it at normal speed. Repeat 10 times. After each open-close cycle, observe:
| Observation | Problem | Solution |
|---|---|---|
| Blind stays flat against door; brackets stay clipped | ✅ Pass | No action needed |
| Blind swings away from door face on opening | Hold-down brackets not engaging | Recheck clip direction; reposition brackets lower or adjust height |
| Knocking sound on closing | Blind contacting door hardware (handle or hinges) | Blind too wide; recheck width against handle clearance; add spacer blocks |
| One hold-down bracket pops free | That bracket not aligned with bottom rail | Reposition that bracket ± 0.25 inches vertically |
| Blind sags to one side | Headrail not level | Remove headrail; shim low bracket; re-test |
Weffort confirms the swing control requirement: “Motorized shades require bottom hold-down brackets or magnetic catches to prevent them from swinging when the door opens.” This applies to all blind types on French doors, not just motorized.
Motorized French Door Blind Installation — Additional Steps
For motorized roller shades, cellular shades, or venetian blinds on French doors, three additional considerations apply after the 8-step protocol above:
Motor End Bracket Position
Most motorized headrails have a heavier motor end and a lighter idle end. The manufacturer typically specifies which end of the headrail is which (often marked or obvious from the motor housing bulk). The motor end bracket should be positioned on the side where the headrail does not obstruct motor housing features (battery port, USB charging port, remote receiver).
Battery Compartment Accessibility Check
Before screwing in the brackets permanently, hold the headrail in the installation position and confirm:
- The battery compartment or USB charging port faces toward the room and is accessible with the headrail installed
- For end-loading battery compartments: the door stile (vertical wood member beside the glass) does not block access to the end of the headrail
Weffort confirms from personal installation: “I mounted a set of battery-powered smart roller shades on my back patio French doors. The setup wasn’t as flawless as the marketing videos suggest.” Planning battery access before final bracket installation prevents this problem.
Hold-Down Bracket for Motorized Blinds
Weffort confirms: “Motorized shades require bottom hold-down brackets or magnetic catches to prevent them from swinging when the door opens.” The hold-down bracket for a motorized blind operates identically to a manual blind — the bottom rail clips in; the motor pulls the rail upward to release it before raising. Confirm the motorized blind’s hold-down bracket is compatible with the motor’s bottom rail release force — some premium motorized systems include magnetic hold-downs that auto-release when the motor signals up.
Frequently Asked Questions
How do you install blinds on French doors? Install French door blinds on the door face using outside-mount brackets. Mark headrail bracket positions 1 to 2 inches above the glass panel using a spirit level for true horizontal. Drill pilot holes with a bit 1/64 inch smaller than the screw shank diameter. Install brackets without overtightening — hand-tight plus a quarter turn. Snap in the headrail and clip the bottom rail into hold-down brackets at both corners. Run the swing test — open and close the door 10 times and verify the blind stays flat and the hold-down brackets stay clipped throughout.
Why do French door blinds need hold-down brackets? French door blinds mount on the door face and travel with the door every time it opens. Without hold-down brackets at the bottom corners, the blind hangs freely from the headrail and swings away from the door face as the door moves. Engineer Fix confirms: “stabilizing the bottom rail is necessary to counteract the force generated by opening and closing the door.” Hold-down brackets clip the bottom rail flat against the door face, eliminating the swing.
What screws should I use to install blinds on French doors? Screw type depends on door material. For solid wood French doors use #8 × 1 inch wood screws with a pilot hole. For hollow-core wood doors use #8 × 1.25 to 1.5 inch to reach internal frame members. For steel doors use #8 self-tapping metal screws that engage the steel skin with a minimum of 3 thread revolutions — do not rely on the foam fill for grip. For fiberglass doors use #8 × 1.25 inch self-tapping or coarse-thread screws.
How do I make sure French door blinds hang straight? Use a spirit level to establish true horizontal when positioning the headrail brackets, not the door frame as a reference. Settled French door frames can be off-level by 1/4 inch or more, which produces a visibly angled blind if the frame is used as the reference. Check both brackets with the spirit level before drilling pilot holes, and check the headrail again after installation by placing the level on top of the headrail.
What is the swing test for French door blinds? The swing test is the final installation check specific to French door blinds. After installing the blind and clipping the bottom rail into the hold-down brackets, open and close the door 10 times at normal operating speed. Listen for knocking (blind contacting door hardware), look for swing (blind moving away from door face), and confirm both hold-down brackets stay clipped through all 10 cycles. A blind that fails the swing test requires hold-down bracket repositioning — problems identified in the swing test are invisible with the door closed.
Related Guides on BlindShades.pro
- The Best French Door Blinds & Shades Buying Guide
- What Are the Best Blinds for French Doors
- How Do You Measure French Doors for Blinds
- Are Magnetic Blinds Good for French Doors
- How Do You Stop French Door Blinds From Swinging
- What Are the Best Vertical Blinds for French Doors
By Michael Turner | 30 Years Home Improvement Expertise | Updated 2026 | BlindShades.pro