What Is the Best Privacy Treatment for Front Door Sidelights?

Authored By Michael Turner -30 Years Home Improvement Expertise | Updated 2026 | BlindShades.pro
Updated on May 29, 2026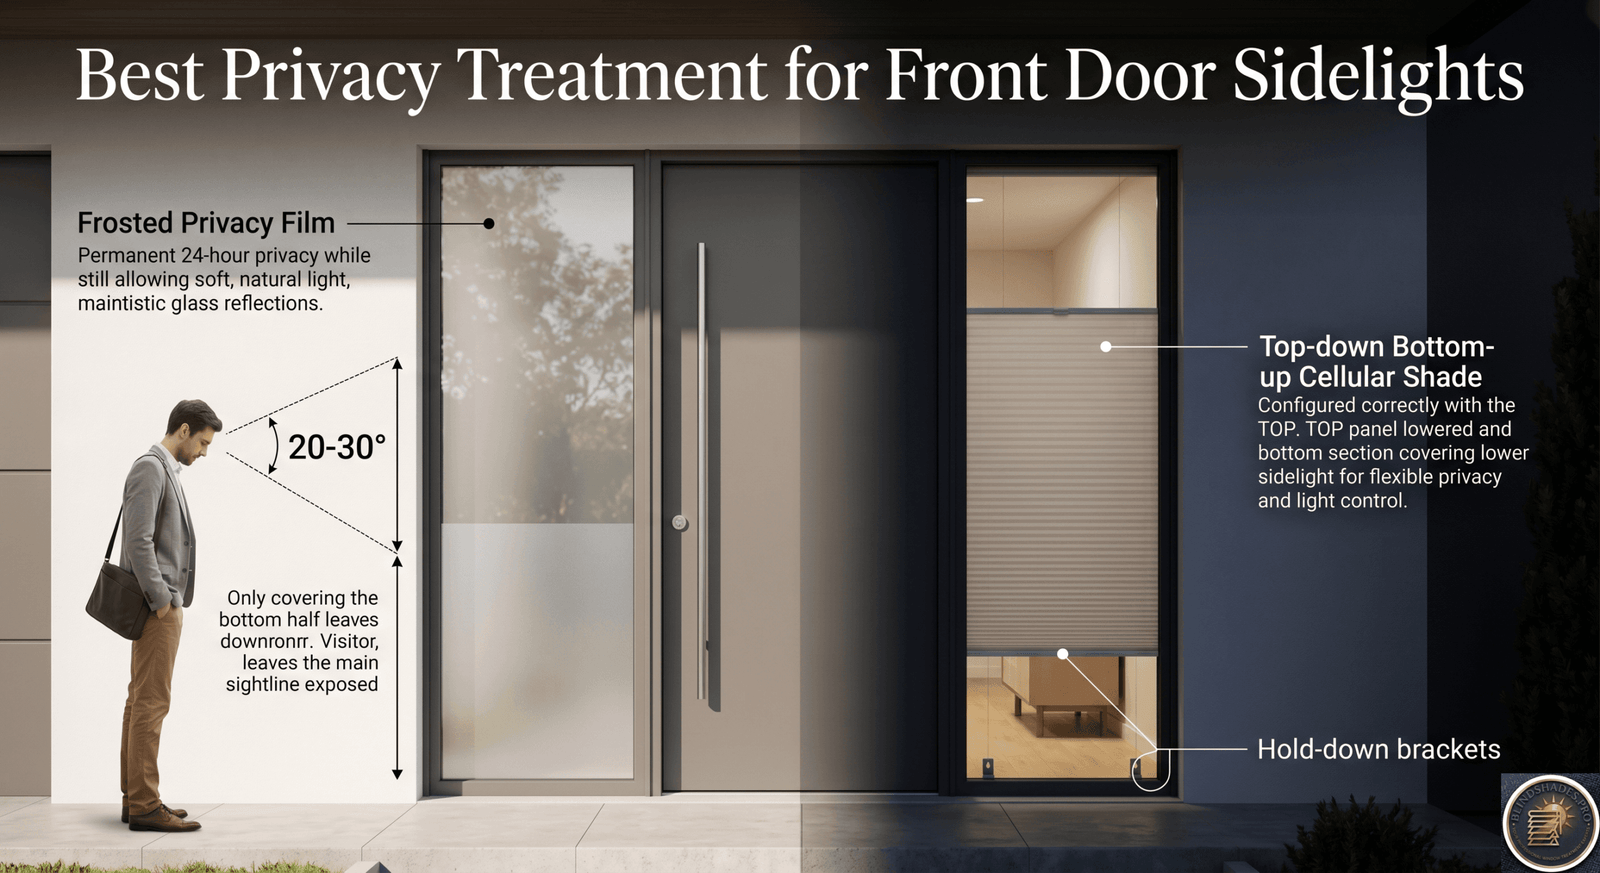
Key Takeaways:
- Most competitor guides show TDBU cellular shades with the bottom panel raised on sidelights – this is the WRONG privacy configuration; the downward 20 to 30 degree sightline from a standing visitor enters through the UPPER window zone; the top panel must be LOWERED from the headrail to cover the upper portion, not the bottom raised; covering the bottom half of a sidelight leaves the top – the primary sightline zone – fully exposed
- Answer the day-only vs 24-hour privacy question before selecting any treatment: if interior lights will be on when a visitor could be at the door, one-way mirror film and solar shades fail because the entryway chandelier creates 100 to 500 lux interior luminance against near-zero exterior – the one-way effect reverses; only frosted film or opaque adjustable shades provide 24-hour privacy
- Homes with covered porches require higher-privacy treatments than homes with open street approaches – the covered porch shades the observer, making the interior relatively brighter; this compromises the one-way privacy of solar shades even during the day when the standard test would pass
- For renters: specify static-cling privacy film (no adhesive, no drilling) at $15 to $40 per sidelight; removable without residue; avoid permanent adhesive-backed film which risks glass damage on removal
- If the entry has a transom window above the door in addition to sidelights: apply matching privacy film or treatment to all glass elements; frosted sidelights with a clear unprotected transom create both a visual inconsistency and a privacy gap at the top of the entry
⭐ Quick Answer — What Is the Best Privacy Treatment for Front Door Sidelights?
- The Five-Level Privacy Scale — Select Your Level Before Selecting a Product: No competitor guide frames front door sidelight privacy treatments on a defined scale. Level 5 (maximum — zero inward visibility at all times): frosted film, blackout cellular or roller fully lowered. Level 4 (high — good privacy day and night with some light): light-transmitting frosted film, room-darkening cellular TDBU. Level 3 (moderate — adjustable day and night): TDBU top panel down; plantation shutters louvers closed. Level 2 (daytime only — fails at night): solar shade, one-way mirror film. Level 1 (light diffusion only): sheer cellular, decorative film light pattern. Start with the Level you need — then choose a product at that Level
- The Day-Only vs 24-Hour Decision — Answer This First: The most important front door sidelight privacy purchase question: will interior lights be on when a visitor could be at the door? If yes: Level 2 treatments (solar shade, one-way mirror film) fail at night — your entryway chandelier creates 100–500 lux interior against 0–5 lux exterior at night, reversing the one-way effect and making the glass fully visible from outside. Most homes with any foyer light need Level 3 or above. Level 2 is adequate only for properties with no interior lighting when the door area is accessible — vacation homes, rear entries, or open-street approaches with strictly daytime occupancy
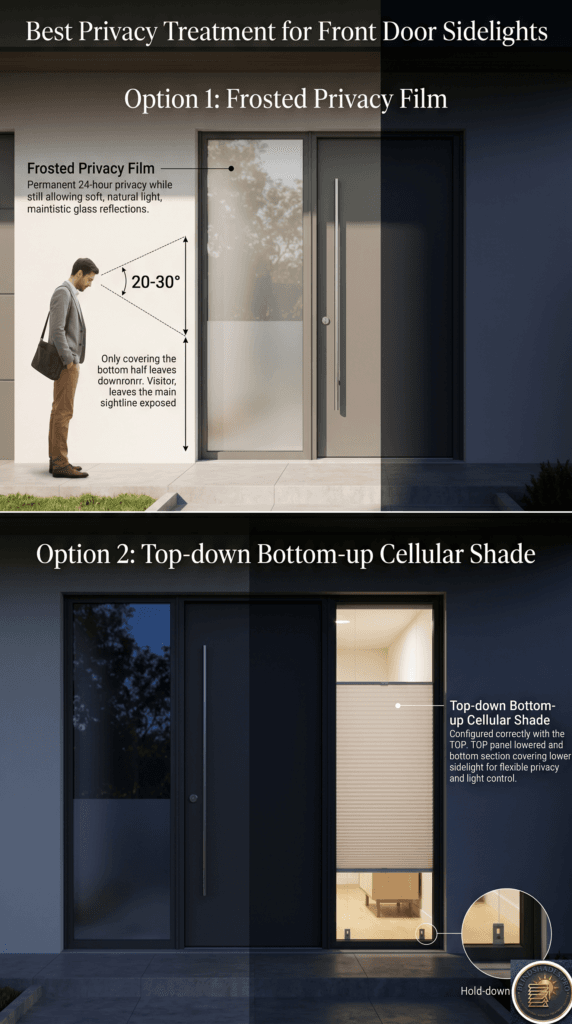
- The TDBU Top-Down Correction — Multiple Guides Show This Wrong: Most competitor guides show TDBU cellular shades on sidelights with the BOTTOM panel raised — this is the incorrect privacy configuration for sidelights. A visitor approaching the front door looks DOWN at approximately 20–30 degrees toward the sidelight; their sightline enters through the UPPER zone of the window. Raising the bottom panel leaves the top — the primary sightline zone — fully exposed. The correct configuration: lower the TOP panel from the headrail to cover the upper 50–60% of the sidelight. Hold-down brackets clip the bottom section permanently. Only the top panel is operated for daily privacy management
- Covered Porch Warning and the Renter Film Decision: Front door sidelight privacy on homes with covered porches requires Level 3 or above even for daytime privacy. A visitor in a covered porch shadow (6–12 feet deep) has lower ambient luminance than a street-level observer — the luminance differential that makes solar shade one-way film work is compromised even at midday from a porch position. Test: stand on the covered porch at midday and look toward the sidelight — if you see interior detail, the treatment is inadequate. For renters: specify static-cling privacy film only — no adhesive, no drilling; Gila Ice Chips and Gila Lasalle fit standard 12-inch by 60 to 72-inch sidelights; cost $15–$40 per sidelight; removable without residue; 1–3 year lifespan before edge peeling
- Decorative Film and Transom Coordination: Patterned adhesive film — etched glass, geometric, botanical — provides both privacy and architectural character from outside. Privacy level by density: dense geometric (Level 4, 70–80% light); medium etched pattern (Level 3–4, 75–85% light); sparse border (Level 1–2, 85–95% light). For entries where the sidelight treatment needs curb appeal as well as privacy, a medium-density etched pattern film presents as premium etched glass from the street at $25–$60 per sidelight. And if the entry has a transom window above the door: apply matching frosted film to the transom simultaneously — frosted sidelights with a clear unprotected transom create both a visual inconsistency and a privacy gap at the top of the entry
- Best Sources: Frosted and decorative film options → North American Tint film guide · TDBU cellular sidelight shades → SelectBlinds cellular range · Full custom sidelight treatment range → Blindsgalore sidelights guide
⚠️ The One-Way vs Both-Way Privacy Distinction and the Decision Tree: Choosing the best privacy treatment for front door sidelights requires knowing whether one-way or both-way privacy is needed. One-way privacy (you can see out; outsiders cannot see in daytime): one-way mirror film; solar shade; TDBU cellular with uncovered lower zone; plantation shutters with angled louvers. Both-way privacy (neither party can see clearly through): frosted film; blackout roller or cellular fully lowered; plantation shutters fully closed. The front door identification function — seeing who is approaching before opening — is preserved with one-way treatments but eliminated by frosted film and fully-closed shutters (requiring a video doorbell or peephole). Decision tree summary: (1) Need 24-hour privacy? YES = Level 3+ only. (2) Need to see out? YES = TDBU or angled louvers; NO = frosted film. (3) Renting? YES = static cling film. (4) Covered porch? YES = Level 3+. (5) Transom above door? YES = match treatment across all glass. (6) Width under 10 inches? YES = film or 1″ mini blind only. For the full five-level treatment table with day-and-night ratings, see-out ratings, and product options at each level, see What Are the Best Blinds for Sidelights. See the full five-level privacy scale below.
💡 The Static Cling vs Adhesive Film Decision and the Decorative Density Guide: For front door sidelight privacy film, the adhesive choice matters beyond cost. Static cling (non-adhesive): $15–$40 per sidelight; removable without residue; repositionable during installation; lifespan 1–3 years before edge peeling in temperature-variable or humid conditions; ideal for renters and trial installations. Adhesive-backed: $30–$100 DIY, $100–$300 professionally installed; bonds to glass; 7–15 year lifespan; professional removal recommended to avoid residue; superior durability and consistent edge seal. Decorative film density as privacy level: dense frosted uniform white (Level 4–5, 70–80% light transmission); dense repeating geometric (Level 4, 70–80%); medium etched pattern (Level 3–4, 75–85%); sparse decorative border only (Level 1–2, 85–95%); clear with frosted stripe (Level 2, 85%). A medium-density etched pattern is the best balance of privacy (Level 3–4) and curb appeal — it appears as premium etched glass from the street while transmitting 75–85% of natural light. For the full comparison of frosted film versus adjustable blinds for sidelights including cost, reversibility, and the permanent vs adjustable privacy trade-off at different privacy levels, see Is Frosted Film Better Than Blinds for Sidelights. See the full day vs night decision guide below.
📖 Read the complete guide below for: the five-level privacy scale (Level 1 sheer to Level 5 blackout/frosted with treatment mapping, see-out rating, and day-and-night rating at each level), the day-only vs 24-hour decision framework (when interior lights are on = Level 2 fails), the TDBU top-down correction (lower the top panel — NOT raise the bottom — visitor sightline enters upper window zone at 20–30 degrees), the one-way vs both-way privacy distinction (see-out preservation vs frosted both-direction obscuring), the static cling vs adhesive film decision for renters ($15–$40 vs $30–$100), the covered porch luminance differential compromise (upgrade to Level 3+ for covered porch approaches), the decorative film density-to-privacy-level table, the transom coordination requirement (matching treatment across all entry glass elements), and the full six-step privacy decision tree.
Privacy Treatment for Front Door Sidelights – The Five-Level Scale
No competitor guide has built a defined privacy scale for sidelight treatments. This scale is the framework for every purchase decision.
| Level | Privacy Type | Treatments | See-Out Preserved? | Day and Night? |
|---|---|---|---|---|
| 5 | Maximum — zero inward visibility at all times | Frosted film (permanent); blackout cellular fully lowered; blackout roller fully lowered | NO — both directions obscured | YES — 24-hour |
| 4 | High — good privacy day and night with some light | Frosted film (light-transmitting but obscured); room-darkening cellular TDBU; room-darkening roller with side channels | Partial (through uncovered zone on TDBU) | YES — 24-hour |
| 3 | Moderate — adjustable privacy with light control | TDBU cellular top panel down; plantation shutters louvers fully closed; mini blind slats fully closed | Partial (through uncovered zone) | YES if opaque fabric; NO if semi-transparent |
| 2 | Daytime only — works when exterior is brighter | Solar shade 1-3%; one-way mirror film; light-filtering roller | YES — clear outward view preserved | NO — fails at night when interior is lit |
| 1 | Minimal — light diffusion only | Sheer cellular; decorative/patterned film (light pattern); sheer roller | YES — minimal obstruction | NO — view through at all angles |
The purchase decision starts with Level selection, not product selection. Identify which privacy level you need — then identify the treatments at that level that match your budget, style, and sidelight dimensions.
The Day-Only vs 24-Hour Privacy Decision
The single most important question before selecting any front door sidelight privacy treatment — absent from all competitor guides.
The question: At what times of day will your interior lights be on when a visitor, delivery driver, or pedestrian could be at the front door?
If interior lights are off whenever the front door area is unlit externally: Level 2 treatments (solar shade, one-way mirror film) provide adequate daytime privacy — the one-way effect works when the exterior is brighter.
If interior lights will be on at night while the front door is accessible: As established in How Do You Cover a Front Door Window for Privacy, the entryway chandelier or foyer light creates 100-500 lux of interior luminance against near-zero exterior lux at night. This reverses the one-way effect — solar shades and mirror film become transparent from outside when the interior is lit.
Most residential front doors are accessible to visitors from early morning to 10pm or later. Any home with an illuminated entry at night — even a single foyer lamp — fails the night privacy test with Level 2 treatments.
The practical consequence: The majority of homeowners need Level 3, 4, or 5 privacy treatments for front door sidelights. Level 2 (solar shade, one-way film) is adequate only for:
- Rental properties or vacation homes with no evening occupancy
- Rear or side door sidelights not visible from public approaches
- Homes with covered porches (see Covered Porch note below) and strictly daytime occupancy
The Critical TDBU Configuration Error — Most Guides Get This Wrong
The most commercially significant correction in this article.
Multiple competitor guides — including Louver Shop and Blindsgalore — show TDBU cellular shades on sidelights in images with the bottom panel raised. This is the standard above-grade TDBU advice. For sidelights, it is incorrect.
Why standard TDBU advice is wrong for sidelights:
Above-grade windows: A standing observer outside looks horizontally or slightly upward toward the window. The lower zone of the window is the primary inward sightline. Raising the bottom panel to cover the lower zone is correct for above-grade windows.
Front door sidelights: A standing visitor approaching a front door looks DOWN at 20-30 degrees toward the sidelight (because the sidelight’s glass extends from near the floor to door height — the top of the glass is at or below eye level). The UPPER zone of the sidelight is the primary inward sightline from a standing observer.
The correct configuration:
- Lower the TOP panel from the headrail to cover the upper 50-60% of the sidelight
- Leave the bottom portion open for natural light entry
- The hold-down brackets keep the bottom section permanently clipped
- The top panel is the privacy element
The incorrect configuration (what many guides show):
- Raise the BOTTOM panel to cover the lower portion of the sidelight
- Leave the top portion open
- This leaves the UPPER zone — the primary sightline — completely exposed
A visual test: Stand outside your front door at normal walking approach distance (3-6 feet). Look toward the sidelight. Notice where your line of sight enters the glass — it is in the upper half. Confirm this before ordering any TDBU treatment.
One-Way vs Both-Way Privacy — The See-Out Question
The privacy specification depends on whether the homeowner needs to see out through the treatment — absent from all guides.
One-way privacy only (exterior cannot see in; interior can see out):
- One-way mirror film (daytime only)
- Solar shade (daytime only)
- TDBU cellular with uncovered lower zone (can look out through the uncovered bottom portion)
- Plantation shutters with louvers angled — can see out through louver gaps; outside observer cannot see clear details
Both-way privacy (neither interior nor exterior can see clearly through):
- Frosted film (permanent in both directions; you cannot see out through frosted glass)
- Blackout cellular fully lowered
- Plantation shutters with louvers fully closed
- Room-darkening roller fully lowered
The practical implication for front doors: The primary sidelight function before any treatment is identification — allowing the homeowner to see who is approaching before opening the door. If both-way privacy is specified (frosted film, fully-closed shutters), this identification function is eliminated — the homeowner must rely on a door viewer/peephole or a video doorbell.
The recommendation:
- For homeowners with a video doorbell or traditional peephole: frosted film provides permanent, zero-maintenance both-way privacy; identification via doorbell
- For homeowners without a doorbell camera: TDBU cellular (top panel down) or plantation shutters with partially open louvers preserves some see-out while providing adequate privacy from the primary approach angle
Static Cling vs Adhesive Film — The Rental and Temporary Coverage Decision
The renter-specific privacy specification absent from all buying guides.
Static cling (non-adhesive) privacy film:
- Attaches to glass via static electricity — no adhesive
- Removable without damage or residue
- Repositionable if misaligned during installation
- Lifespan: 1-3 years before peeling at edges in humid or temperature-variable conditions
- Cost: $15-$40 per sidelight (products: Gila Ice Chips, Artscape Cascade, Gila Lasalle)
- For renters: the only appropriate film specification (no permanent modification to the landlord’s property)
- For owners wanting temporary or trial coverage: appropriate before committing to permanent adhesive film
Adhesive-backed privacy film:
- Bonds directly to glass surface
- Lifespan: 7-15 years depending on product quality and UV exposure
- Professional removal recommended — amateur removal may leave adhesive residue or damage glass surface coating
- Cost: $30-$100 per sidelight for DIY; $100-$300 professionally installed
- For owners: appropriate for permanent privacy; superior durability; consistent coverage that does not peel at edges
The decision tree:
- Renting the property: static cling only
- Short-term ownership (moving within 3 years): static cling or removable adhesive film
- Long-term ownership (staying 5+ years): adhesive-backed film for durability, or adjustable treatment (cellular/shutters) for flexibility
The Covered Porch Privacy Consideration
The approach-angle variable that changes the privacy effectiveness of semi-transparent treatments — absent from all competitor guides.
A covered porch (standard depth 6-12 feet from the sidelight) creates a shaded approach zone. The visitor standing on the covered porch is:
- In shadow (porch ceiling blocks direct sunlight)
- Potentially much closer to the sidelight (6-8 feet vs 20-30 feet from the street)
Why this matters for privacy film selection:
Solar shade and one-way mirror film privacy rely on the exterior being brighter than the interior — the luminance differential creates the one-way effect. A visitor in a covered porch shadow has LOWER luminance around them than a visitor in open daylight. If the interior entry is lit even moderately (50-100 lux from a window or lamp), the porch shadow visitor may be in equal or lower luminance than the interior — compromising the one-way privacy effect even during the day.
The porch-adjusted privacy specification:
- Open street approach (no covered porch): Level 2 treatments (solar shade, one-way film) adequate for daytime privacy
- Covered porch (6-12 feet deep): Level 2 treatments may be inadequate even during day; specify Level 3 (opaque fabric or closed louvers) or Level 4 (frosted film) for full daytime privacy
To test: stand on the covered porch and look toward the sidelight at midday. If you can see interior detail through the current or proposed treatment from the porch shadow, the treatment is inadequate.
The Decorative Film Option — Privacy Plus Curb Appeal
The privacy + curb appeal combination that no buying guide frames as a deliberate specification.
Decorative adhesive films with etched glass, frosted geometric, or botanical patterns provide both inward privacy and architectural character visible from outside the home.
Privacy level by pattern density:
| Pattern Type | Privacy Level | Light Transmission | Curb Appeal |
|---|---|---|---|
| Dense frosted (uniform white) | Level 4-5 | 70-80% | Minimal |
| Dense geometric pattern | Level 4 | 70-80% | Moderate |
| Medium etched pattern | Level 3-4 | 75-85% | High |
| Sparse border pattern | Level 1-2 | 85-95% | Decorative only |
| Clear with frosted stripe | Level 2 | 85% | Minimal |
For homes where front door aesthetics are a priority: A medium-density etched glass pattern film provides Level 3-4 privacy (adequate for most daytime and evening conditions without interior light backlighting) while presenting an architectural etched glass appearance from the street. The effect from outside: the sidelight appears to have premium etched glass rather than film. This impression adds perceived value to the entry without the cost of actual etched or leaded glass.
Cost: $25-$60 per sidelight for adhesive-backed decorative film; $15-$30 for static-cling decorative film.
Coordinating Sidelights With Transoms
The entry system completeness check — absent from all privacy guides.
Many residential entries have a transom window (horizontal glass panel above the door) in addition to one or two sidelights. Together these form the full entry glazing system.
Why transom coordination matters for privacy: If privacy film or opaque treatment is applied to the sidelights but the transom is left untreated:
- A tall person or a visitor approaching from an elevated position (steps, sloped driveway) can see through the clear transom into the entry
- The visual appearance from outside is inconsistent — frosted sidelights flanking a clear transom looks incomplete and diminishes the architectural coherence of the entry treatment
- Night interior lighting visible through the untreated transom creates the same luminance reversal problem as an untreated sidelight
The correct approach: When applying any privacy treatment to sidelights on an entry with a transom, coordinate a matching or harmonious treatment for the transom:
- Frosted film on sidelights: same density frosted film on the transom
- TDBU cellular on sidelights: a matching flat roller shade on the transom (transoms rarely accommodate TDBU due to horizontal format)
- Plantation shutters on sidelights: matching shutters or a top-hung roller shade on the transom
For entries where the transom is high (above 7 feet) and inward visibility through it is minimal: transom treatment is primarily for visual consistency rather than privacy.
The Privacy Treatment Decision Tree for Front Door Sidelights
STEP 1: Do you need privacy when interior lights are on?
   YES → Level 3, 4, or 5 treatments only (film, opaque cellular, opaque roller, shutters)
   NO → Level 2 treatments possible (solar shade, one-way mirror film)

STEP 2: Do you want to see OUT through the sidelight?
   YES → TDBU cellular (top panel down) with uncovered bottom zone, OR plantation shutters with angled louvers
   NO → Frosted film (both-way privacy), OR blackout shade fully lowered

STEP 3: Is this a rental property?
   YES → Static cling film ($15-$40), OR tension-rod panel (no drilling)
   NO → Adhesive-backed film, TDBU cellular, plantation shutters, or roller shade

STEP 4: Is there a covered porch at the approach?
   YES → Upgrade to Level 3 or above even for daytime-only privacy
   NO → Level 2 may be adequate for daytime-only privacy from open street

STEP 5: Is there a transom window above the door?
   YES → Coordinate privacy treatment across all glass elements
   NO → Proceed with sidelight-only specification

STEP 6: Is width under 10 inches?
   YES → Film or 1-inch mini blind only (see Article 45-3 for narrow sidelight guide)
   NO → Full range available at your selected privacy level
Where to Order
For TDBU cellular sidelight shades (Level 3-4 adjustable privacy specification): SelectBlinds TDBU cellular range at selectblinds.com/cellular-shades — specify: cordless TDBU, room-darkening or blackout fabric, hold-down brackets, outside mount. Confirm the top panel can be independently operated downward from the headrail (not all TDBU systems operate this way).
For frosted and decorative privacy film (Level 3-5 permanent specification): North American Tint frosted film guide at northamericantint.com covers frosted film options with the UV blocking, light transmission, and privacy effectiveness data needed for the correct film selection. Blindsgalore sidelights at blindsgalore.com/sidelights for the full custom adjustable treatment range.
Frequently Asked Questions
What is the best privacy treatment for front door sidelights? The best privacy treatment for front door sidelights depends on whether 24-hour privacy is required and whether the homeowner needs to see out through the treatment. For 24-hour permanent privacy: frosted adhesive film at Level 4 provides strong privacy in both directions at all times, transmits natural light, and requires no daily operation. For adjustable 24-hour privacy: TDBU cellular shade with the top panel lowered to cover the upper 50 to 60 percent and hold-down brackets at the bottom provides privacy from the primary 20 to 30 degree downward sightline while preserving light from the lower window. For daytime-only privacy from an open street approach with no covered porch: one-way mirror film or solar shade provides adequate daytime coverage but fails at night when interior lighting reverses the luminance differential.
Why should the top panel of a TDBU shade be lowered rather than the bottom raised on a front door sidelight? The top panel should be lowered on sidelight TDBU shades because a standing visitor approaches the front door and looks down at approximately 20 to 30 degrees toward the sidelight glass. This downward sightline enters through the UPPER portion of the sidelight window. Covering the bottom half with the standard above-grade TDBU configuration (raise the bottom panel) leaves the top portion of the sidelight glass exposed – exactly the zone where the visitor’s inward sightline enters. The correct configuration for sidelights is to lower the top panel from the headrail to cover the upper 50 to 60 percent where the sightline enters, while the bottom section remains open below for light entry.
Does a covered porch affect front door sidelight privacy treatment selection? Yes – a covered porch changes the privacy calculation for solar shades and one-way mirror films. These treatments rely on the exterior being brighter than the interior to create the one-way privacy effect. A visitor standing in a covered porch shadow has lower ambient luminance around them than a visitor standing in open daylight. If the interior entry has any ambient lighting, the luminance differential required for one-way privacy may be reduced or reversed even during the day. Homes with covered porches should specify Level 3 or above privacy treatments (opaque fabric or frosted film) rather than relying on solar shades or mirror film for daytime privacy from porch-level approach positions.
Can renters use privacy film on sidelights without damaging the glass? Yes – static cling (non-adhesive) privacy film products sized for sidelights can be applied and removed without adhesive residue or damage to the glass surface. Static cling film products including Gila Ice Chips, Gila Lasalle, and Artscape Cascade are sized to fit standard 12-inch wide by 60 to 72-inch sidelight dimensions. Static cling film costs $15 to $40 per sidelight and has a lifespan of 1 to 3 years before peeling at edges may occur. Adhesive-backed film should be avoided in rental properties because removal may leave residue or risk surface damage and potential landlord claims.
Should sidelight privacy treatments be coordinated with a transom window above the door? Yes – if the entry has a transom window above the door in addition to sidelights, the privacy treatment should be coordinated across all glass elements. Frosted film on sidelights with an untreated clear transom creates both an inconsistent visual appearance from outside and a privacy gap at the top of the entry through which a tall person or elevated visitor can see. Apply matching frosted film of the same density to the transom, or specify a complementary treatment such as a flat roller shade for the horizontal transom format.
Related Guides on BlindShades.pro
- The Best Sidelights and Front Door Blinds Buying Guide
- What Are the Best Blinds for Sidelights
- How Do You Cover a Front Door Window for Privacy
- Is Frosted Film Better Than Blinds for Sidelights
- How Do You Add Privacy to Sidelights Without Blocking Light
By Michael Turner | 30 Years Home Improvement Expertise | Updated 2026 | BlindShades.pro
