Why Is Light Coming Through the Sides of My Blackout Blinds — How to Fix Light Gaps
Authored By Michael Turner -30 Years Home Improvement Expertise | Updated 2026 | BlindShades.pro
Updated on May 12, 2026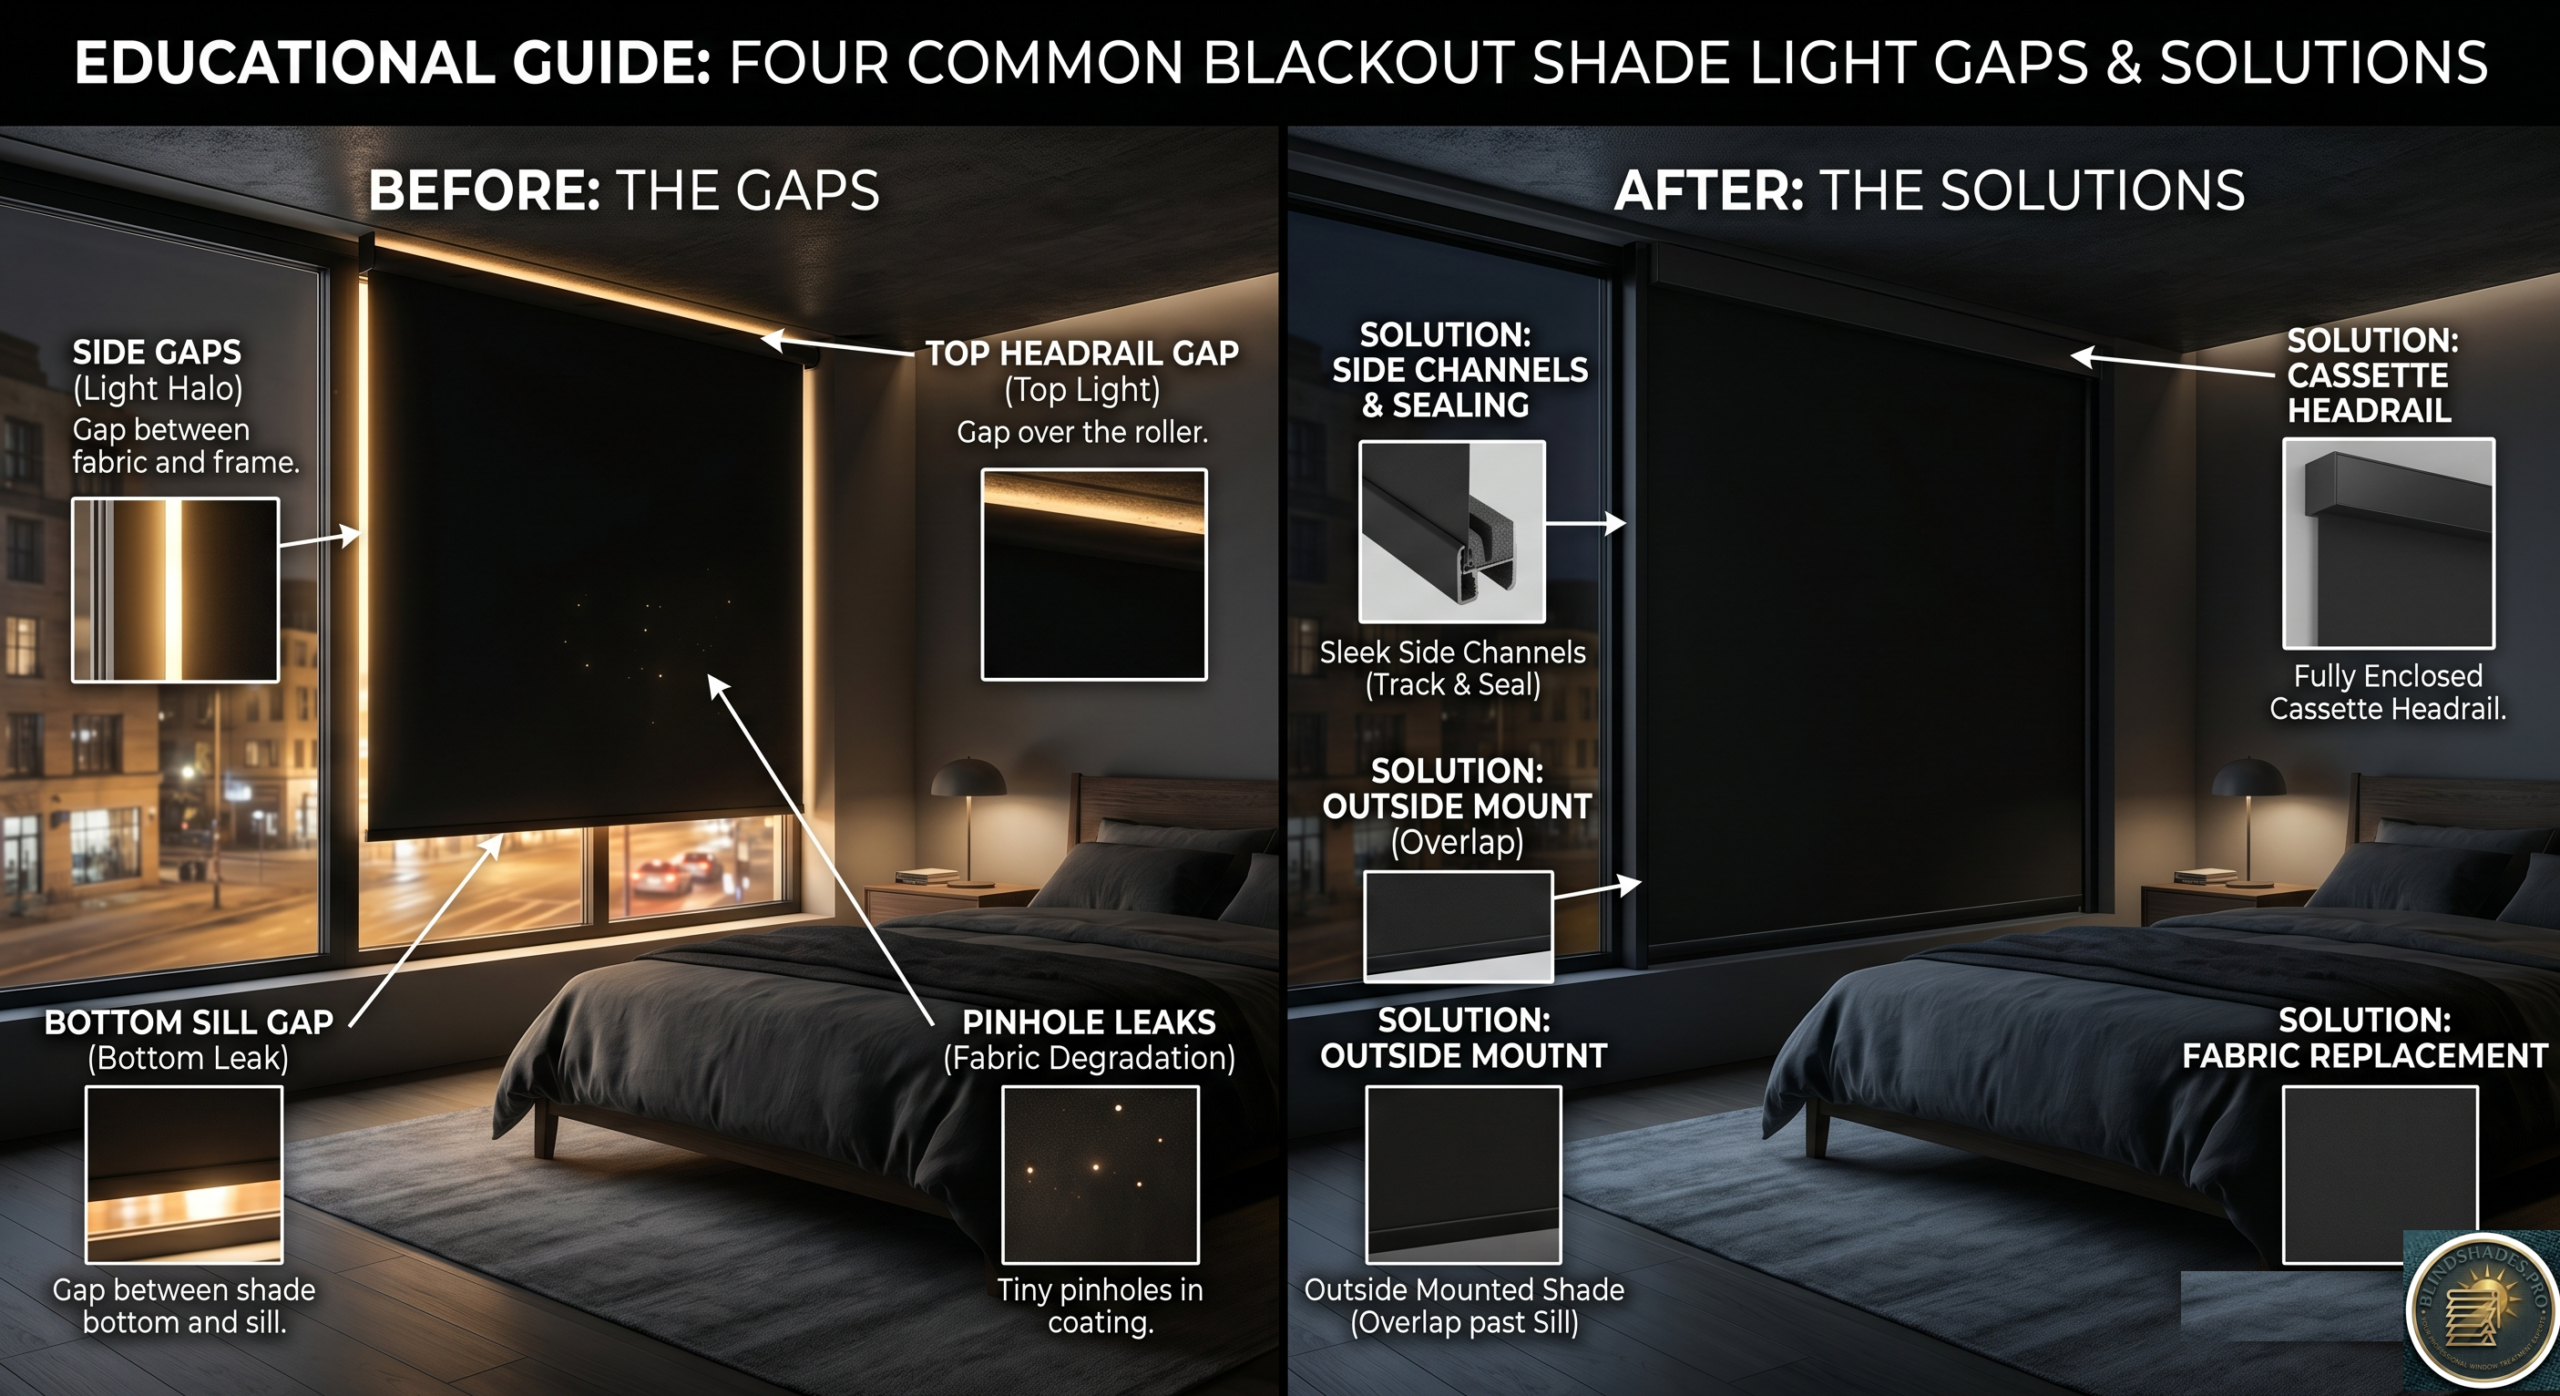
⭐ Quick Answer — Why Is Light Coming Through My Blackout Blinds, and How Do I Fix It?
- Diagnose the Gap Type First — There Are Four: (1) Side gaps — vertical light on left/right of shade fabric (most common) · (2) Top headrail gap — horizontal light strip at very top above the shade, worst when viewed from bed · (3) Bottom sill gap — shade doesn’t reach the sill (common in shorter windows) · (4) Pinhole dots through fabric — triple-pass coating has cracked; shade needs replacing. Each gap type needs a different fix
- The $3–$8 Fix Nobody Mentions: Self-adhesive closed-cell foam weather stripping (at every hardware store) applied to the window frame at the shade fabric edge position. When the shade is pulled down, the fabric compresses against the foam — blocking the side gap. Universal, removable (important for renters), and costs $3–$8 vs $15–$30 for proprietary light blockers
- For the Top Headrail Gap: Specify a cassette headrail — encloses the roller tube in a housing that covers the top gap. Or apply a strip of blackout window film to the glass area above the headrail position (permanent, $8–$15, no hardware). The top gap is often worse than side gaps when viewed from bed looking up at the window
- Outside Mount — Wall Surface, Not Just Window Casing: True gap elimination requires mounting the shade on the wall surface (3–4 inches beyond the casing on all sides, 2–3 inches below sill) — not just on the window casing. Casing-only outside mount still leaves the casing-to-wall transition visible. Wall-surface mount is the hotel room specification
- The 7-Solution Cost-Performance Ranking: Foam weather stripping $3–$8 (70–85%) · Light blockers $15–$30 (80–90%) · Blackout film strip $8–$15 (top gap 95%+) · Outside mount wall surface $30–$80 (95%+) · Cassette + side channels $80–$150 (90–95%) · Blackout curtains $40–$100 (95%+)
- Best Sources: Blackout + side channels → Blindsgalore Blackout Roller with Side Channels · Cellular blackout → SelectBlinds Premier Blackout Cellular · Premium with LightLock → Hunter Douglas Duette
⚠️ The Pinhole Dot Problem — and Why the Bottom Sill Gap Is the Most Overlooked: If you see dozens of small bright dots scattered across the fabric (not just at the edges), this is not a gap problem — it is triple-pass acrylic coating degradation. The coating has cracked under repeated rolling stress (typically after 5–8 years of daily use). No edge fix will help. The shade needs replacement — specify woven blackout fabric next time (no coating to crack). And the most overlooked gap type is the bottom sill gap — in east-facing bedrooms, low-angle morning sunlight travels along the floor and enters directly under a shade that doesn’t reach the sill. Fix: outside mount specification extending the shade 2–3 inches below the sill level. See the full four-gap diagnostic guide below.
💡 Why the Gap Exists — and the Cassette + Side Channel System Explained: Every blackout blind must be made 1/4 to 3/8 inch narrower per side than the window frame so the fabric doesn’t abrade on the frame during operation. This mechanical deduction is unavoidable on inside-mount installations. The most complete factory-built solution is a cassette headrail with integrated side channels: the cassette encloses the roller tube (eliminating the top gap), and the channels guide the fabric edge against the frame (eliminating side gaps). Only the bottom sill gap remains. This is the hotel room specification. The Hunter Douglas Duette LightLock system takes it further with U-shaped channels that overlap both front and back of the shade fabric edge for near-total gap elimination. See the full fix guide with the cost-performance comparison table below.
📖 Read the complete guide below for: the four gap types with appearance description and primary cause of each, the complete fix guide ranked by cost and effectiveness (7 solutions from $3 to $150), the mechanical deduction explained (why every blind has this gap), the foam weather stripping application method step by step, why the top headrail gap is worse from bed than standing, the distinction between wall-surface vs window-casing outside mount, blackout window film for the top gap, and the cassette headrail system explained.
Why Blackout Blinds Always Have Some Light Gap — The Physics
Before diagnosing your specific gap type, it is important to understand why every blackout blind, shade, or roller treatment on the market creates some light gap around the edges. This is not a quality defect or installation error.
The mechanical clearance requirement: Every roller shade operates on a rotating tube. When you raise the shade, the fabric winds around this tube. The tube sits in bracket supports at each end of the headrail. If the shade fabric were cut to the exact same width as the window frame opening, two problems would occur:
- The fabric edges would contact the window frame sides as they travel up and down, causing abrasion, fraying, and eventual damage to the fabric
- The end caps and brackets that hold the tube would physically prevent the shade from fitting into the frame
The standard mechanical deduction: To accommodate the tube, brackets, and end caps without frame contact — shade manufacturers must make the fabric narrower than the measured window width. The standard mechanical deduction is approximately:
- Inside-mount roller shades: 1/2 to 3/4 inch total (approximately 1/4 to 3/8 inch per side)
- Cellular shades: 1/4 to 1/2 inch total (approximately 1/8 to 1/4 inch per side, as the folding mechanism requires less tube diameter clearance)
- Venetian/faux-wood blinds: 3/8 to 1/2 inch total
Custom vs stock blinds: A stock blind purchased in a fixed width has a larger potential gap because it is unlikely to match your exact window width. A custom blind ordered to your specific measurement minimises the gap to the smallest mechanical limit — but cannot eliminate it entirely within an inside-mount installation.
The Four Types of Light Gap — Diagnose Yours First
All competitor guides treat “light gap” as a single undifferentiated problem. There are actually four distinct gap types, each with a different primary cause and a different most-effective fix.
Gap Type 1 — Side Gaps (Left and Right of Fabric)
Appearance: Two vertical strips of light visible on the left and right sides of the shade when it is closed. Most commonly described as the “halo effect” on the sides of the window.
Cause: The mechanical deduction — the fabric must be narrower than the window frame. The gap width equals the tube radius + bracket width + clearance allowance, which typically produces 1/4 to 3/8 inch of exposed frame on each side.
Fixes ranked by effectiveness: See the Fix Guide section below.
Gap Type 2 — Top Headrail Gap
Appearance: A horizontal strip of light visible at the very top of the window, above the shade fabric, where the headrail mechanism sits. Especially visible when lying in bed looking upward toward the window.
Cause: The roller tube, when the shade is fully lowered, still sits in its headrail bracket at the top of the window frame. The fabric cannot cover the headrail itself. In an inside-mount installation, the headrail takes up 1 to 2 inches of space at the top of the frame, leaving a gap of light between the headrail and the frame ceiling.
Commonly overlooked reason: This gap is frequently the most important source of light for people lying in bed — the angle of view from a lying position looks directly upward at the top gap. Standing in the room, the top gap may appear minor; lying in bed, it can be the dominant light source.
Fixes:
- Cassette headrail — the most effective solution; encloses the tube in a housing that reaches to the frame ceiling
- Blackout window film strip applied to the glass area above the shade headrail — permanent, no hardware
- Outside mount extending the shade to the wall surface above the window — covers the headrail gap entirely
Gap Type 3 — Bottom Sill Gap
Appearance: A horizontal strip of light visible at the very bottom of the window, at the sill level. The shade fabric does not fully reach the sill.
Cause: When a shade is ordered for inside mount and the window has a shallow recess, the shade fabric may not extend all the way to the sill when fully lowered — particularly in smaller windows where the shade roll (the wound-up fabric around the tube) has a significant diameter that “uses up” fabric length before the shade reaches sill level.
Most commonly overlooked: In all competitor guides, the bottom gap is almost never mentioned despite being a frequent contributor to bedroom light entry — particularly in east-facing bedrooms where morning light enters at a low angle that travels along the floor and up through the bottom sill gap.
Fix:
- Outside mount specification extending the shade below the sill level by 2–3 inches
Gap Type 4 — Pinhole Gaps Through the Fabric
Appearance: Dozens to hundreds of small bright dots visible through the shade fabric when lowered in full daylight. Not a line of light at the edges — points of light distributed across the fabric surface.
Cause: Triple-pass acrylic coating degradation. The acrylic foam layer applied to the back of the blackout fabric has cracked at stress points created by the rolling mechanism. Each crack admits a pinhole of light. This typically occurs after 5–8 years of daily operation, especially in dry climates or hot rooms.
Fix: This gap type cannot be repaired. A shade showing pinhole light transmission through the fabric has reached end of functional life and requires replacement. When replacing — specify woven blackout fabric (no coating to degrade) rather than triple-pass coated fabric for longer service life. See What Is the Difference Between Blackout Shades and Room-Darkening Shades for the full construction comparison.
The Complete Fix Guide — All Solutions Ranked by Cost and Effectiveness
Fix 1 — Foam Weather Stripping (DIY, $3–$8)
What it is: Self-adhesive closed-cell foam strips sold at every hardware store for door and window sealing. Standard 3/8 inch × 1/4 inch or 1/2 inch × 3/16 inch foam weather stripping.
How to apply: Clean the inside surface of the window frame on both sides. Cut the foam to the height of the window. Press the adhesive foam strip to the window frame surface at the position where the shade fabric edge passes when lowered. When the shade is pulled down, the fabric edge compresses slightly against the foam, creating a soft seal that blocks the side gap.
Advantages:
- Cost: $3–$8 for a full window
- Available at every hardware store immediately
- Works with any shade brand and any window type
- Fully removable without damage (important for renters)
- Can be replaced when compressed
Limitations:
- Requires the shade to be pulled to the same position each time for consistent sealing
- Slight compression pressure on the fabric edge over time
- Does not address top or bottom gaps
Why no competitor guide mentions this: Foam weather stripping is a general hardware product, not a window treatment product. It doesn’t generate affiliate commission from blind retailers. It is the most universally practical DIY fix for side gaps and costs less than a cup of coffee.
Fix 2 — Proprietary Light Blocking Strips ($15–$30)
What they are: Brand-specific adhesive vinyl or foam strips (called “light blockers” or “light gap blockers”) designed to attach to the window frame alongside specific shade products. Available from Blinds.com, Blindsgalore, and SelectBlinds as add-ons to new orders.
Advantages:
- Designed to integrate with specific shade mechanisms
- Clean appearance when installed correctly
- Available in matching colours for some brands
Limitations:
- Brand-specific — often not compatible with other manufacturers’ shades
- More expensive than foam weather stripping for equivalent function
- Must be ordered with or after the specific shade purchase
Best use: Order light blockers at the same time as a new shade from the same retailer for a matched product set.
Fix 3 — Cassette Headrail with Side Channels ($80–$150 additional)
What it is: A cassette headrail is a three-sided housing (top + both sides) that completely encloses the roller tube. When the shade is fully lowered, the cassette fills the space from the tube down to the fabric — covering the top headrail gap that no side channel alone can address. When combined with integrated side channels that guide the fabric edge against the window frame sides, the cassette + side channel system addresses Type 1 (sides) and Type 2 (top) gaps simultaneously.
This is the single most complete edge gap solution available for new shade orders. It is the standard specification for hotel rooms, nurseries, and media rooms where complete darkness is required.
Why no competitor guide fully explains this: Most guides mention side channels but treat them as separate from the headrail. The cassette + side channel as a combined system for addressing both top and side gaps simultaneously is never explained.
Where to order:
- Blindsgalore Blackout Roller Shade with Side Channels — cassette headrail + channel system available
- Hunter Douglas Duette LightLock — the premium cellular blackout with factory-integrated U-shaped channels covering top, sides, and partial bottom
- SelectBlinds with light blocker upgrade
Remaining gap after cassette + side channels: Only the bottom sill gap, addressed by outside mount or extension below sill.
Fix 4 — Outside Mount with Wall Overlap (most effective overall, $20–$50 additional shade cost)
What it is: Mounting the shade above and beyond the window frame on the wall surface, so the shade fabric overlaps all four edges of the window opening.
The critical distinction no guide makes: There are two different “outside mount” specifications:
Outside mount on the window casing (frame): The shade brackets attach to the window casing (the decorative trim surrounding the window). This positions the shade 1–3 inches beyond the glass edge. It eliminates side gaps against the glass but still leaves the casing-to-wall transition visible — small light may enter at the very edges where the casing meets the wall.
Outside mount on the wall surface (true gap elimination): The shade brackets attach directly to the drywall or plaster wall surface, 3–4 inches above and 3–4 inches to each side of the window casing. The shade fabric then overlaps the casing entirely. The window is fully covered by the shade, and the casing perimeter is under the shade fabric. This is the specification used in hotel rooms and the correct approach for shift workers who need true darkness.
Specification for wall-surface outside mount:
- Add 6–8 inches to measured window width for total shade width
- Add 4–6 inches to measured window height for total shade height
- Extend at least 2–3 inches below the sill to eliminate bottom sill gap
- Use appropriate wall anchors (toggle bolts for drywall, wood screws where studs are accessible)
Fix 5 — Blackout Window Film Strip for Top Gap ($8–$15)
What it is: A strip of blackout window film (available from 3M and other manufacturers as cut-to-size rolls) applied to the glass surface of the window above the headrail position.
How to apply: With the shade in the lowered position, mark the top edge of the headrail position on the glass. Apply blackout film to the glass area between the top of the headrail and the top of the glass. The film is permanent, optically eliminates this glass area, and requires no hardware.
Best use: Top headrail gaps in inside-mount installations where the shade cannot be moved or replaced.
Not suitable for: Windows where the top glass area provides important daylight or view when the shade is raised.
Fix 6 — Blackout Curtains Layered Over the Shade ($40–$100)
What it is: Ceiling-mounted or wall-mounted curtain track with blackout-lined panels hung to cover the window and surrounding wall. When closed, the curtains cover all four edges of the shade, eliminating side, top, and bottom gaps simultaneously.
Advantages:
- Addresses all four gap types simultaneously
- Adds acoustic benefit (NRC 0.20–0.35 lined drape)
- Provides decorative flexibility
- Can be paired with any existing shade without replacing it
Limitations:
- Requires ceiling or wall mounting — structural anchor points needed
- Takes up floor space when open
- Adds cost and installation complexity
The Cost-Performance Comparison — Complete Table
| Fix | Cost | Addresses | Effectiveness | Reversible |
|---|---|---|---|---|
| Foam weather stripping | $3–$8 | Side gaps | 70–85% | ✅ |
| Proprietary light blockers | $15–$30 | Side gaps | 80–90% | Partial |
| Blackout film strip (top) | $8–$15 | Top gap | 95%+ | Partial |
| Cassette + side channels | $80–$150 | Sides + top | 90–95% | ❌ (built-in) |
| Outside mount (casing) | $20–$50 | Sides + top + partial | 85–90% | ❌ |
| Outside mount (wall surface) | $30–$80 | All four gap types | 95%+ | ❌ |
| Blackout curtains layered | $40–$100 | All four gap types | 95%+ | ✅ |
The Fix Priority Sequence — What to Do First
If you already have installed blackout blinds and see light:
- Check for pinhole gaps (Type 4) first — look at the fabric in full daylight. If you see dozens of dots of light through the fabric, the coating has degraded and the shade needs replacing (no edge fix will help).
- Identify which gap types are present — side, top, bottom, or all three.
- Try foam weather stripping first ($3–$8, hardware store, today) — it is the lowest-cost, immediately available solution for side gaps.
- Add blackout curtains if foam stripping is insufficient and you want a complete all-in-one solution covering all gap types.
If you are ordering new blackout blinds:
- Specify outside mount with wall surface anchoring (3–4 inches beyond casing on all sides, 2–3 inches below sill).
- If inside mount is required — specify cassette headrail with side channels as part of the shade order.
- Order in charcoal or dark colour to minimise interior light reflection (see What Is the Difference Between Blackout Shades and Room-Darkening Shades for the colour effect on perceived darkness).
Where to Order — For New Blackout Shades with Edge Gap Solutions
Best mid-range complete blackout specification: Blindsgalore Blackout Roller Shade — order with light blocking side channels add-on. Specify outside mount for new installations. Phifer SheerWeave blackout fabric options available for commercial applications.
Best cellular blackout with factory-integrated side channels: Hunter Douglas Duette with LightLock — the LightLock system uses U-shaped side channels that overlap front and back of the shade, providing the tightest factory-integrated edge sealing available. Premium price point but the most complete out-of-box blackout solution without additional DIY fixing.
Best value blackout with side channel option: SelectBlinds Premier Blackout Cordless Cellular — add light blocker upgrade at order time. Good edge sealing for the price, especially in cellular construction which has naturally smaller gaps than roller shades.
Frequently Asked Questions
Why is light coming through the sides of my blackout blinds? Light enters around the sides of blackout blinds because all roller shades and cellular shades must be made slightly narrower than the window frame to avoid friction damage during operation. The standard mechanical deduction is approximately a quarter to three-eighths of an inch per side for custom blinds, or larger for stock blinds that do not match your window width precisely. This side gap is not a defect — it is a mechanical requirement. Fix options include foam weather stripping ($3 to $8 from any hardware store), proprietary light blocking strips ($15 to $30), or cassette headrail with integrated side channels ($80 to $150 additional) for the most complete built-in solution.
How do I fix light coming in from the top of my blackout blind? Light entering at the top of a blackout blind comes from the headrail gap — the space between the roller tube housing and the top of the window frame. A cassette headrail addresses this by enclosing the tube in a housing that reaches to the frame ceiling. Alternatively, blackout window film applied to the glass area above the headrail position permanently covers this gap without additional hardware. For new installations — outside mount positioning the shade on the wall surface above the window casing eliminates the top headrail gap entirely.
Is there a cheap way to stop light coming through the sides of blackout blinds? Yes — self-adhesive closed-cell foam weather stripping sold at any hardware store for $3 to $8 per window. Clean the inside surface of the window frame on both sides, cut the foam to window height, and press the adhesive strip to the frame at the position where the shade fabric edge rests when lowered. When the shade is pulled down, the fabric edge compresses against the foam creating a soft seal that blocks side light. This solution is universal (works with any brand), immediately available, fully reversible, and costs a fraction of proprietary light blocker strips.
Why does my blackout blind have dots of light through the fabric? Dozens of small pinhole dots of light visible through the blackout fabric — not at the edges — indicate that the triple-pass acrylic coating on the back of the fabric has cracked or delaminated. This occurs typically after 5 to 8 years of daily rolling and unrolling, especially in dry or hot environments. The coating material (acrylic foam) is different from the woven fabric base and eventually separates under repeated mechanical stress. This type of light gap cannot be fixed — the shade requires replacement. When replacing, specify woven blackout fabric rather than triple-pass coated fabric for longer service life.
What is the most effective way to eliminate all light gaps on blackout blinds? The most effective approach combines outside mount installation on the wall surface (not just the window casing) with a cassette headrail and side channels. Outside mount on the wall surface positions the shade 3 to 4 inches beyond the window casing on all sides and 2 to 3 inches below the sill, covering all four gap locations. The cassette headrail eliminates the top headrail gap. Layering blackout curtains on a ceiling-mounted track over this setup provides complete redundant coverage and the highest acoustic benefit. This combination is the specification used in hotel rooms, nurseries for light-sensitive babies, and home theatre rooms.
Related Guides on BlindShades.pro
- The Best Bedroom Blinds & Shades Buying Guide — the complete bedroom specification guide
- What Is the Difference Between Blackout Shades and Room-Darkening Shades — fabric construction, triple-pass coating, and shade colour effects on darkness
- Blackout Roller Shades vs Blackout Cellular Shades — Which Is Better for a Bedroom — the full product comparison including gap size difference
- What Are the Best Blinds for a Nursery — Blackout, Cordless and Safety Guide — nursery-specific complete blackout specification
- How Do I Measure Windows for Blackout Blinds — Inside Mount vs Outside Mount Guide — the full measurement and mount decision guide
By Michael Turner | 30 Years Home Improvement Expertise | Updated 2026 | BlindShades.pro