How to Restring Venetian Blinds: A Step-by-Step Guide
Authored By Michael Turner -30 Years Home Improvement Expertise | Updated 2026 | BlindShades.pro
Updated on June 19, 2026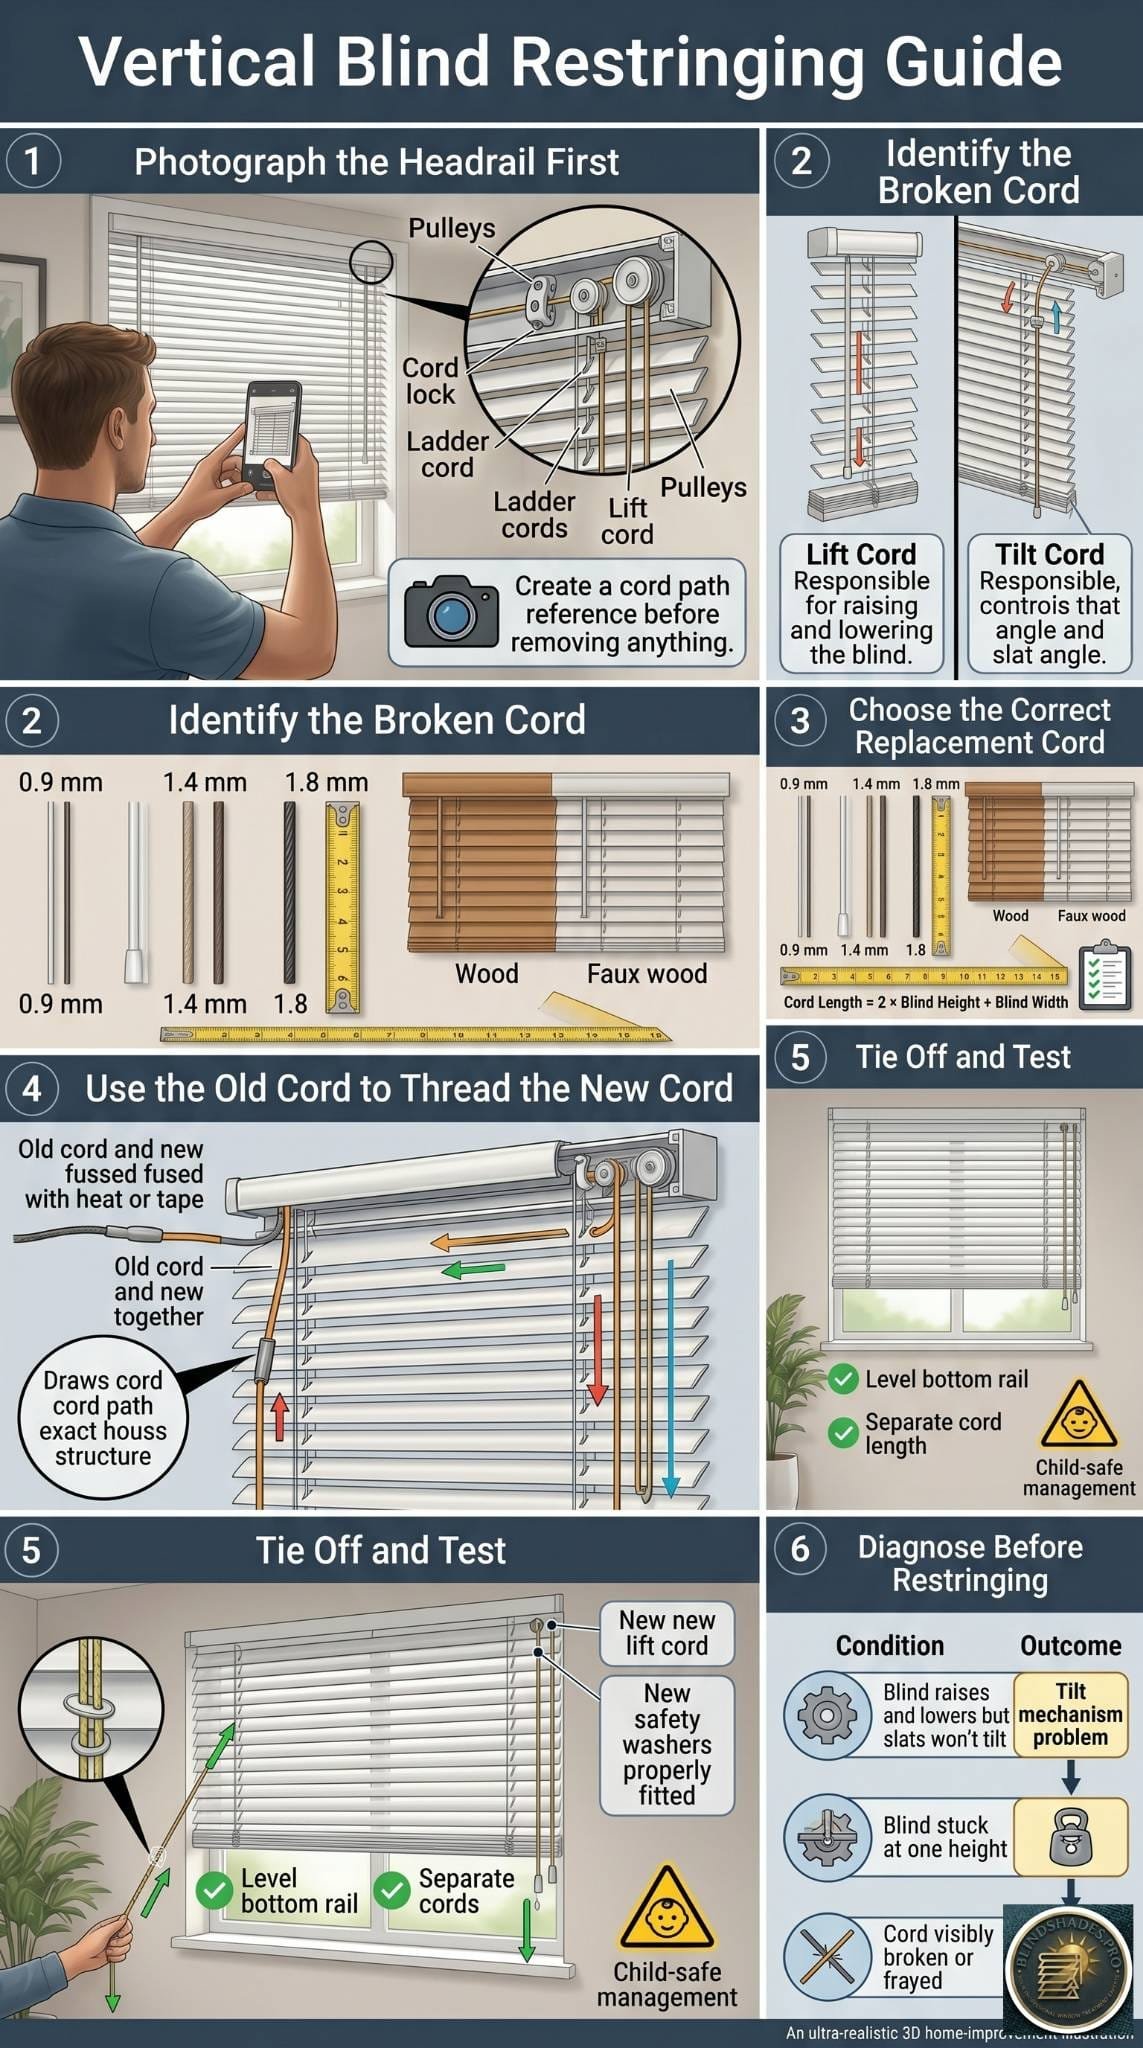
Authored by Michael Turner — 30 Years of Home Improvement Expertise | BlindShades.pro
To restring Venetian blinds, photograph the headrail cord path first, identify whether the broken cord is the lift cord or the tilt cord, buy matching replacement cord, then use the old cord as a threading guide: fuse the new cord to the end of the old one and pull the old cord out, dragging the new cord through the exact same path. Tie it off with the lift cords no longer than 40 percent of the blind’s length for child safety, and test that both sides rise evenly. Done right, it is a one-hour repair that saves replacing the whole blind.
Key Takeaways
- The single most important step happens before you touch a cord: photograph the headrail. Take clear photos of exactly how the cord routes through each pulley, channel, the cord lock, and the tilt mechanism. Restringing fails most often not because it is hard, but because people cannot remember the original path once the old cord is out. A photo is your map back.
- Use the old cord as your threading tool — do not rethread from scratch. Fuse the end of the new cord to the end of the old cord with a lighter (or tape them tightly together), then pull the old cord out from the other end. It drags the new cord through the slats, route holes, and headrail along the identical path, which is far faster and far less error-prone than feeding new cord blind.
- Know which cord broke first, because lift and tilt cords are different repairs. The lift cord raises and lowers the blind and runs down through the holes punched in every slat; the tilt cord angles the slats and runs only over a pulley at the top. Restringing the wrong one wastes an afternoon.
- Replace all the lift cords, not just the broken one. Lift cords fray because they saw back and forth through the route holes in the slats year after year, so if one has worn through, the others are not far behind. Doing them all at once saves repeating the job.
- Restring is the moment to make the blind child-safe. Keep the lift cords no longer than 40 percent of the blind’s length, fit the safety washers, leave the cords hanging separately rather than tied together, and use a cleat. If the blind is old and keeps breaking, replacing it with a cordless model is the safer long-term answer.
⭐ Quick Answer
How to restring Venetian blinds in about an hour: photograph the cord path, identify the broken cord, then use the old cord to pull the new one through the exact same route.
- Photograph the headrail first. Before anything comes apart, take clear photos of how the cord runs through the pulleys, the cord lock, and the tilt mechanism — it is your map back, and the step almost every guide skips.
- Identify which cord broke: the lift cord (raises the blind, runs through the slats) or the tilt cord (angles the slats, runs over a top pulley). They are different repairs.
- Buy matching cord. Most blinds use 0.9mm to 1.8mm cord, with 1.4mm or 1.8mm common on wood and faux wood, per Engineer Fix. Allow about twice the height plus the width per lift cord.
- Use the old cord to pull the new one through. Fuse the new cord to the old cord end with a lighter, then draw the old cord out — it drags the new cord along the exact path, as Fix My Blinds describes. Replace all the lift cords, not just the broken one.
- Tie off child-safe: keep lift cords under 40 percent of the blind length, fit the safety washers, and leave cords separate — the Window Covering Safety Council standard. If it keeps breaking, consider a cordless model from our best Venetian blinds guide. Not sure it is the cord? Check won’t go up or down and slats won’t close first.
Can You Restring Venetian Blinds Yourself?
Yes for most standard wood, faux wood, and aluminum blinds — but a cheap blind is often cheaper to replace, and some types are not worth the effort.
Restringing a standard Venetian blind is well within reach of anyone comfortable with simple hands-on tasks. You need replacement cord, scissors, a small screwdriver, a lighter, and patience. The repair restores a blind that would otherwise be thrown away, which makes it both economical and the lower-waste choice.
That said, it is worth being honest about when restringing is the right call:
- A basic aluminum mini blind is often cheaper to replace than the cord and the hour it takes. If the blind cost very little new, weigh that before committing.
- Bamboo, woven wood, pleated, and motorized blinds have integrated or delicate mechanisms that are genuinely difficult, and AtoZ Blinds and other repair specialists flag these as poor DIY candidates. Leave those to a professional or replace them.
- A quality wood or faux wood Venetian blind is exactly the case where restringing pays off — the blind is worth keeping, the parts are cheap, and the method below is reliable.
If your blind passes that gate, read on.
Before You Start: Photograph the Headrail and Identify the Cord
Take photos of the exact cord path first — this is the step that makes or breaks the whole repair.
This is the move almost every guide skips and the one that separates a smooth repair from a frustrating one. Before you remove anything, lower the blind fully, lay it flat, open the headrail by removing the end caps, and take several clear photos of how the cord runs: which pulley it crosses, which channel it sits in, how it passes through the cord lock, and how the tilt mechanism is routed. Photograph both the lift-cord path and, if you are touching it, the tilt-cord path.
The reason is simple. Once you pull the old cord out, the only record of how it was threaded is gone, and Venetian headrails route cord through several small pulleys and channels that are easy to get wrong. A photo is your map back. The pull-through method below largely avoids rethreading from scratch, but if a cord ever slips free of the old one mid-pull, those photos save the entire job.
While the headrail is open, confirm which cord actually failed, because that determines what you are about to do.
Lift Cord or Tilt Cord — Which One Broke?
The lift cord runs through the slats and raises the blind; the tilt cord runs over a top pulley and angles the slats. They are different repairs.
People often start restringing before working out which cord is the problem, and the two are not interchangeable:
- The lift cord is what you pull to raise and lower the blind. It threads up through the holes punched in every slat (the route holes), over pulleys in the headrail, and through the cord lock. When a blind will not raise, or the cord is visibly frayed where it hangs, the lift cord is the culprit. This is the more common and more involved restring.
- The tilt cord is the separate cord (on cord-tilt blinds) that rotates the slats open and closed. It runs only over a pulley at the top and does not pass through the slats at all. As HowStuffWorks notes, the tilt cord is simply threaded over its pulley and out again, and it does not connect to the lift cord. If your slats will not angle, this is the cord, and it is the easier fix.
Identify the right one now, then follow the matching section.
What Cord Do You Need, and How Much?
Match the cord diameter to your blind and buy roughly twice the height plus the width per lift cord.
Getting the cord right is the most important preparation, because cord that is too thick will not pass through the route holes and pulleys. Most Venetian blinds use cord between 0.9mm and 1.8mm in diameter, with 1.4mm or 1.8mm common on wood and faux wood blinds, according to Engineer Fix and Fix My Blinds. If you can, take a piece of the old cord to match, or contact the manufacturer for the exact size.
For length, a simple rule covers it: for each lift cord, you need about twice the blind’s height plus its width, which gives enough to run up one side, across the headrail, and down the other with slack for the tassel. Multiply that by the number of lift cords in the blind. Buying a little extra is wise; running short mid-restring means starting over.
You will also need scissors, a small flathead screwdriver, a lighter (to fuse and blunt the cord ends), and optionally needle-nose pliers or a stiff wire to coax cord through tight channels.
How Do You Restring the Lift Cord?
Use the old cord as a threading guide: fuse the new cord to it and pull the old cord out, dragging the new cord through the exact path.
This is the core of the repair, and the pull-through method is what makes it reliable. Work in order:
- With the blind flat, lower it fully and tilt the slats flat (open) so the route holes through the slats line up into a clear channel.
- Remove the bottom rail plugs or buttons to expose the knotted cord ends underneath, and untie the knot on the old lift cord. Save the tassels and safety washers — you will reuse them.
- Fuse the new cord to the old cord. Hold the end of the new cord against the cut end of the old cord and melt them together with a lighter into a single continuous strand, or wrap them tightly with thin tape. The join must be slim enough to pass through the route holes.
- Pull the old cord out from the top. As you draw the old cord up and out of the headrail, it pulls the new cord along behind it through the slats, the route holes, the headrail pulleys, and the cord lock — following the original path exactly.
- Stop when the new cord reaches the correct position and separate it from the old cord. Blunt the new cord end with a lighter so it will not fray.
- Tie off the bottom. Thread the new cord through the bottom rail, tie a secure double knot, push it into the hole, and reattach the safety washer and tassel you saved.
- Repeat for each lift cord. Replace them all, since the others are wearing at the same rate.
- Reinsert the bottom rail plugs and you are ready for the safety and test steps below.
If a cord ever pulls free of the old one mid-thread, this is where your headrail photos earn their keep — rethread by hand along the path you photographed, using a stiff wire or pliers for the tight pulleys.
How Do You Replace the Tilt Cord?
The tilt cord is a quick job — thread the new cord over its pulley and knot both ends.
If the broken cord is the tilt cord, the repair is much simpler because it never passes through the slats:
- Untie or cut the knots at the ends of the old tilt cord and remove the pulls or tassels.
- Pull the old tilt cord out — it is simply threaded over the pulley at the top.
- Thread one end of the new cord over the pulley and feed it through until it comes out the other side.
- Even up the two sides, knot both ends, and reattach the pulls. Blunt the ends with a lighter.
If the slats are tilting unevenly rather than not at all, the issue may be the tilt mechanism or a ladder cord rather than the tilt cord — that is covered in Venetian blind slats won’t close.
Make It Child-Safe While You’re There
A restring is the ideal moment to bring the blind up to the cordless-era safety standard.
Corded blinds are a recognized child strangulation hazard, and the ANSI/WCMA A100.1 standard and the Window Covering Safety Council set out how to reduce the risk. While you have the blind apart, build these in:
- Keep the lift cords no longer than 40 percent of the blind’s total length. Fix My Blinds flags this as the key safety measure — shorter cords are far less of a hazard.
- Fit the safety washers (the small breakaway devices) onto each lift cord as you reassemble.
- Leave the cords hanging separately — do not tie them together, which is what creates a loop a child can reach into.
- Install a cleat high on the wall to wind cords out of reach.
If the blind is old, corded, and keeps breaking, the honest long-term fix in a home with children is to replace it with a cordless or motorized model rather than restring it again. Our best Venetian blinds guide covers the cordless and motorized options.
Should You Restring or Replace?
Restring a quality blind; replace a cheap one or a fundamentally worn one.
The decision comes down to the value of the blind and the state of the rest of it:
- Restring when the blind is good quality wood or faux wood, the slats and mechanism are sound, and only the cords have worn. This is the economical, lower-waste choice.
- Replace when the blind is an inexpensive aluminum mini blind that costs little new, when the slats are bent or the tilt mechanism is also failing, or when the blind is bamboo, woven, pleated, or motorized and not realistically DIY.
(Cord and part costs are low and vary by brand; confirm current prices before ordering. We never publish fabricated figures.)
Final Check: Test and Level
Cycle the blind fully, then confirm both sides rise evenly and adjust the knots if they do not.
Once everything is reassembled and rehung, raise and lower the blind through its full travel a few times to seat the new cords and clear any slack. Then check that both sides rise level and that the blind locks and releases smoothly. If one side sits higher than the other, the cord tension is uneven — take up or let out a little at the bottom knot on the high or low side until it balances. A blind that rises evenly and locks cleanly is a successful restring.
Best Sources
- Fix My Blinds — on replacing all lift strings, the 40 percent child-safety cord length, safety washers, leaving cords separate, and blunting the cord end with a lighter.
- Engineer Fix — on cord diameter (0.9mm to 1.8mm, with 1.4mm and 1.8mm common) and calculating cord length from the blind height.
- HowStuffWorks — on the tilt cord being threaded simply over its pulley, separate from the lift cord.
- Window Covering Safety Council / ANSI-WCMA A100.1 — on corded-blind child-safety standards and cordless alternatives.
Related Guides
- Best Venetian Blinds Buying Guide
- Venetian Blinds Won’t Go Up or Down
- Venetian Blind Slats Won’t Close
Frequently Asked Questions
How hard is it to restring Venetian blinds?
For a standard wood, faux wood, or aluminum blind, it is a manageable one-hour DIY repair if you photograph the cord path first and use the old cord to pull the new one through. The job gets much harder if you rethread from scratch, or if the blind is bamboo, woven, pleated, or motorized, which are better left to a professional or replaced.
What size cord do I need to restring Venetian blinds?
Most Venetian blinds use lift cord between 0.9mm and 1.8mm in diameter, with 1.4mm or 1.8mm common on wood and faux wood styles. The cord must be thin enough to pass through the route holes in the slats and the headrail pulleys, so match the old cord or check with the manufacturer. For length, allow roughly twice the blind’s height plus its width per lift cord.
Can I just replace one broken lift cord?
You can, but it is better to replace all the lift cords at once. They all wear at the same rate because each one saws through the route holes in the slats over years of use, so if one has frayed through, the others are close behind. Replacing them together saves repeating the job soon after.
How do I get the new cord through the blind?
Use the old cord as a threading guide. Fuse the end of the new cord to the cut end of the old cord with a lighter, or tape them tightly together, then pull the old cord out from the top. It drags the new cord through the slats, route holes, and headrail along the exact original path, which is far easier than feeding new cord through by hand.
How long should the cords be for child safety?
Keep the lift cords no longer than 40 percent of the blind’s total length, fit the safety washers, leave the cords hanging separately rather than tied together, and use a cleat to wind them out of reach. These measures follow the ANSI/WCMA A100.1 standard. If an old corded blind keeps breaking in a home with children, replacing it with a cordless model is the safest option.