How Do You Install Skylight Blinds?
Authored By Michael Turner -30 Years Home Improvement Expertise | Updated 2026 | BlindShades.pro
Updated on June 6, 2026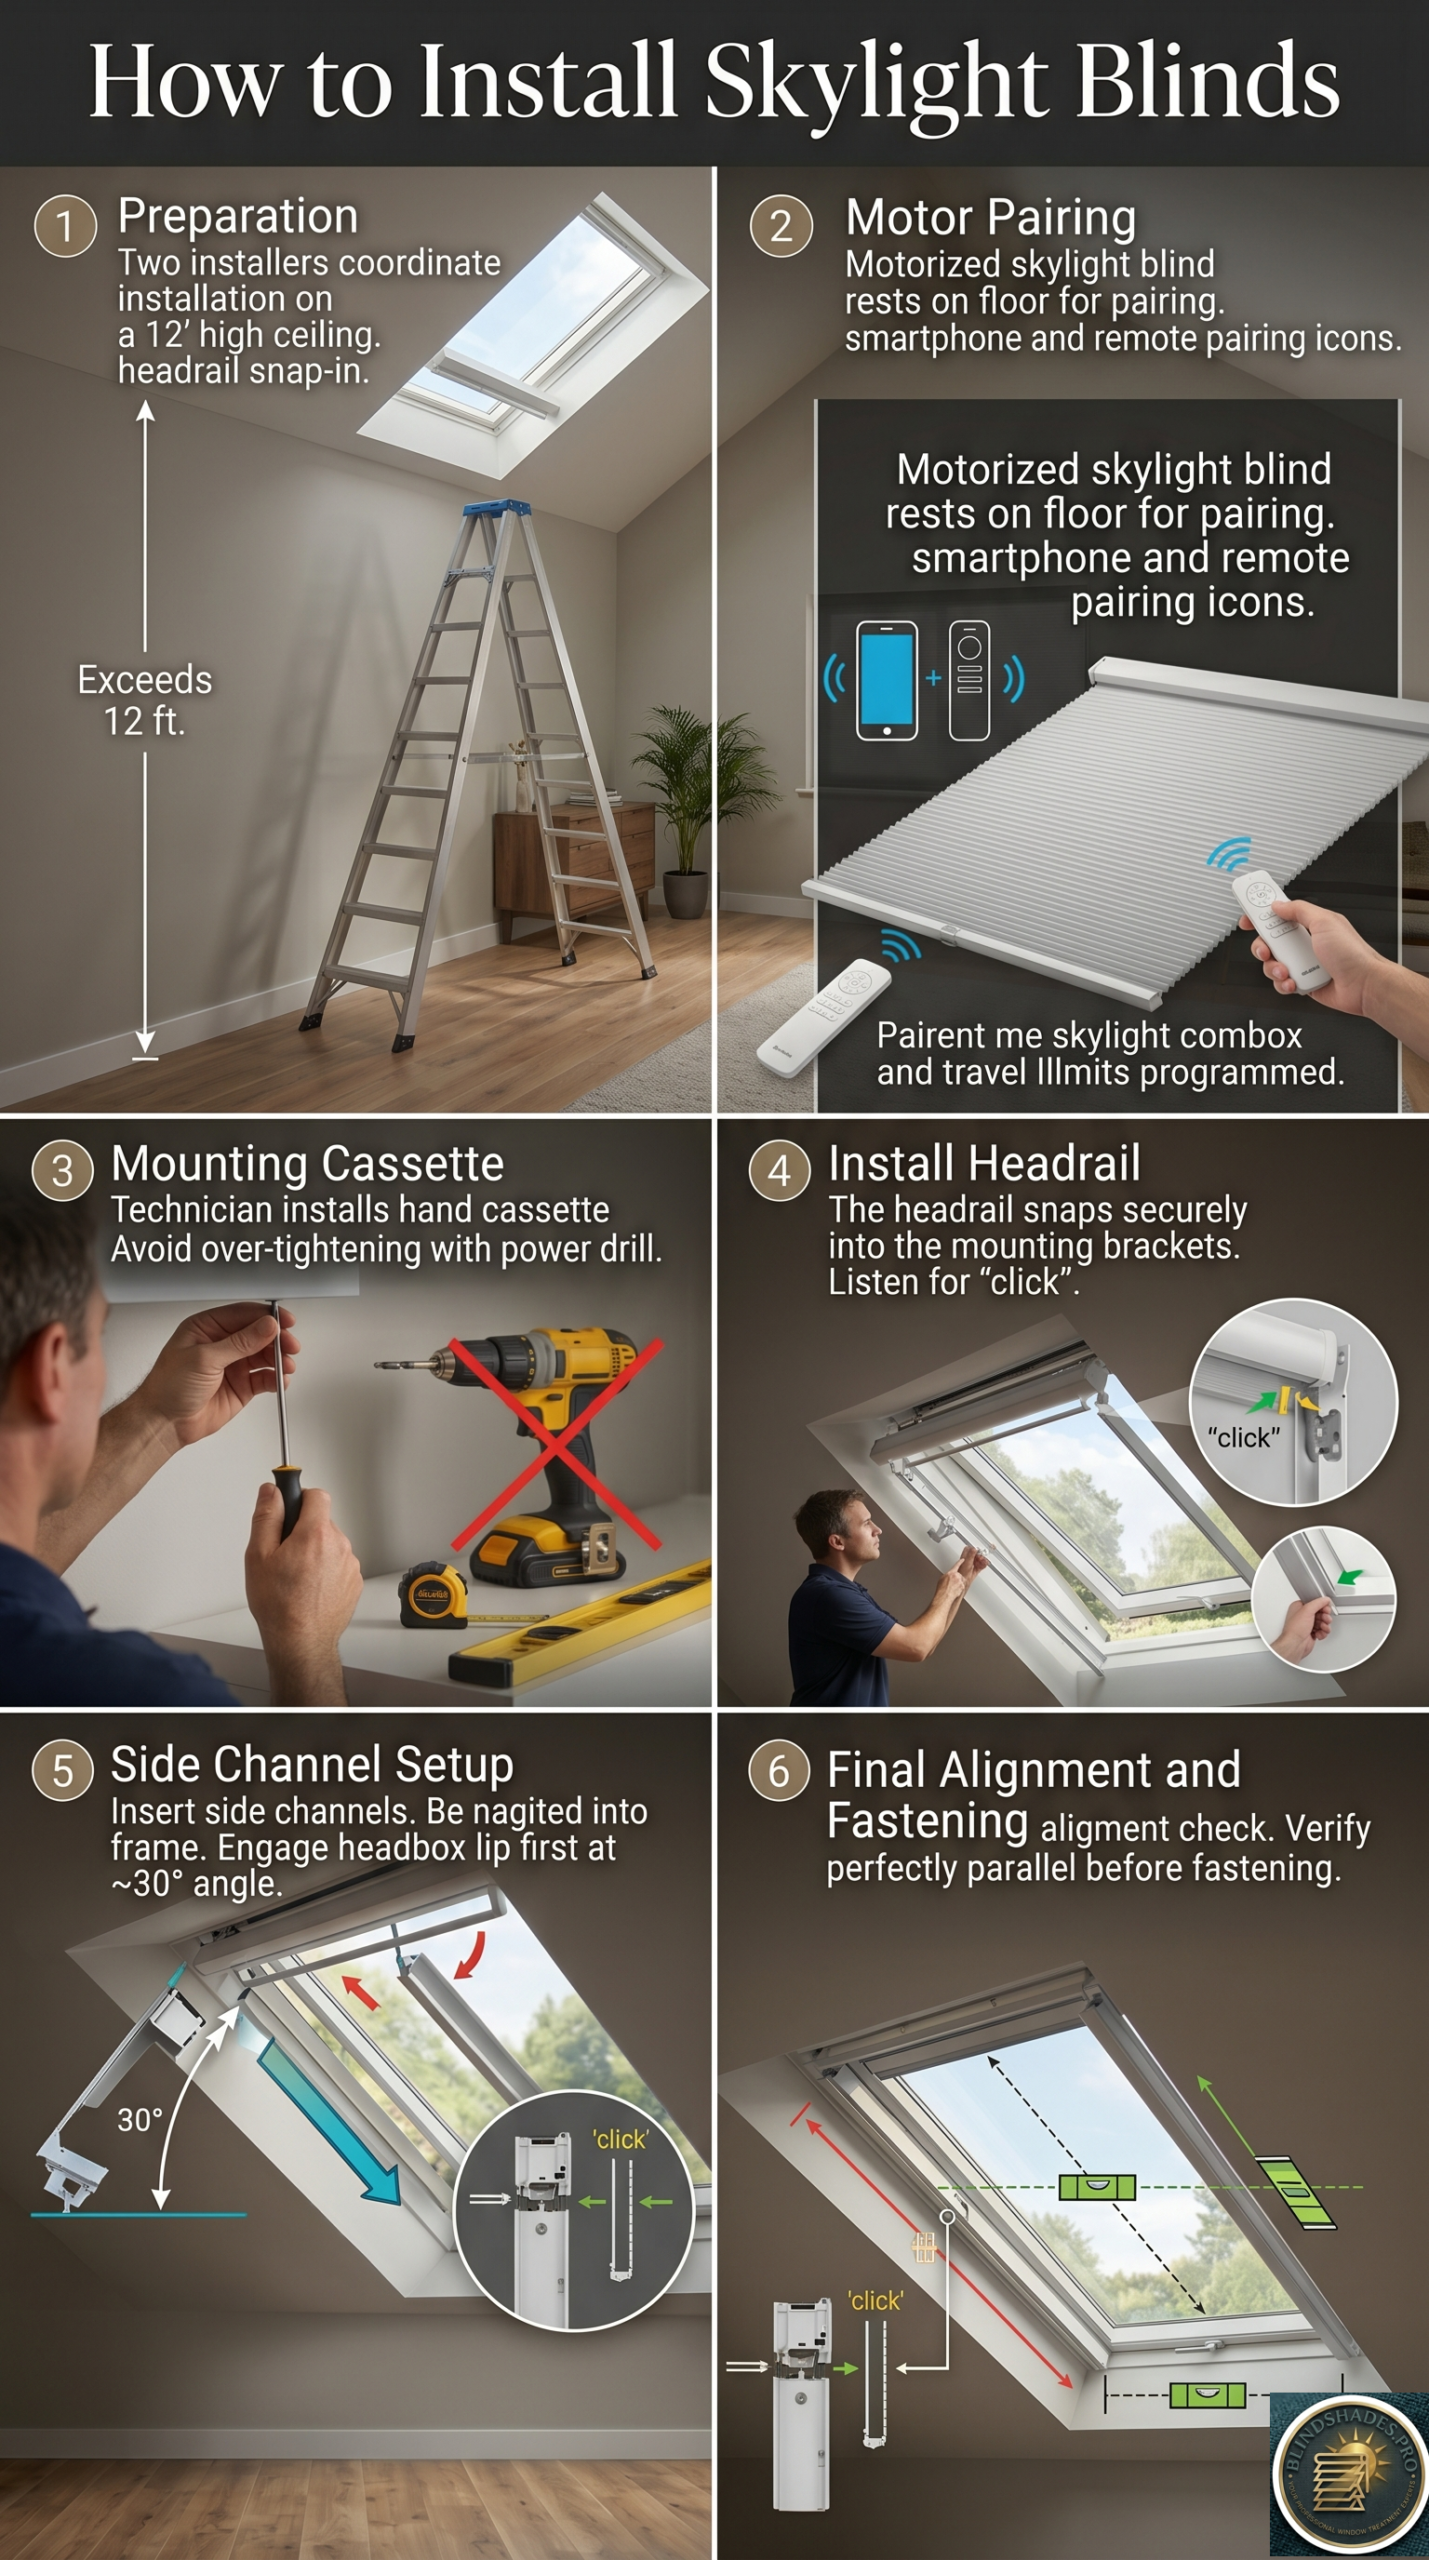
Key Takeaways:
- For skylights at ceiling heights above approximately 12 feet, skylight blind installation requires a second person — one to operate the ladder and one to hold components and fasten overhead; for ceiling heights above 16 feet, scaffolding rather than a ladder is recommended; the overhead nature of skylight installation requires both hands free simultaneously during the headrail snap-in step, which cannot be safely performed solo on an unstable ladder
- Always use a hand screwdriver (not a power drill or electric screwdriver) when fastening the skylight blind cassette or headbox to the frame; the cassette is typically lightweight aluminum or PVC with pre-formed screw holes that have shallow thread depth; a power screwdriver applies excessive torque that strips the thread and makes the screw loose; a stripped overhead cassette can fall; a power driver is acceptable for the mounting bracket screws that go into the wooden window frame
- Before installing any motorized skylight blind overhead, pair the remote control to the motor and set the upper and lower travel limits while the shade is still on the ground and accessible; once the shade is installed overhead, the motor’s pairing button on the motor body is inaccessible without removing the entire shade from its brackets
- After snapping the headrail into the mounting brackets, listen for a distinct audible click confirming the headrail has locked into the bracket lip, then perform a pull-test by pulling the headrail firmly downward with approximately 5 to 10 pounds of force; if the headrail holds without movement, installation is secure; if it pulls free, re-position the bracket teeth or re-engage the headrail groove before proceeding
- When installing the side channels, insert each channel at a 30-degree angle rather than straight-on; the angled insertion allows the channel’s top hook to clear and engage under the headbox lip first, then the bottom swings into the window frame for fastening; straight-on insertion jams the channel against the headbox lip and prevents proper seating
⭐ Quick Answer — How Do You Install Skylight Blinds?
- Safety Setup and the One-Person vs Two-Person Threshold: Before beginning skylight blind installation, assess the ceiling height to determine whether a second person is required. At ceiling heights up to approximately 10 to 12 feet, one-person installation on a step ladder is generally viable. Above 12 feet, a second person is required — one to stabilize the ladder base and one to hold components and fasten overhead. Above 16 feet, scaffolding replaces a ladder. The reason: the headrail snap-in step (Step 4) requires both hands pushing firmly upward simultaneously; on a ladder above 12 feet, both hands overhead eliminates the three-point ladder contact needed for stability. Skylight Blinds Direct confirms “some designs have a 2-person installation process.” Tools required: power drill with 5/64-inch bit (for pilot holes in wooden frame); hand screwdriver (for cassette screws); 2mm allen key (for cord tension); 4mm diameter screws; pencil; small level; stable ladder. Clean the inside of the skylight frame with a dry cloth before marking bracket positions
- The Hand Screwdriver Rule — Why Power Drills Damage the Skylight Blind Cassette: The most critical rule for skylight blind installation: use a hand screwdriver (not a power screwdriver or drill) for all cassette and headbox screws. Skylight Blinds Direct states this explicitly twice in their installation guide. The reason: the skylight blind cassette is typically lightweight aluminum or PVC with pre-formed screw boss holes that have shallow thread depth. A power screwdriver applies consistent torque that over-drives the screw past the thread end, stripping the boss hole — leaving the screw without grip. A stripped overhead cassette is held by friction only and can fall from the ceiling position. Rule summary: power drill = acceptable ONLY for pilot holes in the wooden window frame and for frame bracket screws; hand screwdriver = required for ALL cassette and headbox screws, every time. Mark bracket positions approximately 4 to 4.5 inches from each end of the headrail (Engineer Fix confirmed); pre-drill 5/64-inch pilot holes; mount brackets flush against the frame; use drywall anchors if mounting into drywall (Levolor confirmed)
- Motorized Shades: Pair Remote and Set Limits BEFORE Installing Overhead: For motorized skylight blind installation, the SelectBlinds installation PDF states: “IMPORTANT: Make sure remote is paired to shade before installing.” Once the shade is installed overhead, the motor’s pairing button is inside the headrail and inaccessible without removing the entire assembly. The pre-installation sequence on the ground: (1) insert batteries or connect power; (2) activate pairing mode on motor; (3) pair the remote until the motor confirms (brief up-down movement); (4) set the UPPER limit (shade fully open position); (5) set the LOWER limit (shade fully closed); (6) test full travel between limits; (7) confirm motor wire is not pinched (SelectBlinds confirmed); THEN mount overhead. Also confirm: remote is paired and shade is fully functional on the ground before going up the ladder
- The Click Confirmation, Pull-Test, and the 30-Degree Side Channel Angle: After snapping the headrail into the mounting brackets during skylight blind installation: listen for a distinct audible click confirming the headrail has locked into the bracket lip (Science Pulse confirmed: “a distinct and reassuring click as the locking mechanism engages”). Then immediately perform the pull-test — apply approximately 5 to 10 pounds of downward force on the headrail; if it holds, proceed; if it pulls free, re-seat before proceeding. Never skip the pull-test for an overhead installation. Then install side channels: insert each channel at a 30-degree angle rather than straight-on (Swift Direct Blinds confirmed). The angled insertion allows the channel’s top hook to clear and engage under the headbox lip first; once the top engages, the bottom swings toward the window frame for fastening. Straight-on insertion jams the channel against the headbox lip. Fasten with screws at no more than 12 inches apart (SelectBlinds confirmed); use hand screwdriver only
- Parallel Tracks Verification and the Two-Fault Cord Tension Diagnosis: After installing both side channels for skylight blind installation: verify the channels are parallel by sighting down both simultaneously from the bottom (SelectBlinds: “make sure the 2 tracks are parallel to each other”). Non-parallel tracks cause the shade to bind on one side and operate at an angle. If not parallel: loosen the off-angle track, re-adjust, and re-fasten. After confirming parallel tracks and testing the shade operation, adjust cord tension if needed using the 2mm allen key supplied (Swift Direct Blinds confirmed). Fault 1: shade slides down on its own = cord tension too LOW; tighten the cord stop (clockwise). Fault 2: shade difficult to raise = cord tension too HIGH; loosen the cord stop (counterclockwise). Correct tension: shade holds in any position; raises and lowers with approximately 1 to 2 pounds of hand pressure. Trim excess cord to 1.5 centimetres after confirming operation (Swift Direct Blinds confirmed)
- Best Sources: Bracket spacing, pilot hole specs, headrail groove alignment technique → Engineer Fix skylight blind installation · Hand screwdriver rule, cassette installation, side rail fitting and bottom bar centering → Skylight Blinds Direct installation guide · 30-degree channel technique, cord tension allen key, and cord trim protocol → Swift Direct Blinds skylight how-to-fit
⚠️ The Complete 8-Step Skylight Blind Installation Protocol: Installing skylight blinds correctly: Step 1 — assess ceiling height; recruit second person above 12 feet; gather tools (power drill with 5/64″ bit; hand screwdriver; 2mm allen key; 4mm screws; pencil; level; appropriate ladder). Step 2 — for motorized shades, pair remote and set upper/lower limits on ground before going overhead. Step 3 — clean frame; mark bracket positions 4 to 4.5 inches from each end; confirm both marks are at the same height with a level. Step 4 — pre-drill 5/64-inch pilot holes with power drill; mount brackets flush against frame with 4mm screws; confirm rear of brackets flush against mounting surface. Step 5 — hold shade assembly overhead; align headrail front groove under bracket front lip; push firmly up and back until audible click; perform 5 to 10 lb pull-test; if pulls free, re-seat. Step 6 — for cassette screws: hand screwdriver only; insert side channels at 30-degree angle; top hook engages headbox lip first; swing bottom flat; fasten with screws no more than 12 inches apart. Step 7 — verify both channels are parallel by sighting down both simultaneously; re-adjust if needed. Step 8 — test shade operation; adjust cord tension with 2mm allen key (tension too low = slides down; tension too high = difficult to raise); trim cord to 1.5cm. For the operable skylight distinction: for centre-pivot (Velux GGL) and top-hung (Velux GPL) windows, mount blind brackets to the SASH (moving panel), not the fixed outer frame. For the full Velux-specific guide including product code compatibility and INTEGRA motor requirements, see What Are the Best Velux Skylight Blinds. See the full safety setup guide below.
💡 The Centre-Pivot vs Top-Hung Mounting Distinction and Troubleshooting Guide: For skylight blind installation on operable Velux or Fakro skylights, always mount the blind brackets to the SASH (the moving panel), not to the fixed outer curb frame. Centre-pivot skylights (Velux GGL) rotate 180 degrees for cleaning; the blind travels with the sash during this rotation. Top-hung skylights (Velux GPL) open from the top edge and tilt outward; the blind’s side channels travel with the sash on opening. Check before installation: open the skylight sash to identify which part moves; mount brackets only on the moving part. If brackets are installed on the fixed outer frame of an operable skylight, the blind will prevent the window from opening. Troubleshooting after installation: Shade not level (one side higher than other) = channels not parallel; loosen off-angle channel and re-align. Shade fabric bunching at one track = channels not parallel or one track tilted inward. Headrail pulling free from brackets = click not fully engaged; remove and re-seat; check bracket screw tightness. Motorized shade not responding to remote = remote not paired; remove shade, access motor, re-pair on ground. Shade fabric sagging at center = side channel tension insufficient or track not securing fabric edge; check narrow flange at front (Levolor: “narrow flange on side tracks should be at the front of the shade”). For the full motorized skylight blind worth-it analysis including solar motor ceiling-position advantage, per-year cost by power type, and the ceiling height safety rule, see Are Motorized Skylight Blinds Worth the Cost. See the full cord tension adjustment guide below.
📖 Read the complete guide below for: the one-person vs two-person ceiling height threshold (12 feet for second person; 16 feet for scaffolding), the complete tools list (5/64-inch drill bit; 2mm allen key; 4mm screws), the motorized pre-installation sequence (pair remote; set upper and lower limits; test travel; all on the ground before mounting), the bracket positioning and pilot hole protocol (4 to 4.5 inches from each end; 5/64-inch; flush against frame), the headrail snap-in technique with click confirmation and 5 to 10 pound pull-test, the hand screwdriver rule for cassette screws with the WHY explained, the 30-degree side channel insertion angle (top hook first; then swing flat), the parallel tracks verification (sight down both; re-adjust off-angle), the two-fault cord tension diagnosis (slides down = tension low; difficult = tension high; 2mm allen key; trim to 1.5cm), and the centre-pivot vs top-hung operable skylight mounting distinction (blind mounts to sash not outer frame).
How to Install Skylight Blinds — The Tools and Safety Setup
Before starting: tools, safety assessment, and the two-person threshold.
Tools required:
- Power drill with 5/64-inch bit (Engineer Fix confirms: 5/64″ for pilot holes in wooden skylight frames)
- Hand screwdriver (Phillips head; for cassette/headbox screws only — do NOT use power driver on cassette)
- 2mm allen key (Swift Direct Blinds confirms for cord tension adjustment)
- 4mm diameter screws compatible with the frame material
- Pencil for marking bracket positions
- Level (small torpedo level)
- Stable step ladder or scaffolding (height-appropriate)
- Tape measure
- Clean cloth (to clean frame before installation)
The one-person vs two-person threshold:
| Ceiling Height | Installation Approach | Reason |
|---|---|---|
| Up to 10 feet | One person viable | Easy overhead reach from step ladder |
| 10–12 feet | One person possible; second recommended | Extended reach reduces stability |
| Above 12 feet | Two people required | Second person stabilizes ladder; passes components |
| Above 16 feet | Scaffolding required | Ladder instability at maximum height |
Why the headrail snap-in requires two people above 12 feet: The headrail must be pushed firmly upward into the mounting brackets with both hands simultaneously. On a ladder above 12 feet, both hands overhead reduces the three-point contact needed for ladder stability. A second person on the ground steadies the ladder base during this critical step.
Skylight Blinds Direct (April 2026) confirms: “Some designs, such as our Roof Lantern Blinds, have a 2-person installation process.”
Step 1 — Pre-Installation: Pair Motorized Remote BEFORE Going Overhead
The critical motorized shade pre-step absent from all competitor guides.
SelectBlinds installation PDF states: “IMPORTANT: Make sure remote is paired to shade before installing.”
Why this matters: Once a motorized skylight shade is installed overhead, the motor’s pairing button is located on the motor body inside the headrail — inaccessible without removing the entire shade from its brackets. If the remote is not paired before installation, the entire shade must come down.
The pre-installation sequence for motorized skylight blinds (on the ground, before mounting):
- Insert batteries or connect the power source to the motor
- Activate the pairing mode on the motor (typically by pressing the motor’s button)
- Press the pairing button on the remote control until the motor confirms pairing (typically a brief up-down movement)
- Set the UPPER limit: lower the shade to the fully-open position; press the motor’s limit-set button per manufacturer instructions
- Set the LOWER limit: raise the shade to the fully-closed position; press the limit-set button
- Test the full travel between upper and lower limits
- ONLY THEN mount the shade overhead
Step 2 — Clean the Frame and Mark Bracket Positions
Prepare the frame surface for secure mounting.
Clean the inside of the skylight frame with a dry cloth to remove dust, debris, and any residue from previous blind hardware. Engineer Fix (November 2025) confirms: “Clean the inner frame of the skylight thoroughly to remove any debris or dust, ensuring a secure and flush mount for the brackets and side channels.”
Marking the bracket positions: Engineer Fix confirms: “Mark the placement for the brackets, typically 4 to 4.5 inches in from each end of the skylight frame, ensuring they are positioned at the desired depth for the shade to be fully recessed.”
For most skylight blind installations:
- Position brackets approximately 4–4.5 inches from each end of the headrail length
- Confirm the bracket depth positions the headrail at the correct depth (flush with or slightly recessed from the interior face of the frame)
- Mark both bracket positions with a pencil
- Use a level to confirm the two bracket marks are at the same height — critical for parallel shade operation
Step 3 — Pre-Drill Pilot Holes and Mount the Brackets
Pilot holes prevent frame splitting and ensure straight fastening.
Engineer Fix confirms: “Pre-drilling pilot holes is advisable to prevent the wood frame from splitting when securing the brackets with screws.”
The pilot hole specification:
- Drill bit size: 5/64 inch (Engineer Fix confirmed for wooden skylight frames)
- Drill to the depth of the screw shank (typically 1 to 1.5 inches)
- Angle: perpendicular to the frame surface
After drilling:
- Position the bracket at the marked location
- Fasten with appropriate screws (4mm diameter; Swift Direct Blinds confirmed)
- For mounting into drywall: use drywall anchors (Levolor PDF confirms: “IMPORTANT: Use drywall anchors when mounting into drywall”)
- Confirm the rear of the bracket is flush against the frame surface (Engineer Fix: “the rear of the brackets rests flush against the mounting surface”)
- Confirm the two brackets are at the same depth and height by holding the headrail against them dry (without snapping in) to check alignment
Spacer blocks: If the brackets need to project further from the frame (for depth positioning), Levolor confirms: “A maximum of 1.5 inches of spacer blocks per installation bracket is recommended.” Never stack spacer blocks higher than 1.5 inches.
Step 4 — Snap the Headrail into the Brackets
The click confirmation and pull-test — the safety verification absent from all guides.
The snap-in technique: Engineer Fix confirms: “Hold the shade assembly up to the window opening and align the headrail so that the front groove slips under the front lip of the brackets. Firmly push the headrail up and back until it snaps securely into place within the brackets.”
The click confirmation: Science Pulse blog confirms: “You should hear a distinct and reassuring click as the locking mechanism engages with the bracket. This sound confirms that the blind is securely mounted.”
If no click is heard:
- The headrail groove may not be fully engaged with the bracket lip
- Lower the headrail, re-align the groove with the bracket front lip, and push again more firmly
- Repeat until the click is heard from both brackets
The pull-test (the skylight-specific safety verification): After hearing the click, apply approximately 5 to 10 pounds of downward force on the headrail (a firm tug):
- If the headrail holds: installation is secure — proceed to side channels
- If the headrail pulls free: the bracket teeth are not engaged; re-seat the headrail
The pull-test is particularly important for skylight installation because an unsecured headrail installed overhead can fall, causing damage or injury. Never skip this test.
Step 5 — Install the Side Channels at 30 Degrees
The angle technique absent from all competitor guides.
Side channels (side tracks) must be installed AFTER the headrail is confirmed secure.
The 30-degree insertion technique: Swift Direct Blinds confirms: “Slide the right side channel at a 30-degree angle onto the bottom bar end cap to ensure position under the headbox lip.”
Why the angle matters: Inserting the side channel straight-on (0 degrees, perpendicular to the window) will cause the channel’s top edge to catch against the headbox lip and prevent proper seating. The 30-degree angle allows:
- The channel’s top hook to approach and slide under the headbox lip first
- Once the top hook is engaged, the bottom of the channel swings toward the window frame
- The channel lies flat against the frame in its installed position
After inserting at 30 degrees: Use the provided screws and a HAND screwdriver to secure the channel to the window frame. Skylight Blinds Direct (March 2026) confirms: “use a hand screwdriver to secure the side rail into place with the screws provided.”
Screw spacing: SelectBlinds PDF confirms: “Space the screws no more than 12 inches apart.” For a 24-inch channel: 3 screws minimum (top, middle, bottom). For a 48-inch channel: 5 screws minimum.
Step 6 — Verify Parallel Tracks
The alignment verification absent from all guides — non-parallel tracks cause binding.
After installing both side channels, verify they are parallel.
The verification method: SelectBlinds PDF confirms: “Make sure that the 2 tracks are parallel to each other.”
Sight down the channel length of both tracks simultaneously from the bottom:
- Both channels should be mirror images of each other in plane and angle
- Both should face the same direction (narrow flange at the front; Levolor confirms: “the narrow flange on the side tracks should be at the front of the shade”)
If the tracks are not parallel:
- Loosen the screws of the off-angle track (leave snug, not fully tight)
- Adjust the track angle slightly until it mirrors the opposite track
- Confirm parallelism before final tightening
A non-parallel installation will cause the shade fabric to bind in one track and slip freely in the other, resulting in the shade operating at an angle with one side higher than the other.
Step 7 — The Hand Screwdriver Rule for the Cassette
The overtorque warning absent from all guides.
Skylight Blinds Direct (March 2026) states explicitly — twice in their guide: “use a hand screwdriver to secure the cassette into place.”
Why not a power screwdriver on the cassette: The skylight blind cassette (headbox) is typically constructed from lightweight aluminum extrusion or PVC plastic with pre-formed screw boss holes. These holes have a relatively shallow thread depth compared to wood.
A power screwdriver applies consistent torque that can over-drive the screw past the end of the thread, stripping the boss hole. Once stripped:
- The screw no longer grips the cassette
- The cassette is held by friction only — insufficient for an overhead installation
- Risk of falling
The correct approach:
- Power drill: ONLY for pilot holes in the window frame and bracket screws into the frame
- Hand screwdriver: for ALL cassette/headbox screws
Step 8 — Cord Tension Adjustment and Final Testing
The two-fault diagnosis protocol absent from all guides.
Swift Direct Blinds provides the specific adjustment tool and two failure conditions:
Fault 1: Blind slides down on its own: Cord tension too LOW. Add tension by adjusting the cord stop:
- Use the 2mm allen key supplied with the shade
- Tighten the cord stop (typically clockwise rotation)
- Test: blind should hold in any position without moving
Fault 2: Blind is difficult to raise: Cord tension too HIGH. Reduce tension:
- Use the 2mm allen key
- Loosen the cord stop (typically counterclockwise)
- Test: blind should raise with approximately 1–2 lbs of hand pressure
Correct tension: Shade holds in any position when released; can be raised and lowered with light, smooth hand pressure (approximately 1–2 lbs). Bottom bar remains level throughout operation.
Final cord trim: Swift Direct Blinds confirms: “Trim excess cord to 1.5cm once it is confirmed the blind is working correctly.”
The Centre-Pivot vs Top-Hung Mounting Distinction
The operable skylight sash installation difference absent from all guides.
For operable Velux and Fakro skylights, the blind mounts to the SASH (the moveable panel), not to the fixed outer frame.
Centre-pivot skylights (Velux GGL): The sash rotates 180 degrees for cleaning access to the outer glass. A blind mounted to the sash frame travels with the sash during rotation. When the sash is rotated for cleaning, the blind goes with it to the exterior position. This is the correct installation — the blind is NOT mounted to the fixed outer curb.
Top-hung skylights (Velux GPL): The sash opens from the top edge and tilts outward. A blind mounted to the sash frame travels with the sash when the window opens for ventilation. The blind’s side channels move with the sash — they are mounted to the sash, not to the fixed frame.
The practical check before installation: Open the skylight sash to identify which part moves and which remains fixed. The blind mounting brackets go on the SASH frame (the moving part). If brackets are mounted to the fixed outer frame on an operable skylight, the blind will obstruct the window from opening.
Where to Order
For step-by-step skylight blind installation guide including bracket positions and pilot hole specs: Engineer Fix at engineerfix.com/how-to-install-skylight-blinds-a-step-by-step-guide — 4 to 4.5 inches bracket spacing; 5/64-inch pilot holes; flush bracket confirmation; headrail groove alignment technique.
For cassette installation guide with the hand screwdriver rule and side channel installation: Skylight Blinds Direct at skylight-blinds-direct.co.uk/blog/how-to-install-skylight-blinds — test cassette dimensions before install; sticky strip + hand screwdriver cassette fastening; side rail installation; bottom bar centering and operation test.
For the 30-degree side channel technique and cord tension adjustment with allen key: Swift Direct Blinds at swiftdirectblinds.co.uk/how-to-fit/skylight-blinds — 30-degree channel insertion technique; 2mm allen key tension adjustment; cord trim to 1.5cm; double-sided tape + screw cassette fixing.
Frequently Asked Questions
How do you install skylight blinds? To install skylight blinds: clean the frame; mark bracket positions approximately 4 to 4.5 inches from each end; pre-drill 5/64-inch pilot holes; mount brackets flush against the frame; snap the headrail into the brackets until an audible click is heard; perform a 5 to 10 pound pull-test to confirm secure engagement; insert side channels at a 30-degree angle to engage the headbox lip first; verify both channels are parallel; fasten channels with a hand screwdriver at no more than 12-inch screw spacing; adjust cord tension with a 2mm allen key until the shade holds in any position with 1 to 2 pounds of operating force.
Why must you use a hand screwdriver (not a power drill) for skylight blind cassette installation? The skylight blind cassette is typically made from lightweight aluminum or PVC with pre-formed screw boss holes that have shallow thread depth. A power screwdriver applies torque that can over-drive the screw past the end of the thread, stripping the boss hole and leaving the screw without grip. A stripped overhead cassette is held only by friction and can fall. Skylight Blinds Direct explicitly confirms using only a hand screwdriver for the cassette. A power drill is acceptable for bracket screws going into the wooden window frame, which has sufficient thread depth for powered fastening.
Why must the motorized skylight blind remote be paired before installation? The motor’s pairing button is located on the motor body inside the headrail. Once the shade is installed overhead, the motor body is inaccessible without removing the entire shade from its brackets. The pairing sequence, including setting upper and lower travel limits, must be completed on the ground while the motor is accessible. SelectBlinds installation instructions confirm: pair the remote to the shade before installing.
What is the 30-degree side channel insertion technique? The 30-degree side channel insertion technique requires sliding the side channel at a 30-degree angle onto the bottom bar end cap rather than inserting it straight-on. The angled approach allows the channel’s top hook to clear and engage under the headbox lip first. Once the top hook is engaged, the bottom of the channel swings toward the window frame for fastening. Inserting straight-on causes the channel to jam against the headbox lip and prevents proper seating. Swift Direct Blinds confirms this 30-degree angle as the correct insertion method.
How do you adjust the cord tension after installing skylight blinds? After installing skylight blinds, test the shade by raising and lowering it. If the shade slides down on its own, the cord tension is too low — use the 2mm allen key to tighten the cord stop. If the shade is difficult to raise, the cord tension is too high — use the 2mm allen key to loosen the cord stop. The correct tension allows the shade to hold in any position without moving and to be raised and lowered with approximately 1 to 2 pounds of hand pressure. Trim the excess cord to approximately 1.5 centimetres after confirming the shade is operating correctly.
Related Guides on BlindShades.pro
- The Best Skylight Blinds & Shades Buying Guide
- What Are the Best Blinds for Skylights
- How Do You Measure a Skylight for Blinds
- Are Motorized Skylight Blinds Worth the Cost
- What Are the Best Velux Skylight Blinds
By Michael Turner | 30 Years Home Improvement Expertise | Updated 2026 | BlindShades.pro