What Are the Best Curtains for a Bay Window?
Authored By Michael Turner -30 Years Home Improvement Expertise | Updated 2026 | BlindShades.pro
Updated on June 3, 2026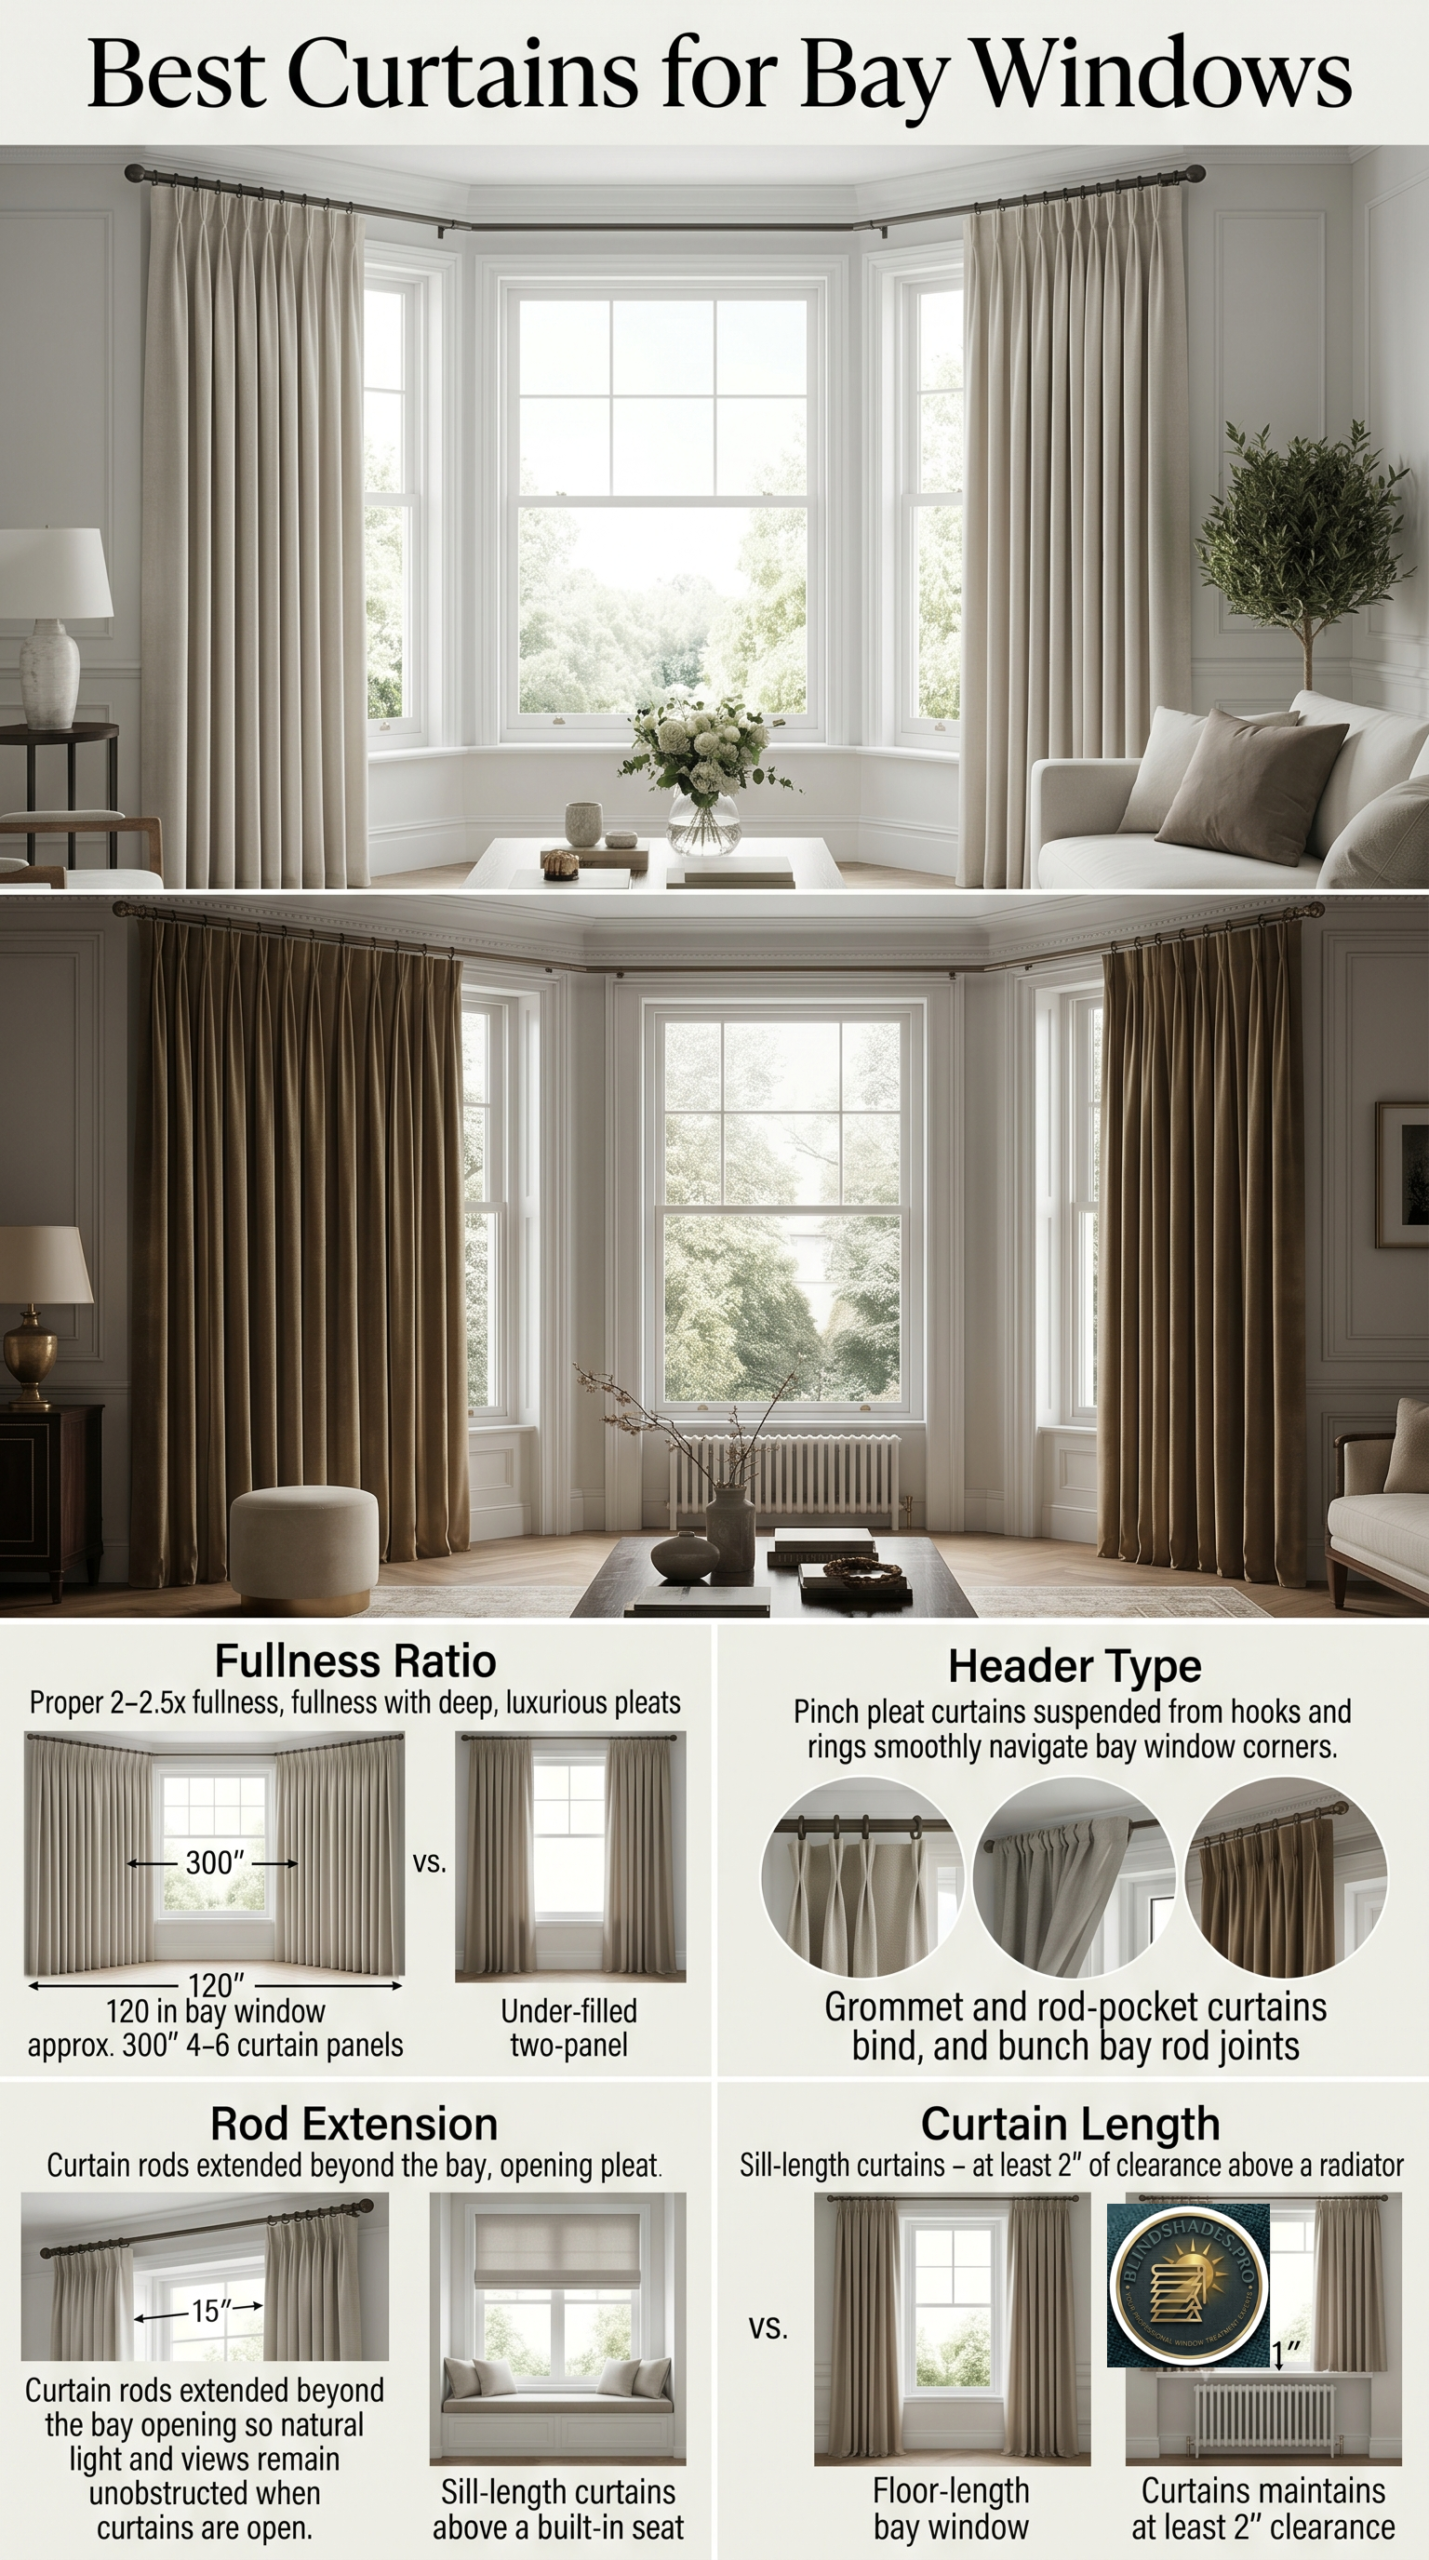
Key Takeaways:
- Bay window curtains require 2 to 2.5 times fullness for pleated styles and 1.5 to 2 times fullness for grommet styles; a 120-inch wide bay window with 2.5 times fullness requires 300 inches (25 feet) of fabric across 4 to 6 panels — not the 2 panels buyers typically expect when first approaching the purchase; under-paneling a bay window produces flat skimpy curtains that look insufficient
- Grommet and rod pocket headers cannot be operated smoothly on curved bay window rods; the rigid metal rings of grommet curtains bind at the angle changes where the rod bends at the bay corners; only pinch pleat curtains with hooks and rings travel around curved bay corners smoothly; for bay windows that require curtains to open and close daily, specify pinch pleat headers only
- The curtain rod must extend 6 to 15 inches past the bay opening on each side to allow open curtains to stack completely outside the glass area; a 100-inch bay window rod creates approximately 20 inches of stackback total (10 inches per side); if the rod extends only 6 inches past the bay and the stackback is 12 inches, the open curtains partially cover the side bay panels
- For bay windows with built-in window seats: specify sill-length curtains ending approximately 3 inches above the seat cushion; floor-length curtains drape over the seat cushion when swept open; for bay windows with radiators below: curtains must clear the radiator by at least 2 inches to allow heat circulation and prevent fabric discoloration or fire risk
- The thermal benefit of floor-length curtains on a bay window is only achieved when the curtains touch the floor (or the sill surface for window seat bays) AND when the rod extends to the wall on both sides; properly fitted fully lined floor-length drapes touching the floor and walls trap a cold air pocket in front of the glass rather than letting it circulate into the room, adding approximately R-1 to R-2 of insulation to the bay window glass
⭐ Quick Answer — What Are the Best Curtains for a Bay Window?
- 4 to 6 Panels — Not the 2 Most Buyers Expect: The best curtains for bay windows start with the correct panel count. Curtain fullness should be 2 to 2.5 times the window width for pleated styles (Goelst’s bay window track specification guide). A 120-inch wide bay at 2.5 times fullness requires 300 inches (25 feet) of fabric — at a standard 52-inch panel width, that is 5 to 6 panels. A 96-inch bay at 2 times fullness needs 192 inches — 4 panels. Ordering 2 standard panels for a 120-inch bay creates only 0.87 times fullness — the curtains will look flat, sparse, and completely insufficient for the window scale. Fullness ratio by header type: pinch pleat (double) = 2 times (built-in); pinch pleat (triple) = 2.5 times (built-in); grommet = 1.5 to 2 times (not built-in; multiply by rod width); rod pocket = 2 to 2.5 times (not built-in); light fabrics (sheer, linen) = 2.5 to 3 times; heavy fabrics (velvet) = 1.5 to 2 times
- Grommet Headers Bind on Curved Bay Rods — Pinch Pleat Only: Curtains for bay windows that require daily opening and closing must use pinch pleat headers with hooks and rings — not grommets. A grommet curtain has solid metal rings (approximately 1.5 to 2 inches in diameter) that slide along the rod. On a straight rod: grommets slide freely. On a curved bay window rod that bends at the 30 or 45-degree corner angles: the rigid metal rings cannot navigate the bend and bind against the curve, preventing the curtain from traveling past the corner. Pinch pleat curtains attach via hooks to rings that slide along the rod; these navigate corner angles smoothly. Rod pocket headers are stationary-only for the same reason — the channel cannot move around a corner. The rule: for any curtain on a curved bay rod that must open and close daily, specify pinch pleat with hooks and rings exclusively
- The Stackback Rule — Rod Must Reach the Main Walls: For bay window curtains to clear all glass when open, the rod must extend past the bay opening far enough for the stacked fabric to sit outside the glass area. NICETOWN confirms: “for a 100-inch rod, expect 20 inches of stackback total, 10 inches on each side.” For a 120-inch bay with 6 panels, the total stackback is approximately 39 inches per side — the rod must extend roughly 39 inches past the bay opening on each side, which typically means mounting the rod from main wall to main wall across the full bay alcove. If the rod ends at the bay edge and the stackback is 12 inches, the open curtains partially cover the side bay panels. Practical specification: mount the rod to the main walls on each side of the bay; open curtains then stack against the main walls completely clear of all three glass panels
- Window Seat, Radiator, and Length Specifications: Bay window curtains for window seat bays should be sill-length ending approximately 3 inches above the seat cushion; floor-length curtains drape over the cushion when swept open, impeding sitting. For bay windows with radiators below the sill: curtains must end at least 2 inches above the radiator surface — a curtain touching a radiator blocks convective heat output, yellows and weakens fabric within one to two heating seasons, and presents a fire risk. Measure the radiator height from the floor and subtract 2 inches for the maximum curtain hem. For most residential radiators (8 to 12 inches on legs), the hem sits at approximately sill height. For standard bays with no seat or radiator: floor-length is the correct specification — the curtains should touch the floor to maximize thermal benefit (see below)
- The Three-Layer System and the Thermal Benefit Conditions: The best curtains for bay windows use three layers: Layer 1 — inside-mount cellular or solar shade per individual panel (daytime light control and insulation at glass level); Layer 2 — sheer panels on a curved rod at the bay opening (daytime privacy and soft diffused light); Layer 3 — opaque drapes on an outer rod spanning the full bay opening wall-to-wall (evening privacy and blackout). The thermal benefit of floor-length drapes is approximately R-1 to R-2 — but ONLY when three conditions are met simultaneously: curtains touch the floor (cold air sealed at the bottom); rod extends to the walls on both sides (cold air sealed at the sides); center panels overlap by 2 to 3 inches when closed (cold air sealed at the center). Missing any one condition reduces the thermal benefit to near zero; cold air escapes through the gap and circulates into the room as a convective draft
- Best Sources: Custom curtain ideas and heading style guidance for bay windows → Spiffy Spools bay window curtains · Inside vs outside mount, curved vs straight rod, combination treatments → The Shade Store bay window curtains · Sill-length specifications, layering system, and velvet thermal guidance → Joydeco bay window curtains guide
⚠️ The Pattern Alignment Challenge for Multi-Panel Bay Window Curtains: When four to six panels hang across a bay window, horizontal patterns such as stripes, checks, geometric prints, and bold floral repeats must be aligned across all panels for a cohesive appearance. Each panel must be cut from the same position in the fabric repeat. For a fabric with a 12-inch pattern repeat and six panels: each panel begins at the same point in the repeat, requiring additional fabric of (number of panels minus 1) times the repeat height above the basic yardage requirement. Order all panels from the same dye lot for colour consistency; specify sequential cuts from the fabric roll for pattern alignment. The simplest solution for a bay window requiring 4 to 6 panels: choose solid fabrics, small allover textures, or small-scale patterns with a repeat under 4 inches — these eliminate the pattern alignment challenge entirely while still providing the desired fabric texture and movement. The two-approach decision for bay window curtain installation: curtains across the full bay opening on a single rod from main wall to main wall (simpler installation; one rod, higher panel count) vs curtains on each individual panel with separate inside-mount rods per panel (more tailored; individual per-panel light control; requires curved or angled rod sections at each corner connection). For the full how-to guide on hanging a curtain rod across a bay window including elbow connectors, bracket placement, and stud-finder protocol, see How Do You Hang Curtains on a Bay Window. See the full fullness and panel count table below.
💡 Best Curtain Styles by Bay Window Room Type: Formal living room: floor-length pinch pleat in velvet or silk; puddle finish (2 to 3 inches extra); bay as room focal point. Family room: floor-length pinch pleat or grommet-on-straight-rod in linen or cotton; float finish (0.5 to 1 inch clearance); practical daily operation. Bedroom: floor-length pinch pleat with blackout lining in velvet or lined cotton; full floor contact for thermal benefit; motorized preferred for ease. Kitchen nook: cafe curtain on lower half of each panel; sill-length; cotton or gingham; natural light preserved in upper half. Bathroom: cafe curtain on lower half; sill-length; moisture-resistant polyester or treated cotton. Window seat alcove: sill-length (3 inches above cushion) in linen or cotton; pinch pleat for clean stack at sides. Study or home office: ripple fold sheer plus lined drape layered; floor-length; full range from full-transparency to full blackout. The header compatibility summary for curved bay window rods: pinch pleat with hooks and rings = fully compatible (travels smoothly around 30 and 45-degree corners); goblet pleat with hooks and rings = compatible; ripple fold on track = compatible with curved track systems only; back tab and tab top = stationary decorative only; rod pocket = stationary decorative only; grommet = NOT compatible with curved rods (rigid rings bind at corner angles). For the full bay window treatment selection including cellular shades, faux wood blinds, and plantation shutters with their respective depth and angle compatibility requirements, see What Are the Best Blinds for Bay Windows. See the full three-layer system below.
📖 Read the complete guide below for: the two bay window curtain installation approaches (full bay rod vs individual panel rods), the fullness ratio by header type (pinch pleat 2-2.5x built-in; grommet 1.5-2x not built-in; light fabric 2.5-3x; heavy fabric 1.5-2x), the panel count calculation (120-inch bay at 2.5x = 6 panels; 96-inch bay at 2x = 4 panels; 2 panels for 120-inch bay = 0.87x fullness), the grommet header binding problem on curved bay rods and the pinch pleat solution, the stackback calculation (100-inch rod = 20-inch total; 6-panel bay stackback = 39 inches per side; rod mounts to main walls), the window seat sill-length and radiator 2-inch clearance specifications, the three-layer system with dimensional positions, the thermal benefit conditions (floor + walls + center overlap = R-1 to R-2), and the horizontal pattern alignment specification for multi-panel sets.
Curtains for Bay Windows — The Two Installation Approaches
The foundational decision before selecting any curtain style.
Approach 1 — Curtains across the full bay opening: A single curtain rod spans the full width of the bay opening above all three panels. This is the simpler installation (one rod, one set of panels) but requires careful calculation of panel count, fullness, and stackback.
Approach 2 — Curtains on each individual panel: Each of the three bay panels has its own curtain rod or track inside the panel frame. This creates a tailored, custom look with individual light control per panel. Requires a curved rod or track that follows the bay angles at each corner connection point.
How to choose:
- Bay window with a window seat: full bay rod above for a cohesive canopy effect
- Bay window without a seat: either approach works; individual panels look more tailored
- Bay window with very shallow side panel frames (under 2 inch depth): full bay rod above only — not enough depth for individual inside-mount rods on side panels
- Bay window in a formal room: individual panels with matching heading styles on each panel
The Fullness Ratio — How Many Panels a Bay Window Actually Needs
The calculation absent from all competitor guides — most buyers under-panel their bay windows.
When shopping for curtains, most buyers see “one pair = two panels” and assume a bay window needs one pair. A bay window needs far more.
The fullness calculation:
Curtain fullness describes how many times wider the curtain fabric is compared to the rod or window width it will cover. Groelst’s bay window track specification guide confirms: “curtain fullness should be 2 to 2.5 times the window width for pleated styles.”
The fullness ratio by header type:
| Header Style | Recommended Fullness | Built-in? |
|---|---|---|
| Pinch pleat (double) | 2× | YES — order at rod width |
| Pinch pleat (triple) | 2.5× | YES — order at rod width |
| Goblet pleat | 2× | YES — order at rod width |
| Grommet | 1.5–2× | NO — order at fabric width × fullness |
| Rod pocket | 2–2.5× | NO — order at fabric width × fullness |
| Back tab / tab top | 1.5–2× | NO — order at fabric width × fullness |
| Ripple fold | 2–2.5× | YES — order at rod width |
The bay window panel count calculation:
For a 120-inch wide bay (10-foot bay opening):
- With 2.5× fullness for pleated style: 120 × 2.5 = 300 inches of fabric needed
- Standard panel width: 50–54 inches
- Panels needed: 300 ÷ 52 = 5.77 → round up to 6 panels
For a 96-inch wide bay (8-foot bay opening):
- With 2× fullness: 96 × 2 = 192 inches of fabric needed
- Panels needed: 192 ÷ 52 = 3.7 → round up to 4 panels
The consequence of under-paneling: Two curtain panels (2 × 52 inches = 104 inches of fabric) covering a 120-inch bay creates only 0.87× fullness — less than a single flat panel. The curtains look flat, stretched, and sparse. The bay window appears underdressed.
The Header Type and Corner Operability Problem
The header compatibility issue absent from all buying guides — grommet curtains bind on curved bay rods.
groensfinefurniture confirms: “in a bay window, the header affects both the look and how easily the curtain moves around corners.”
Why grommet headers fail on curved bay window rods: A grommet curtain has solid metal rings of approximately 1.5 to 2 inches in diameter embedded in the header. These rings slide along the curtain rod. On a straight rod, the rings slide freely. On a curved bay window rod that bends at the corner angles, the rigid metal rings cannot navigate the bend — they bind against the curve of the rod and prevent the curtain from traveling past the corner point.
The practical consequence: A grommet curtain hung on a curved bay window rod will pull open and close smoothly along the straight center section of the rod but will stop and jam at the point where the rod angles at the bay corners. The curtain cannot travel past the angle bend to cover or uncover the side panels.
Header compatibility with curved bay window rods:
| Header Type | Compatible with Curved Bay Rod? | Notes |
|---|---|---|
| Pinch pleat with hooks and rings | YES | Hooks attach to rings; rings slide along rod; rings navigate corners |
| Goblet pleat with hooks and rings | YES | Same mechanism as pinch pleat |
| Ripple fold (track only) | YES — on track only | Compatible with curved track systems; not standard curved rods |
| Back tab / tab top | STATIONARY ONLY | Cannot move smoothly around corners; for fixed decorative panels only |
| Rod pocket | STATIONARY ONLY | Cannot move around corners; for fixed decorative panels only |
| Grommet | NO | Rigid rings bind at corner bends |
The specification: For bay window curtains that will be opened and closed daily: pinch pleat with hooks and rings is the only reliable header choice. Grommet curtains on a bay window require a straight rod above the bay — not following the angles — and are pulled to the far sides as static decorative panels.
The Stackback Calculation — How Far the Rod Must Extend
The specific clearance needed so open curtains don’t block the side panels — absent from all guides.
When bay window curtains are pushed open, the fabric stacks into a compressed bundle at each end of the rod. This “stackback” takes up horizontal space.
The stackback rule for bay windows: NICETOWN confirms: “for a 100-inch rod, expect 20 inches of stackback space total, 10 inches on each side.”
Why this matters specifically for bay windows: The bay window has a side wall (the angled wall connecting the bay to the main room wall) on each side of the opening. If the curtain rod ends at the edge of the bay opening and the stackback is 12 inches, the open curtains will extend 12 inches INTO the bay opening, partially covering the side panels.
The correct rod extension: The rod must extend past the bay opening on each side by AT LEAST the stackback depth — typically 6 to 15 inches past the bay opening on each side. For a 120-inch bay with 6 panels: total fabric when open = six panels × 52 inches ÷ 4 (compression ratio) ≈ approximately 78 inches total stackback ÷ 2 = approximately 39 inches per side. The rod must extend at least 39 inches past the bay opening on each side — which often means the rod extends to the main room wall itself.
The practical approach: For most bay windows: mount the rod from main wall to main wall across the full bay alcove opening, with brackets on the main wall on each side. The open curtains then stack against the main walls where they are completely clear of all glass.
Window Seat and Radiator Length Specifications
The specific clearance measurements absent from all guides.
Bay Windows with Window Seats
Floor-length curtains on a bay window with a built-in window seat create a practical problem: when the curtains are swept open (pushed to the sides), the trailing floor-length hem drapes over the seat cushion, impeding sitting and creating a trip hazard.
The specification: Joydeco confirms: “for bay windows with window seats, curtains should stop at the sill or just above the seat cushion.”
Sill-length curtains end approximately 3 inches above the seat cushion. This provides visual coverage of the window frame and lower glass while keeping the seat surface fully usable.
Bay Windows with Radiators
Bay windows frequently have radiators positioned beneath the sill on the bay’s interior floor. A floor-length curtain touching a radiator or draping over it creates:
- Heat circulation blockage: the radiator’s convective heat output is directed behind the curtain rather than into the room, reducing heating efficiency
- Fabric discoloration: sustained heat contact yellows and weakens most curtain fabrics within one to two heating seasons
- Fire risk: most curtain fabrics are not fire-rated; sustained radiant contact with a hot radiator surface presents a fire risk
The specification: Curtains must clear the radiator surface by at least 2 inches. Measure the height of the radiator top surface from the floor and subtract 2 inches; this is the maximum curtain hem height. For most residential radiators (8 to 12 inches tall on legs): the curtain hem is typically at sill height (approximately 12 to 18 inches from the floor).
The Three-Layer System for Bay Window Curtains
The complete layering architecture absent from all guides.
Joydeco recommends layering but does not explain the specific layer positions. The three-layer system for maximum bay window flexibility:
Layer 1 — Inside mount per individual panel (light filtering + insulation): A cellular shade, solar shade, or Roman shade installed inside-mount in each of the three bay panels. This layer handles daytime light control and privacy at the glass level while the curtains remain fully open. Each panel operates independently.
Layer 2 — Sheer curtains on a curved/angled rod at the bay opening: A set of sheer or semi-sheer curtain panels hung on a curved rod following the bay angles at the opening. The sheers provide daytime privacy and soft diffused light quality without blocking the view when the drapes (Layer 3) are open.
Layer 3 — Opaque drapes on an outer rod or track across the full bay: Heavy drapes (linen, velvet, cotton) hung on a rod spanning the full bay opening from wall to wall. These close for evening privacy and blackout. The rod extends to the main wall on each side so that when open, the drapes stack entirely outside the glass area.
The dimensional sequence: Layer 1 (innermost): inside the panel recess Layer 2 (curved rod): at the bay opening line, approximately 1 to 2 inches forward of the panel frames Layer 3 (outer rod): mounted above the bay opening on the ceiling or wall above the bay, extending to the main walls on each side
The Thermal Benefit — When Bay Window Curtains Actually Insulate
The specific conditions required for thermal benefit absent from all guides.
Many guides say curtains “add warmth” or “insulate.” The thermal benefit from bay window curtains is real but requires specific conditions.
The mechanism: Fully lined floor-length drapes that:
- Touch the floor (or the sill for window seat bays) creating a seal at the bottom
- Extend to the wall on both sides of the bay creating a seal at the sides
- Close fully without significant gaps at the center
…trap the cold air that falls from the glass surface in front of the curtain, rather than allowing it to circulate into the room as a cold convective draft. The air pocket between the curtain and the glass becomes a still thermal buffer, adding approximately R-1 to R-2 of insulation value.
If any of these conditions are missing:
- Curtains hovering 1 inch above the floor: cold air escapes from the gap at the bottom; thermal benefit is minimal
- Rod ending 6 inches from the wall: cold air circulates around the side of the curtain; thermal benefit is minimal
- Center gap where panels don’t meet: cold air escapes at the center; thermal benefit is minimal
The practical specification: For bay windows where thermal performance is a goal alongside aesthetics: lined floor-length curtains with a proper floor seal; rod mounted from wall to wall on the main walls; center panel overlapping by 2 to 3 inches when closed.
The Pattern Alignment Challenge for Multi-Panel Bay Window Curtains
The ordering consideration absent from all guides.
When four to six panels hang across a bay window, horizontal patterns — stripes, checks, geometric prints, bold floral repeats — must be aligned across all panels for a cohesive appearance.
The challenge: Each panel must be cut from the same position in the fabric repeat to align horizontally at the seam lines. For a fabric with a 12-inch pattern repeat and six 52-inch panels: each panel must begin at the same point in the repeat (e.g., all starting at the “top of the flower” or “center of the stripe”). This requires purchasing enough fabric to account for the repeat loss at each panel — typically (number of panels − 1) × repeat height in additional fabric.
The ordering specification:
- Same dye lot across all panels (color consistency)
- Sequential cuts from the fabric roll (pattern alignment)
- For ready-made panels: buy from the same manufacturing run or verify the retailer stocks same-pattern panels that are pattern-matched
The simplest solution: For bay windows requiring 4 to 6 panels: choose solid fabrics, small allover textures, or small-scale patterns with a repeat under 4 inches. These eliminate the pattern alignment challenge entirely while still providing the desired fabric texture.
The Best Curtain Styles by Room Type
The room-specific recommendation guide.
| Room | Best Curtain Style | Length | Fabric | Why |
|---|---|---|---|---|
| Formal living room | Pinch pleat | Floor (puddle) | Velvet or silk | Structured, luxurious; bay as focal point |
| Family room | Pinch pleat or grommet | Floor (float) | Linen or cotton | Practical daily operation; easy care |
| Bedroom | Pinch pleat with blackout lining | Floor | Velvet or lined cotton | Full night privacy + insulation |
| Kitchen nook | Café curtain (lower half only) | To sill | Cotton or gingham | Natural light in upper half; privacy in lower |
| Bathroom | Café curtain (lower half) | To sill | Moisture-resistant polyester | Privacy without blocking light above |
| Window seat alcove | Pinch pleat | Sill (above cushion) | Linen or cotton | Seat remains usable when curtains open |
| Study / home office | Ripple fold or pinch pleat | Floor | Sheer + lined drape (layered) | Flexible light control throughout the day |
Where to Order
For custom bay window curtains with heading style guidance: Spiffy Spools at spiffyspools.com/spiffy-speak/bay-window-curtain-ideas — the most detailed custom curtain guide for bay windows; heading style comparison; layering tips; drapery poles connected by elbows at the angular joints.
For bay window curtain installation methods and style inspiration: The Shade Store at theshadestore.com/blog/bay-window-curtains — inside-mounted vs outside-mounted curtain approaches; curved vs straight rod placement; combination treatment ideas (cellular shades + drapes layered).
For practical bay window curtain guidance including window seat and radiator specifications: Joydeco at joydeco.com/blogs/guide/bay-window-curtains-ideas — Roman shades as best style for bay corners; sill-length for window seat bays; velvet thermal insulation for large bay glass areas; daylight sheer + evening blackout layering.
Frequently Asked Questions
What are the best curtains for a bay window? The best curtains for a bay window are floor-length pinch pleat panels with hooks and rings for smooth operation on curved bay window rods. Linen is ideal for casual and transitional rooms; velvet provides superior insulation and formal elegance. The most important specifications are the fullness ratio (2 to 2.5 times the total bay width for pleated styles), the panel count (4 to 6 panels for a standard bay window, not 2), the rod extension (reaching the main walls on each side so open curtains stack outside the glass), and the header type (pinch pleat only for curved bay rods; grommet headers bind at the corner angles).
How many curtain panels do I need for a bay window? A bay window typically requires 4 to 6 curtain panels, not the 2 panels commonly expected. A 120-inch wide bay window with 2.5 times fullness for pleated style requires 300 inches of total fabric. With standard 52-inch wide panels, this equates to approximately 6 panels. Under-paneling a bay window by using only 2 standard panels for a 120-inch bay creates less than 1 times fullness, producing flat, sparse curtains that look insufficient for the window scale.
Can you use grommet curtains on a bay window? Grommet curtains cannot be smoothly operated on a curved bay window rod because the rigid metal grommet rings bind at the corner angles where the rod bends. Grommet curtains work on a bay window only when hung on a straight rod mounted above the bay opening (not following the angles), where they are used as static decorative side panels rather than daily-operated curtains. For bay window curtains that open and close regularly, specify pinch pleat curtains with hooks and rings, which can travel around the corner angles of curved bay window rods.
How long should curtains be for a bay window with a window seat? Curtains for a bay window with a window seat should be sill length, ending approximately 3 inches above the seat cushion surface. Floor-length curtains drape over the seat cushion when swept to the sides, impeding sitting and creating a trip hazard. For bay windows with radiators below the sill, curtains must end at least 2 inches above the radiator surface to allow heat circulation and prevent fabric discoloration and fire risk.
What is the three-layer curtain system for bay windows? The three-layer system for bay window curtains provides maximum light control and privacy flexibility. Layer 1 is an inside-mount cellular shade or solar shade installed within each individual bay panel frame, handling daytime light control independently per section. Layer 2 is a set of sheer panels on a curved rod at the bay opening, providing soft diffused daylight with daytime privacy. Layer 3 is opaque drapes on an outer rod spanning the full bay opening from wall to wall, closed for full evening privacy and blackout. The outer rod extends to the main walls on each side so the open drapes stack entirely outside the glass area.
Related Guides on BlindShades.pro
- The Best Bay Window Blinds & Shades Buying Guide
- What Are the Best Blinds for Bay Windows
- How Do You Hang Curtains on a Bay Window
- How Do You Add Privacy to a Bay Window Without Blocking Light
- Are Cellular Shades Good for Bay Windows
By Michael Turner | 30 Years Home Improvement Expertise | Updated 2026 | BlindShades.pro