How Do You Measure Sliding Glass Door Blinds?
Authored By Michael Turner -30 Years Home Improvement Expertise | Updated 2026 | BlindShades.pro
Updated on June 13, 2026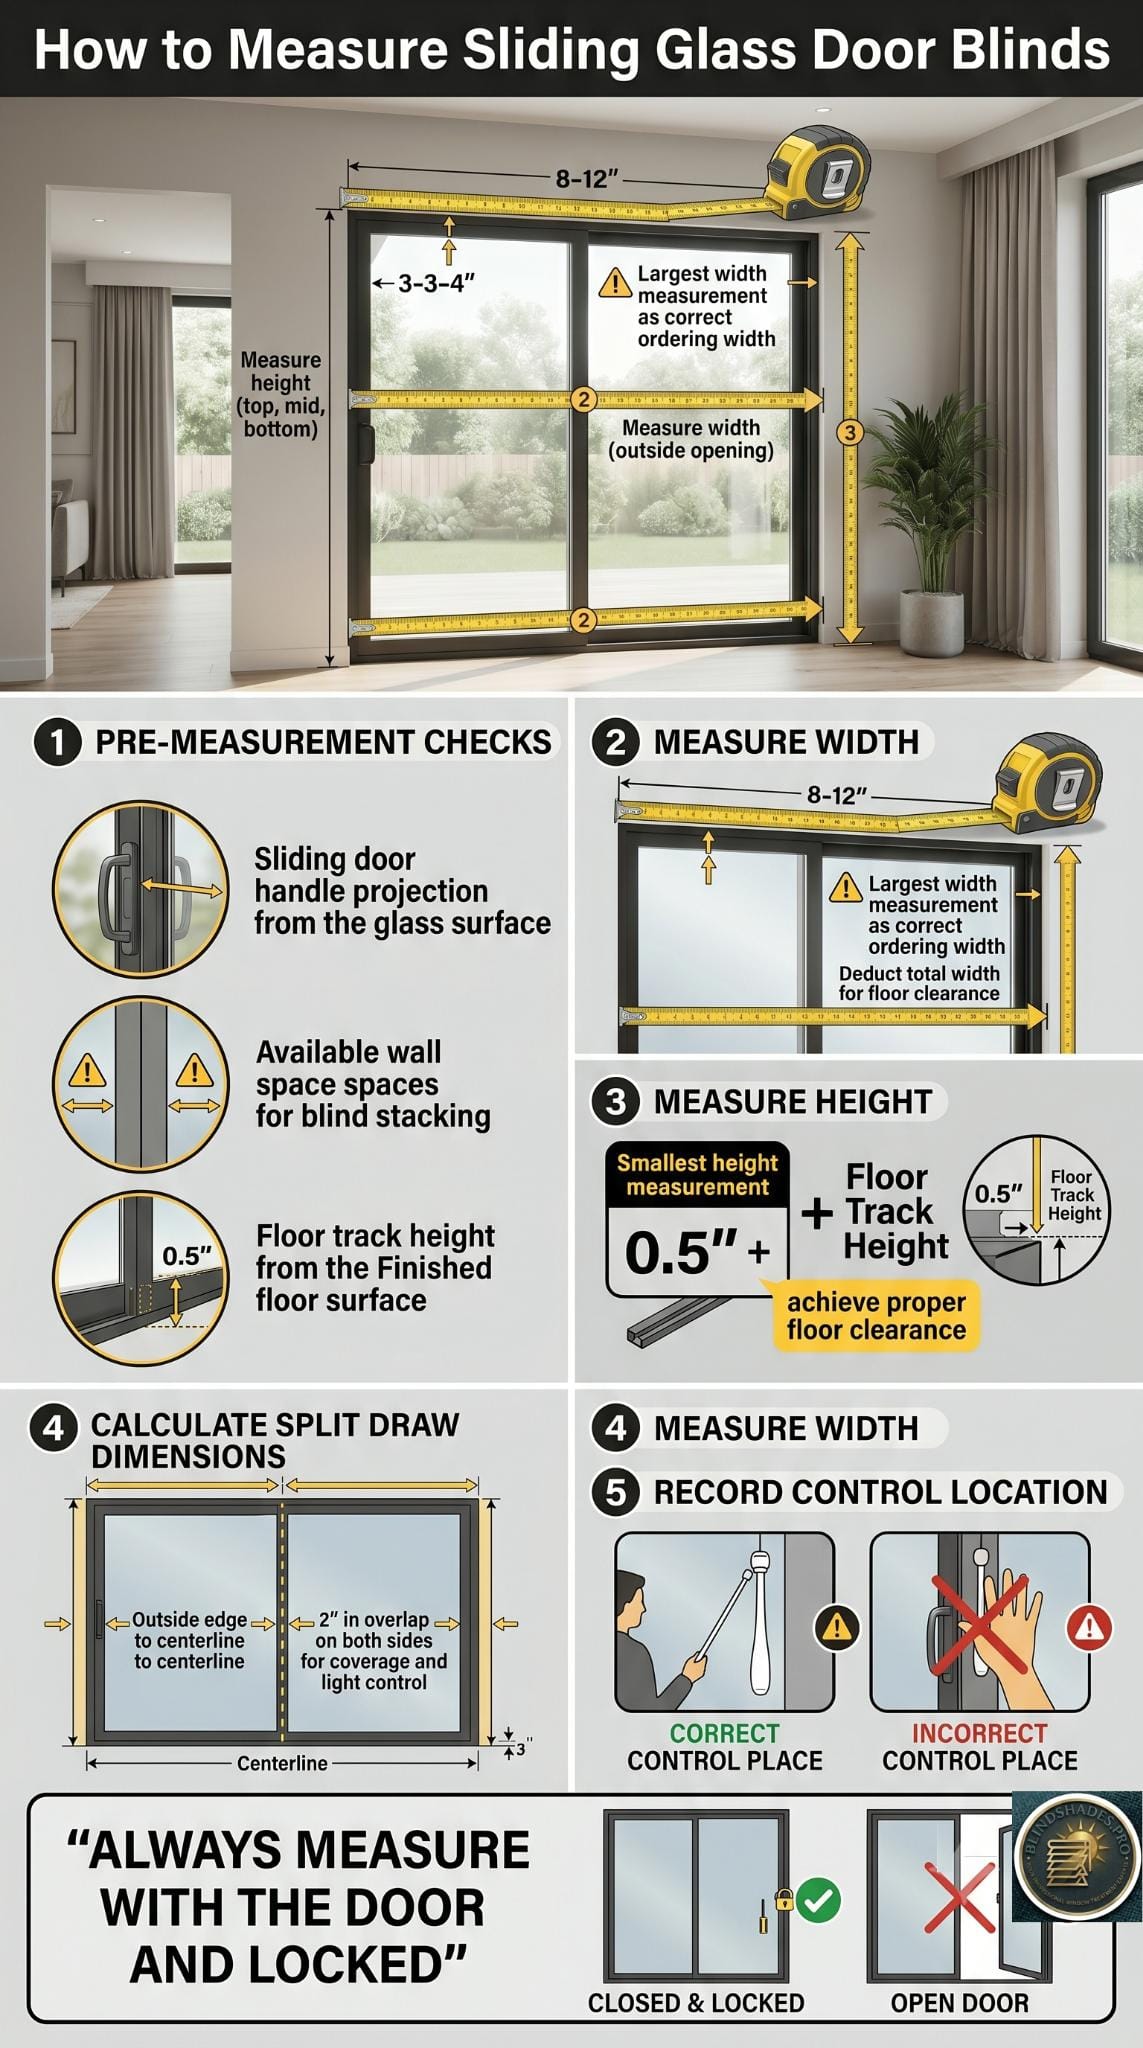
Key Takeaways:
- Every guide tells you to add 2 to 6 inches to the width and deduct 0.5 inches from the height — no guide explains the specific sliding glass door reasons behind these numbers; the 0.5-inch floor deduction accounts for two problems specific to sliding glass doors: (1) the floor track protrudes 0.25 to 0.75 inches above the floor surface and the vane tip must clear it, and (2) floors are rarely perfectly level across 6 to 12 feet; using the smallest of three height measurements plus 0.5-inch deduction ensures the vane clears both the track and the lowest floor point
- Before measuring width and height, run the sliding door handle projection check: the recessed door handle typically projects 1.5 to 2.5 inches from the door face; the wall-mounted headrail bracket must project further from the wall than the door handle projects from the door face; if the bracket depth is less than the handle projection, the hanging vanes will contact the handle every time the door slides; measure the handle projection with a tape measure before ordering and confirm the bracket depth specification exceeds it
- When measuring the available wall space for the blind stack-back, confirm a minimum of 16 to 20 percent of the total blind width is available beside the door frame on the stack side; 3 Day Blinds (November 2025) confirms a 3.5-inch vane blind at 160 inches wide stacks 25 to 30 inches; for a standard 80-inch outside-mount blind, expect 13 to 16 inches of stack-back; if the sliding glass door is positioned against a perpendicular wall, the available wall space on that side may be less than 13 inches, making a single-stack configuration impossible and requiring a split draw specification instead
- For two-blind split installations where separate blinds cover each panel of the sliding glass door, the correct formula is: measure the total outside-mount width from frame edge to frame edge; divide by 2 to find the center point; add 2 inches to each half for center overlap; left blind width equals distance from left frame edge to center plus 2 inches; right blind width equals distance from right frame edge to center plus 2 inches; both blinds ordered at the same height; the 2-inch center overlap eliminates the gap that appears between two independently measured blinds at the center stile
- The wand or control side decision must be made during the measurement visit, not after ordering: record which direction the sliding panel opens (left or right); the wand goes on the opposite end from the door handle side; for a door where the sliding panel opens to the right, position the wand on the left so the operator traverses the vanes from left to right — clearing the path before walking through; specifying the wrong wand side results in an ergonomically awkward blind that works against the natural door operation
⭐ Quick Answer — How Do You Measure Sliding Glass Door Blinds?
- Run These Four Pre-Checks Before Taking a Single Width or Height Measurement: Measuring sliding glass door blinds requires four pre-checks that no standard guide includes. (1) Door handle projection: the recessed handle on a sliding glass door projects approximately 1.5 to 2.5 inches from the door face; the wall-mounted headrail bracket must project farther from the wall than the handle projects from the door face — if the bracket depth is less than the handle projection, hanging vanes will contact the handle as the door slides; measure the handle projection and confirm the bracket depth specification exceeds it; if not, specify spacer blocks — Blinds.com confirms spacer blocks are available “to help extend the window treatment far enough to pass obstructions such as doorknobs.” (2) Available stack-back wall space: 3 Day Blinds (November 2025) confirms a 3.5-inch vane blind stacks approximately 25 to 30 inches on a 160-inch opening; for a standard 80-inch blind, expect 13 to 16 inches of stack-back on the stack side; measure the available wall space from the door frame edge to the nearest perpendicular wall, corner, or obstacle — if this space is less than 13 inches, specify split draw rather than single stack. (3) Floor track height: measure how far the sliding glass door floor track protrudes above the finished floor (typically 0.25 to 0.5 inches); this measurement is added to the standard 0.5-inch floor clearance deduction — total deduction = track height + 0.5 inches. (4) Obstruction scan: check for security sensors on the door frame, old curtain rod brackets above the door, header projections, and adjacent windows constraining the maximum blind width
- The Width Measurement — Always Outside Mount, Always Largest of Three: Sliding glass door blind width is always measured as an outside mount — inside mount requires a minimum of 3 inches of frame depth, which most sliding glass door frames do not have; Blinds Chalet confirms: “When measuring window blinds for sliding glass doors it is important that you measure the blind to fit as an outside mount.” Measure the opening width at three points — top, middle, and bottom. Use the largest of the three measurements as the base. Add 3 to 4 inches on each side for a total of 6 to 8 inches of outside-mount overlap — this ensures full coverage of the door frame, allows vanes to completely clear the glass when stacked, and reduces side light gaps; Factory Direct Blinds confirms outside-mounted blinds “require about three extra inches per side.” The outside-mount manufacturer makes no deductions — what you order is what you receive; Blinds Chalet confirms: “Remember to select the OUTSIDE MOUNT option as this will ensure that your blind will come the exact width and length desired with no deductions taken.” For the standard 72-inch sliding glass door: 72 inches + 4 inches each side = 80-inch order width
- The Height Measurement — Always Smallest of Three, Always Deduct Track Height Plus 0.5 Inches: Measuring sliding glass door blinds for height uses the opposite rule from width: use the smallest of three measurements, not the largest. Measure at the left, center, and right from the floor to the planned headrail mounting position. SelectBlinds confirms: “For sliding doors for vertical blinds, use the smallest height, not the largest, minus a half-inch, so they hang slightly above the floor.” Why the smallest: floors across a 6 to 12-foot sliding glass door span are rarely perfectly level; a floor measuring 96 inches at the left and 95.5 inches at the right has a 0.5-inch dip; ordering at the largest (96 inches) produces a vane that contacts the floor on the lower right side; ordering at the smallest (95.5 inches) and then deducting ensures clearance at the lowest point. Then deduct: total floor deduction = floor track height + 0.5 inches. If the track protrudes 0.25 inches: deduct 0.75 inches total. If the track protrudes 0.5 inches: deduct 1.0 inch total. The standard industry deduction of 0.5 inches only works when the floor track is flush with the floor — which most sliding glass door tracks are not. Headrail mounting position: 2 to 4 inches above the door frame top or molding; Lowe’s confirms “the blinds should overlap the top of the glass by at least 3 inches”
- The Two-Blind Split Formula and the Panel Sweep Arc Clearance Check: Two measurements specific to sliding glass door blinds absent from all standard guides. (1) Two-blind split formula: when ordering two separate blinds — one covering the fixed panel and one covering the sliding panel — measure the total outside-mount width from the left frame edge to the right frame edge including wall overlap; divide by 2 to find the center point; left blind width = left frame edge to center + 2 inches; right blind width = right frame edge to center + 2 inches; both blinds ordered at the same height; the 2-inch center overlap on each blind (4 inches total at center) closes the gap that forms at the center stile between the fixed and sliding panels when both blinds are fully lowered; without center overlap, a visible light gap appears between the two blinds. (2) Panel sweep arc clearance: when the sliding door panel opens, its top edge sweeps laterally across the full opening width beneath the hanging blind; if the headrail is at the same height as the top of the sliding panel, the moving door panel will contact and deflect the hanging vanes; measure the height of the sliding door panel’s top edge from the floor and add 1 inch — this is the minimum headrail mounting height; for a panel top edge at 80 inches from the floor, the headrail must be at 81 inches or higher
- The Wand/Control Side Decision — Confirm During the Measurement Visit: The wand or control side position on sliding glass door blinds must be decided at the measurement stage, not after ordering. Record which direction the sliding panel opens as part of the measurement visit. The correct wand position: wand on the opposite end from the door handle side. For a door where the sliding panel opens to the right, specify the wand on the left — the operator stands at the left, pushes the vanes right toward where the door will open, and then walks through the cleared opening; for a door where the sliding panel opens to the left, specify the wand on the right. 3 Day Blinds confirms: “For sliding glass doors: position the stack on the opposite side of the active door panel to keep pathways open and maintain your view” — the wand position is what enables this natural operation; specifying the wrong wand side produces a blind that requires the operator to walk past the door opening to reach the wand before traversing back — an ergonomically counterproductive daily routine. For split draw, the wand can go on either side; specify whichever side is most accessible from the main interior room
- Best Sources: Closed/locked door before measuring; outside mount requires 3 extra inches per side; obstruction check for accurate large-opening fit → Factory Direct Blinds sliding glass door measurement guide · Stack-back quantified (25-30 inches on 160-inch blind); position stack on fixed panel side; 2-3 inches overlap each side → 3 Day Blinds how to measure for vertical blinds (November 2025) · Smallest height minus 0.5 inch for sliding door vertical blinds; headrail 2-3 inches above frame; spacer blocks for obstacles → SelectBlinds door blinds measuring guide
⚠️ The Floor Track Height Measurement Table and the Obstruction Scan — Two Pre-Checks All Guides Miss: (1) Floor track height measurement for sliding glass door blind height deduction: the standard 0.5-inch floor clearance deduction cited by every guide assumes the floor track is flush with the finished floor — but most sliding glass door tracks protrude 0.25 to 0.75 inches above the floor surface. Measure the actual track height using a small ruler placed flush with the finished floor beside the track. Then apply the correct total deduction from the smallest height measurement: track flush with floor (0 inches) = deduct 0.5 inches; standard track (0.25 inches) = deduct 0.75 inches; standard tall track (0.5 inches) = deduct 1.0 inch; extra-tall track (0.75 inches) = deduct 1.25 inches. Using only the standard 0.5-inch deduction on a door with a 0.5-inch track produces vanes that are flush with the top of the track — any slight swing contacts the track edge. (2) Obstruction scan items specific to sliding glass doors: security alarm sensor on the door frame or adjacent wall — measure how far it projects from the wall and confirm bracket mounting clears it; old curtain rod brackets from a previous treatment still mounted above the door — remove before measuring headrail height; structural header or lintel projecting 1 to 2 inches from the wall face — the headrail will sit this distance further from the wall than a flat-wall mount, affecting vane clearance from the door face; adjacent window or perpendicular wall constraining maximum blind width — measure from the door frame edge to the nearest adjacent obstacle on each side and confirm the intended 3 to 4 inch wall overlap fits within this space; AAA Blind confirms: “Pay attention to any trim, molding, or obstacles that could interfere with the operation of the blinds.” See the full pre-measurement checklist below.
💡 The Complete Measurement Card — Everything to Record Before Ordering Sliding Glass Door Blinds: The complete how to measure sliding glass door blinds checklist: (1) Door handle projection depth (millimeters or inches from door face) — this is the minimum bracket depth required; confirm before selecting product. (2) Available stack-back wall space on the intended stack side (inches from door frame edge to nearest obstacle) — must be 16 to 20 percent of total blind width; if less, specify split draw. (3) Floor track protrusion height (use ruler flush with finished floor) — add this to 0.5 inches for total height deduction. (4) Obstruction scan: security sensor position and projection; old bracket holes; header projection depth; adjacent window edge distance. (5) Width measurement at top, middle, bottom — record all three; use LARGEST; add 3 to 4 inches each side. (6) Height measurement at left, center, right — record all three; use SMALLEST; subtract track height + 0.5 inches. (7) Door panel top edge height from floor — add 1 inch = minimum headrail mounting height. (8) Sliding panel direction (opens left or right) — wand goes on OPPOSITE side. (9) Single blind or two-blind split — if two: each half = (total width divided by 2) + 2 inches center overlap. Common mistakes to avoid: ordering with only the standard 0.5-inch floor deduction without measuring the track; using the largest height instead of smallest; forgetting to check stack-back wall space before ordering single stack; not measuring handle projection before selecting bracket depth. For the full installation protocol after ordering, see How Do You Install Blinds on Sliding Glass Doors. See the full measurement summary card below.
📖 Read the complete guide below for: the four pre-checks before measuring (door handle projection check; available stack-back space check; floor track height measurement; obstruction scan for sensors, old brackets, header projection, and adjacent window constraints), width measurement (outside mount standard; largest of three; add 3-4 inches each side; no factory deductions), height measurement (smallest of three; deduct floor track height + 0.5 inches; headrail 2-4 inches above frame), the two-blind split formula (each half = total width divided by 2, plus 2-inch center overlap per blind), the panel sweep arc clearance check (door panel top edge + 1 inch = minimum headrail height), the wand/control side decision table (wand opposite from door handle; opening-direction-specific guidance), floor track deduction table by track height (0/0.25/0.5/0.75-inch track to correct deduction), and the complete measurement card for all nine items to record before ordering.
How Do You Measure Sliding Glass Door Blinds — The Complete Step-by-Step Protocol
The four measurements every guide covers — and the four pre-checks no guide includes.
<strong>Measuring sliding glass door blinds</strong> involves the same width and height measurements as any window — but three structural features of sliding glass doors create specific measurement steps that standard window blind guides do not address: the sliding door handle that must be cleared as the door moves, the floor track that protrudes above the floor surface, and the sliding panel that sweeps a lateral arc as it opens.
The Pre-Measurement Checks — Run Before Taking a Single Width or Height Number
Four checks that must be completed before measuring — absent from every guide.
Pre-Check 1 — Sliding Door Handle Projection
The recessed handle on a sliding glass door is built into the door panel face and projects approximately 1.5 to 2.5 inches outward from the door surface. When the door slides open, this handle passes beneath the hanging blind.
The measurement: Using a tape measure, measure how far the door handle projects from the flat door face. This is the handle projection depth.
Why it matters for ordering: The headrail bracket mounted on the wall above the door must project from the wall by at least as much as the handle projects from the door face. If the bracket projects less than the handle, the vanes hang closer to the door than the handle extends — and the handle contacts the vanes as the door slides, bending the vanes outward and wearing the vane carrier clips over time.
The specification: Confirm the bracket depth (listed in the product specification sheet) is equal to or greater than the measured handle projection. If the available bracket depth is insufficient, spacer blocks mounted between the wall and the bracket extend the headrail away from the wall until adequate clearance is achieved. Blinds.com confirms: “Spacer blocks or extension brackets are available to help extend the window treatment far enough to pass obstructions such as doorknobs or molding.”
Pre-Check 2 — Available Stack-Back Wall Space
All sliding glass door blinds stack to one side when the door is open. Before measuring the blind width, measure the available wall space beside the door frame on the intended stack side.
3 Day Blinds (November 2025) quantifies the stack-back requirement: “A 3.5-inch vane blind typically stacks about 7 to 8 inches on a 40-inch window and 25 to 30 inches on a 160-inch window.” The stack-back amount is approximately 16 to 20 percent of the total blind width.
The calculation for a standard sliding glass door:
- 72-inch door + 4-inch overlap each side = 80-inch total blind width
- 20% of 80 inches = 16 inches of stack-back on the stack side
The pre-check: Measure the wall space from the door frame edge to the nearest perpendicular wall, corner, or fixed obstacle on the intended stack side. If this space is less than 16 inches, a single-stack blind cannot be fully retracted without partially blocking the door opening.
The solution when wall space is insufficient: Specify split draw (center-open). Split draw divides the stack equally between both sides — 8 inches per side instead of 16 inches on one side. Most sliding glass doors have at least 6 to 8 inches of wall space on each side. If even split draw is not possible (less than 6 inches on either side), the treatment must be a roller shade (which rolls up vertically and requires no lateral stack space) rather than a vertical blind or panel track.
Pre-Check 3 — Floor Track Height
Sliding glass doors have a floor track — an aluminum or vinyl extrusion embedded in the floor that the sliding panel rolls along. This track protrudes above the finished floor surface.
The measurement: Place a small ruler flush with the finished floor beside the track and measure how high the track protrudes above the floor surface. Most standard residential sliding glass door tracks are 0.25 to 0.5 inches high.
Why this matters for height: The standard 0.5-inch floor clearance deduction that all guides specify assumes the blind terminates 0.5 inches above the floor. But if the floor track is 0.5 inches tall, a vane terminating 0.5 inches above the floor surface is flush with the top of the track — not clear of it. When the vane swings slightly (from air movement or door operation), it catches the track.
The correct deduction: Total height deduction = track height + 0.5-inch clearance
| Track Height | Total Deduction from Smallest Height |
|---|---|
| Flush with floor (0 inches) | 0.5 inches |
| Standard track (0.25 inches) | 0.75 inches |
| Tall track (0.5 inches) | 1.0 inch |
| Extra-tall track (0.75 inches) | 1.25 inches |
Factory Direct Blinds confirms: “Closed, locked doors without obstacles prevent gaps that skew sliding door measurements.” Measuring the track height as part of the pre-check is part of understanding those floor-level obstacles.
Pre-Check 4 — The Obstruction Scan
Before measuring, scan the door frame and surrounding wall for items that affect bracket placement or maximum blind width:
Security sensor on frame: Door and window alarm sensors are often mounted on the sliding glass door frame or adjacent wall. Measure how far the sensor projects from the wall. If the sensor is on the frame above where the headrail will mount, the bracket must clear the sensor; use spacer blocks if needed.
Previous curtain rod brackets: If the door previously had curtain rods, old bracket holes and residual brackets may be present above the door. These must be removed before measuring headrail mounting height — they add confusion and can interfere with headrail bracket placement.
Header or lintel projection: Some sliding glass door frames have a structural header that projects 1 to 2 inches beyond the wall face. The headrail bracket must account for this projection. If the header projects 1.5 inches, the headrail sits 1.5 inches further from the wall than a flat-wall mount — vanes will hang with 1.5 inches of gap between them and the door face.
Adjacent window or wall return: If a side window or a perpendicular wall is directly adjacent to the sliding glass door, the maximum width of the outside-mount blind is constrained by the available wall space on that side. Measure from the door frame edge to the nearest obstacle on each side to confirm the intended overlap width fits without interfering with adjacent features.
AAA Blind and Shutter Factory confirms: “Pay attention to any trim, molding, or obstacles that could interfere with the operation of the blinds.”
The Four Core Measurements
Step 1 — Width
Always outside mount for sliding glass doors. Inside mount is theoretically possible but requires at least 3 inches of frame depth — most sliding glass door frames do not have this depth. Smart Blinds Pro confirms: “Blinds mount on the wall above the door frame and extend beyond the sides.” All four sources (Lowe’s, Factory Direct Blinds, Blinds Chalet, SelectBlinds) confirm outside mount as the standard for sliding glass doors.
How to measure width:
- Measure the opening width at the top, middle, and bottom of the door frame
- Record all three measurements
- For outside mount: use the largest width measurement as the base
- Add 3 to 4 inches each side for coverage overlap and light control — this produces a total blind width of the door opening + 6 to 8 inches
- This overlap also ensures the vanes or panels fully clear the door glass when stacked to one side
Blinds Chalet confirms: “The width of the vertical blinds needs to be measured from the outside of the moulding left to right and have 2 to 6 inches added for desired privacy.” Factory Direct Blinds confirms outside-mounted blinds “require about three extra inches per side.”
The split width formula — for two-blind installations: When ordering two separate blinds (one over the fixed panel, one over the sliding panel):
- Measure the total outside-mount width as above
- Find the center point: total width ÷ 2
- Left blind width = left edge to center + 2 inches
- Right blind width = right edge to center + 2 inches
- Both blinds ordered at the same height
The 2-inch center overlap on each blind (4 inches total at center) closes the gap between the two blinds when both are lowered. Without center overlap, a visible gap appears at the center stile between the fixed and sliding panel.
Step 2 — Height
How to measure height:
- Measure from the floor to the planned headrail mounting position at the left side, center, and right side
- Record all three measurements
- For sliding glass door vertical blinds: use the smallest height measurement
- Deduct the total floor clearance (track height + 0.5 inches — see Pre-Check 3)
- The result is the ordered height
SelectBlinds confirms: “For sliding doors for vertical blinds, use the smallest height, not the largest, minus a half-inch, so they hang slightly above the floor.”
Why the smallest height (not the largest): Floors are rarely perfectly level across the 6 to 12-foot span of a sliding glass door opening. A floor that measures 96 inches at the left side and 95.5 inches at the right side has a 0.5-inch dip. If the blind is ordered at 96 inches (the largest height), the vanes will contact the floor on the lower side. Ordering at 95.5 inches (the smallest height) and then deducting 0.5 inches for clearance produces a vane length of 95 inches — clearing the floor by 0.5 inches on the low side and by 1.0 inch on the high side.
The headrail mounting height: Position the headrail 2 to 4 inches above the top of the door frame or molding. Lowe’s confirms: “The blinds should overlap the top of the glass by at least 3 inches.” 3 Day Blinds confirms: “Include 2 to 3 inches of overlap on each side to help the vanes clear the window or door completely and improve light control.” Smart Blinds Pro provides a worked example: “Mounting 4 inches above an 80-inch door opening: Height = 84 inches.”
Step 3 — The Sliding Panel Sweep Arc Clearance Check
The measurement no guide includes.
When the sliding door panel opens, its top edge sweeps laterally across the full width of the door opening until it tucks behind the fixed panel. As it sweeps, its top edge passes through the space directly beneath the hanging blind.
The clearance measurement:
- Measure the height of the sliding door panel’s top edge from the finished floor
- Add 1 inch minimum clearance
- This is the minimum headrail mounting height: door panel height + 1 inch
For a standard sliding glass door with a panel height of 80 inches: minimum headrail height = 81 inches from the finished floor. If the door frame header is at 81 inches, the headrail must be mounted at the header level or above — not inside the frame.
If the headrail is mounted at the same height as the sliding door panel’s top edge, the top edge of the moving door panel will contact the hanging vanes as the door slides, pulling the vanes sideways and stressing the carrier clips.
Step 4 — The Wand/Control Side Decision
Determine during measurement — not after ordering.
Record which direction the sliding panel opens during your measurement visit. The wand position must match the door operation:
| Sliding Panel Opens | Wand Position | Why |
|---|---|---|
| Opens to the right | Wand on the LEFT | Operator stands at left, pushes vanes right toward where door will open; clears path before walking through |
| Opens to the left | Wand on the RIGHT | Operator stands at right, pushes vanes left toward where door will open |
| Split draw center-open | Wand on EITHER side | Center-open splits equally; wand on whichever side is most accessible |
3 Day Blinds confirms: “For sliding glass doors: position the stack on the opposite side of the active door panel to keep pathways open and maintain your view.” The wand position is what enables this — the wand on the opposite side from the door handle means the operator naturally traverses the blind toward the active panel side.
For the complete installation guide after measuring, see How Do You Install Blinds on Sliding Glass Doors.
Measurement Summary — The Complete Sliding Glass Door Blind Measurement Card
Print and take to the door before ordering.
| Item to Measure | What to Record | Spec / Use |
|---|---|---|
| Door handle projection depth | Distance handle extends from door face | Minimum bracket depth required |
| Available stack-back space | Wall space on stack side from door frame | 16–20% of blind width needed; if insufficient = split draw |
| Floor track height | How far track protrudes above floor | Add to 0.5-inch deduction for vane length |
| Obstruction scan | Sensors, brackets, header projection, adjacent window | Affects bracket placement and max width |
| Width (×3 points) | Top, middle, bottom of opening | Use LARGEST; add 3–4 inches each side |
| Height (×3 points) | Left, center, right — floor to headrail mount | Use SMALLEST; deduct track height + 0.5 inches |
| Door panel top edge height | Floor to top of sliding door panel | Headrail must be ≥ 1 inch above this |
| Sliding panel direction | Opens left or opens right | Wand on OPPOSITE side |
| Single or split installation | Is one blind or two being ordered? | Two blinds: each half + 2-inch center overlap |
Measurement by Treatment Type
Vertical Blinds
- Width: largest of 3 measurements + 3–4 inches each side
- Height: smallest of 3 measurements − (track height + 0.5 inches)
- Vane length = ordered height − headrail depth (manufacturer handles this deduction on outside mount)
- Wand side: opposite from door handle side
- Note on outside mount: “Remember to select the OUTSIDE MOUNT option as this will ensure that your blind will come the exact width and length desired with no deductions taken” — Blinds Chalet
Panel Track Blinds
- Width: same as vertical blinds (largest + 3–4 inches each side)
- Height: same floor clearance deduction applies
- Also measure: available stack-back wall space (panels are wider than vanes; a 3-panel system at 80 inches has approximately 22-inch stack when stacked to one side)
- Note: if ordering for a 10+ foot opening, confirm available wall space for 4–5 panel stack-back
For the full panel count and panel junction calculation, see What Are the Best Panel Track Blinds for Sliding Glass Doors.
Roller Shades
- Width: same outside mount formula (largest + 3–4 inches each side)
- Height: measure from headrail mounting position to floor; no floor clearance deduction needed (roller shades roll up entirely into the headrail; when raised, they clear the floor completely)
- For 10+ foot openings: tandem/coupled system = measure each half separately (each half = total width ÷ 2)
- Note: roller shades eliminate the lateral stack-back problem entirely — they roll up vertically and require no wall space beside the door
Common Measurement Mistakes on Sliding Glass Doors
The errors specific to sliding glass doors — not windows:
Mistake 1 — Not measuring the floor track: Deducting only 0.5 inches from the height without measuring the actual floor track height. On doors with 0.5-inch tracks, this results in vanes that contact the track. Fix: measure the track height and add it to the deduction.
Mistake 2 — Using the largest height (not smallest): SelectBlinds confirms the correct rule: “use the smallest height, not the largest” for sliding glass door vertical blinds. Using the largest height produces vanes that drag on the lowest floor point. Fix: always record all three height measurements and use the smallest.
Mistake 3 — Not measuring stack-back space before ordering: Many buyers order a single-stack blind before confirming available wall space. If the door is against a wall, the blind cannot fully stack. Fix: pre-check wall space on the stack side; if insufficient, order split draw.
Mistake 4 — Ordering the wrong wand side: The wand side is not always specified during ordering and defaults to a manufacturer standard. Fix: explicitly specify wand side during order based on the sliding panel direction.
Mistake 5 — Not accounting for the door handle projection: Ordering a blind with standard bracket depth when the door handle requires extended brackets. Fix: measure handle projection depth and confirm bracket depth specification before ordering.
For the full selection guide for the treatment type best suited to your door width, see What Are the Best Blinds for Large Sliding Glass Doors.
Frequently Asked Questions
How do you measure sliding glass door blinds? Measure the width at the top, middle, and bottom of the door frame and use the largest measurement, then add 3 to 4 inches on each side for coverage overlap — this is an outside mount installation in almost all cases. For height, measure at the left, center, and right of the door opening, use the smallest measurement, then deduct the floor track height plus 0.5 inches for floor clearance. Before measuring, run four pre-checks: door handle projection depth, available stack-back wall space, floor track height, and obstruction scan.
Should sliding glass door blinds be inside or outside mount? Outside mount is the standard for sliding glass door blinds. Factory Direct Blinds confirms outside-mounted blinds are the default because most sliding glass door frames do not have the 3-inch depth required for inside mount. Blinds Chalet confirms: “When measuring window blinds for sliding glass doors it is important that you measure the blind to fit as an outside mount.” Inside mount is possible only on doors with unusually deep frame channels.
How much should I add to the width when measuring sliding glass door blinds? Add 3 to 4 inches on each side of the door opening for a total of 6 to 8 inches extra width on the outside mount. This overlap provides adequate coverage of the door frame, allows the vanes to fully clear the glass when stacked, and reduces side light gaps. Factory Direct Blinds confirms outside-mounted blinds require approximately 3 extra inches per side.
Why do I use the smallest height measurement for sliding glass door vertical blinds? The smallest height measurement ensures the vane length accounts for the lowest point of the floor across the full door width. Floors are rarely perfectly level over 6 to 12 feet. Using the smallest measurement and then deducting the floor track height plus 0.5 inches produces a vane that clears the floor track and the lowest floor point. SelectBlinds confirms: “For sliding doors for vertical blinds, use the smallest height, not the largest, minus a half-inch, so they hang slightly above the floor.”
How do I measure for two blinds on a sliding glass door? Measure the total outside-mount width from the left frame edge to the right frame edge, including the wall overlap. Divide this total by 2 to find the center point. The left blind is ordered at the distance from the left frame edge to the center plus 2 inches for center overlap. The right blind is ordered at the distance from the right frame edge to the center plus 2 inches. Both blinds are ordered at the same height. The 2-inch center overlap on each blind closes the center gap at the door stile when both blinds are fully lowered.
Related Guides on BlindShades.pro
- The Best Sliding Glass Door Blinds & Shades Buying Guide
- What Are the Best Blinds for Large Sliding Glass Doors
- What Are the Best Panel Track Blinds for Sliding Glass Doors
- Are Roller Shades Good for Sliding Glass Doors
- How Do You Install Blinds on Sliding Glass Doors
- How Do You Keep Sliding Glass Door Blinds From Sliding
By Michael Turner | 30 Years Home Improvement Expertise | Updated 2026 | BlindShades.pro