How Do You Install Blinds on Sliding Glass Doors?
Authored By Michael Turner -30 Years Home Improvement Expertise | Updated 2026 | BlindShades.pro
Updated on June 13, 2026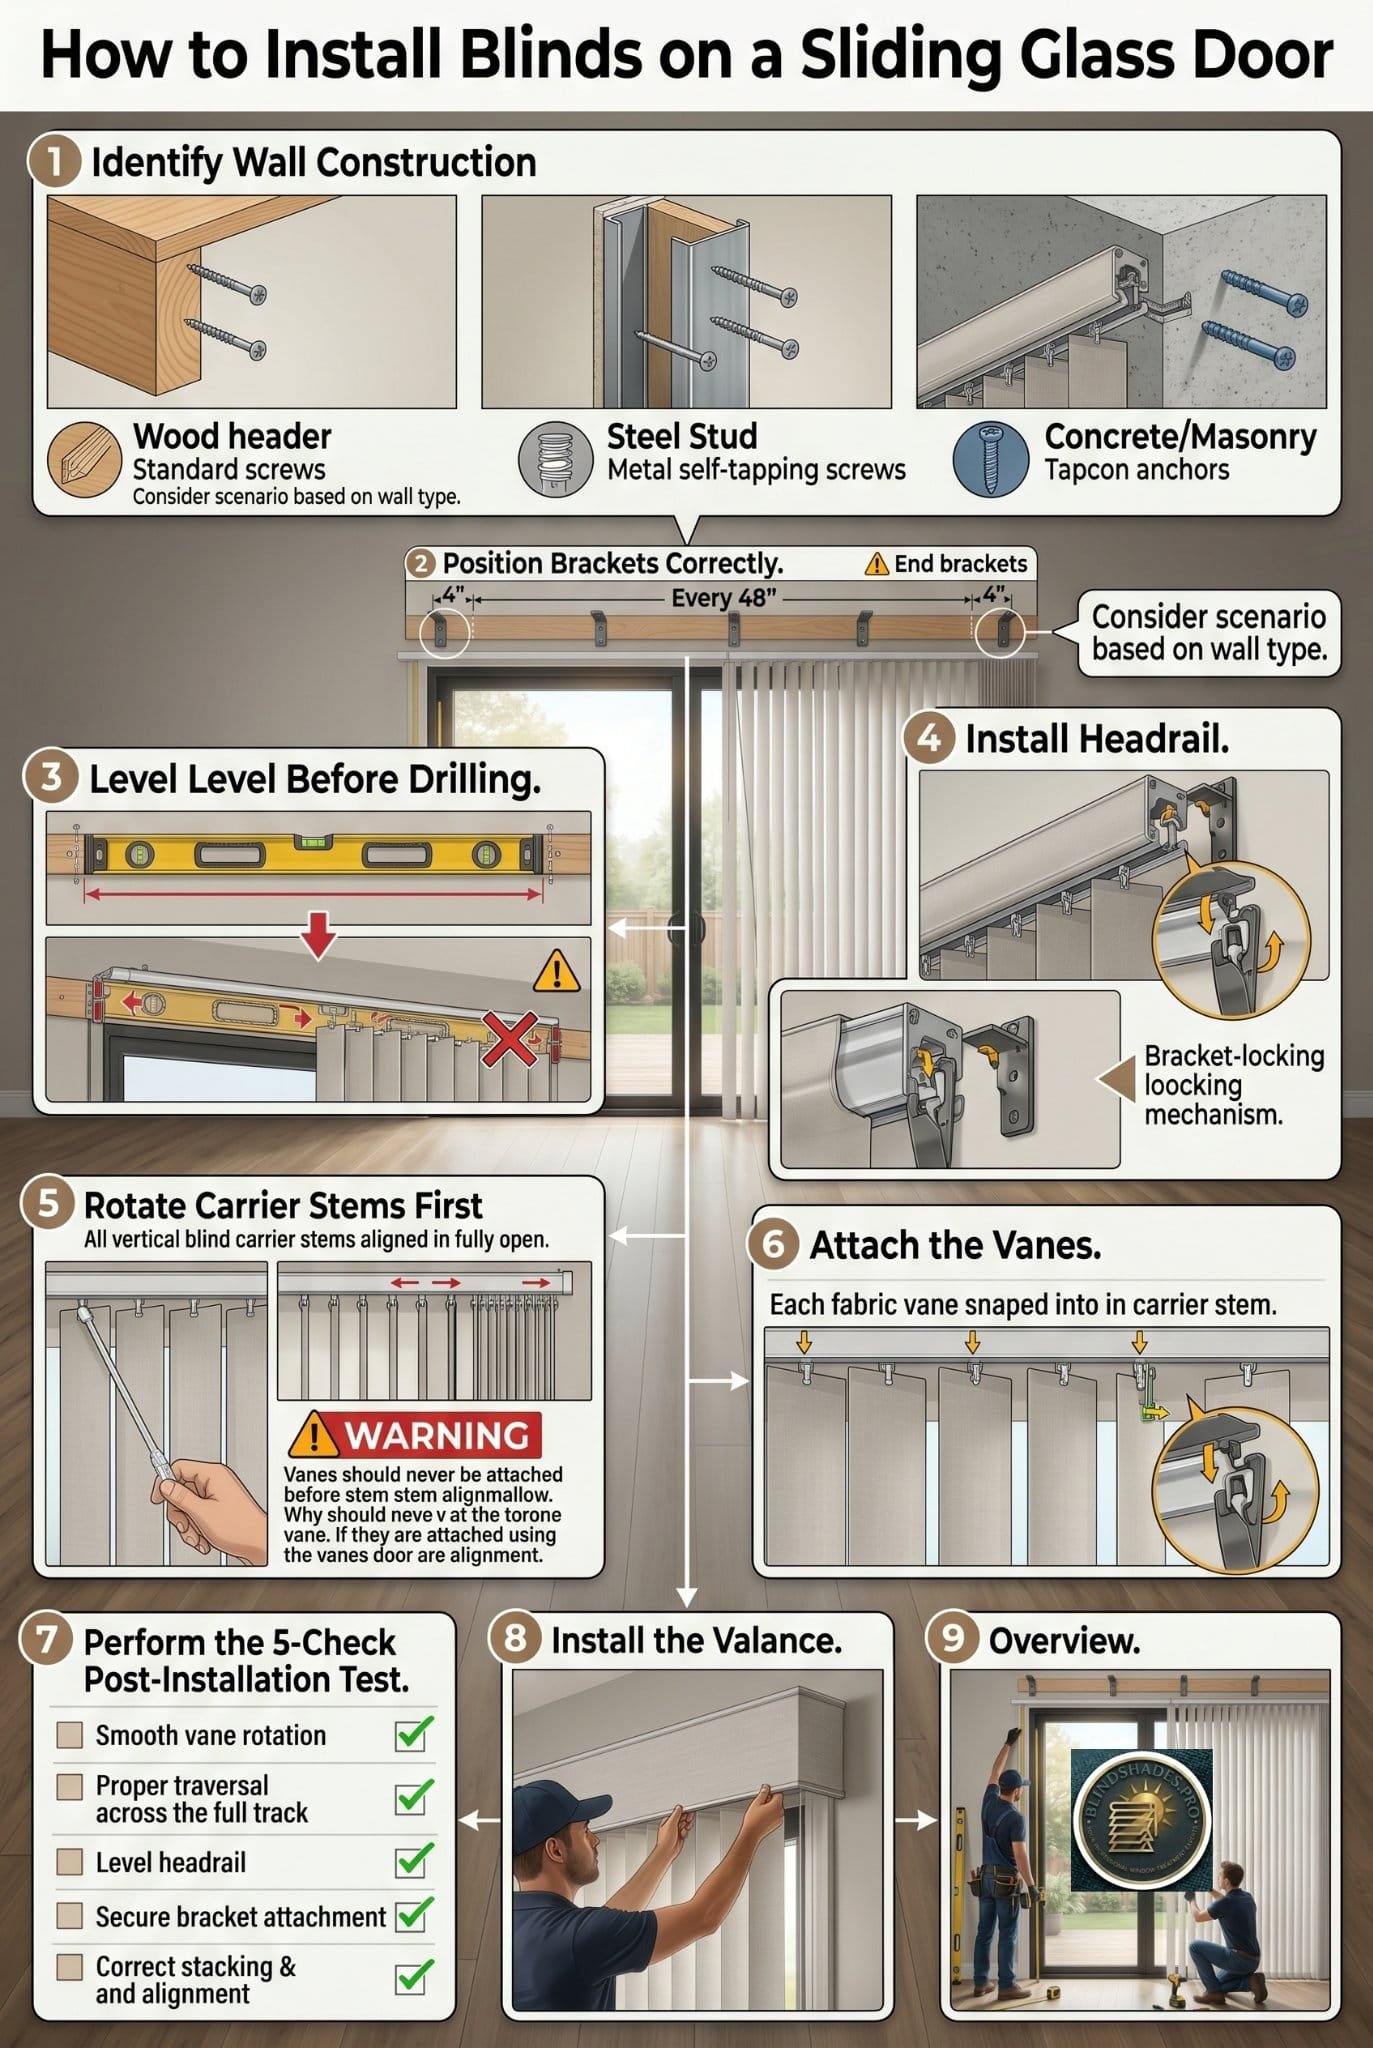
Key Takeaways:
- The wall above a sliding glass door has a specific structural pattern that changes how you anchor the brackets: there are no intermediate vertical studs between the king studs at the edges of the door opening (no 16-inch on-center pattern); instead, a structural header or lintel spans the full opening width; for wood-framed construction, this solid wood header provides a reliable anchor for standard 1.5-inch screws at any position across the width without wall anchors; for steel stud construction, use self-drilling metal screws rated for steel stud applications; for concrete lintel construction, use Tapcon masonry screws; knowing which construction type you have determines whether you need special fasteners before a single pilot hole is drilled
- The bracket spacing formula for sliding glass door blinds: end brackets go 4 inches from each end of the headrail; additional center brackets are required when the unsupported headrail span exceeds 48 inches; for an 80-inch headrail (standard 72-inch door with wall overlap): end brackets at 4 and 76 inches + 1 center bracket at 40 inches = 3 brackets total; for a 120-inch headrail (10-foot door): end brackets at 4 and 116 inches + 2 center brackets at 40 and 76 inches = 4 brackets total; all brackets must be level with each other before the headrail is snapped into place
- The most frequently missed installation step is the carrier stem rotation — and it is missed because the default stem position looks correct for vane insertion but is actually the wrong orientation; use the wand to rotate all carrier stems to the fully open position (stems perpendicular to the glass, parallel to the length of the headrail) BEFORE snapping any vane into place; Blindsgalore (March 2026) confirms: “Rotate the Stems: Before hanging anything, pull the wand to rotate the little plastic stems so they all face open. If you don’t hear the snap, the vane will fall out later”
- After snapping all vanes into the carrier stems, perform the 2-pound vane tug test before installing the valance: grasp each individual vane at its lower edge and apply a firm downward pull of approximately 2 pounds; a properly snapped vane holds completely firm; an improperly snapped vane will release under this force and can be re-snapped immediately; performing this test before valance installation allows free access to all stems for re-snapping; improperly snapped vanes that pass the installation test often fall out the first time the door is opened and air movement disturbs the vanes
- Install the valance only after completing the full 5-check post-installation test sequence: (1) headrail level within 1/8 inch across full width; (2) all stems rotate together smoothly on wand pull; (3) full traversal from closed stack to fully open with no vane touching the floor track; (4) door handle clearance with at least 1 inch between the stacked vane column and the door handle when fully open; (5) individual 2-pound tug test on every vane; only after passing all 5 checks should the valance clips be installed and the valance snapped into place
⭐ Quick Answer — How Do You Install Blinds on Sliding Glass Doors?
- The Wall Construction Diagnosis — What to Anchor Into Before Drilling a Single Hole: The first step in installing sliding glass door blinds is identifying the wall construction above the door — the correct anchor depends entirely on this. Above a sliding glass door, there are no intermediate vertical studs at 16-inch spacing; instead, a structural header spans the full opening width from king stud to king stud. If you run a stud finder above the door you will likely find no stud signal across most of the width — only at the far left and right edges of the opening. For wood-framed construction (most common): the structural wood header sits 0.5 to 1.5 inches behind the drywall and spans the full door width; standard 1.5-inch wood screws anchor directly into this solid wood at any bracket position across the entire width — no wall anchors needed anywhere in the header zone; tap the wall above the door with your knuckle for a solid non-hollow sound to confirm. For steel stud construction: a standard wood screw into a steel stud provides minimal holding power; use self-drilling hex head metal screws rated for steel stud applications; alternatively use toggle bolts in the drywall for bracket positions that miss the steel. For concrete lintel construction: standard screws and typical drywall anchors will not hold; specify Tapcon 3/16-inch masonry screws with a 5/32-inch carbide drill bit. AAA Blind and Shutter Factory (July 2025) confirms: “Pay attention to any trim, molding, or obstacles that could interfere with the operation of the blinds” — the wall construction above the door is the most important obstacle to understand before any bracket is installed
- The Bracket Spacing Formula — How Many Brackets Are Required at Every Headrail Width: Every guide for how to install sliding glass door blinds says to place brackets 4 inches from each end and add center brackets for wide headrails. No guide provides the formula. The structural rule: aluminum headrails support vane weight safely across unsupported spans of up to approximately 48 inches; beyond 48 inches of unsupported span, the headrail flexes and sags at the center, misaligning carriers and creating light gaps. The formula: center brackets required = ceiling((headrail width minus 8) divided by 48). Add 2 end brackets for total count. Results by headrail width: 56-inch or narrower = 2 brackets (end brackets only at 4 and 52 inches); 72-inch = 3 brackets at 4, 36, and 68 inches; 80-inch (standard 72-inch door with wall overlap) = 3 brackets at 4, 40, and 76 inches; 96-inch = 3 brackets at 4, 48, and 92 inches; 120-inch = 4 brackets at 4, 40, 76, and 116 inches. Home Depot confirms: “Mark two more marks 4 inches in from each end of the headrail; align the top of the bracket with the first 4-inch mark.” All brackets must be level with each other before the headrail is snapped in; use a 48-inch level to draw a horizontal reference line at the intended mounting height before marking any bracket position
- The Stem Rotation Rule — Why the Most Important Step Is Missed Most Often: The most critical step in sliding glass door blind installation is rotating the carrier stems before snapping any vanes — and it is the step most often missed because the default stem position looks correct for vane insertion but is actually wrong. When shipped, all carrier stems are in the tilt-closed position: pointing parallel to the door glass. In this position, the vane slot opening faces outward and the installer can slide a vane in. Many installers snap all vanes into this position because the insertion feels correct. The problem: when the vanes are snapped in with the stems in the tilt-closed position, pulling the traversal wand causes the mechanism to attempt to tilt the vanes closed further rather than traverse them; the vanes resist and the carrier train stresses. Blindsgalore (March 2026) confirms the correct rule: “Rotate the Stems: Before hanging anything, pull the wand to rotate the little plastic stems so they all face open (perpendicular to the window).” In the fully open position the stems point perpendicular to the glass — parallel to the headrail length — and the slot now faces sideways. Only in this position should any vane be snapped in. The correct sequence: use the wand to rotate ALL stems to fully open FIRST; snap all vanes in; then test tilt and traverse. After snapping, Blindsgalore confirms: “Push each vane up until you hear a distinct crunch or snap — if you don’t hear the snap, the vane will fall out later”
- The 2-Pound Vane Tug Test and the One-Person vs Two-Person Installation Technique: Two sliding glass door blind installation steps absent from all competitor guides. (1) 2-pound vane tug test: after all vanes are snapped into the carrier stems and before the valance is installed, grasp the lower edge of each individual vane and apply a firm downward pull of approximately 2 pounds — equivalent to lifting a standard coffee mug; a properly snapped vane holds completely firm; an improperly snapped vane releases under this force; re-snap it immediately until the distinct crunch is heard and felt; this test must be done before valance installation because any vane that fails must be re-accessed from below, which is impossible with the valance in place; a vane that holds during visual inspection and the initial traversal test can still be borderline un-snapped and will fall the first time the door opens and air displacement disturbs the vanes. (2) One-person installation technique for wide headrails: a 72-inch or wider headrail loaded with carriers weighs 15 to 25 lbs; one person holding it horizontally at shoulder height while snapping it into two brackets simultaneously is physically difficult; the one-person technique: insert the left end of the headrail into the left end bracket first; support the right end against the wall surface; slide the headrail to the right until the right end is over its bracket; lower the right end in; then press the center into any center brackets; Patio Enclosures confirms: “Most manufacturers implement a click system that makes this process incredibly easy” — but the one-end-first technique is the practical method for solo installation
- The 5-Check Post-Installation Test Sequence and the Valance Installation Protocol: Every guide for how to install sliding glass door blinds mentions testing clearance but none provides a systematic 5-check sequence. Run all 5 checks before touching the valance: (1) Headrail level: place a 48-inch level on the headrail face; must be within 1/8 inch of level across full width; if not, loosen one end bracket, adjust, retighten. (2) Stem rotation test: pull the wand gently; all stems rotate together smoothly and uniformly; any stem that rotates opposite or does not move indicates a broken carrier or disconnected carrier train. (3) Full traversal test: traverse all vanes from fully stacked to fully spread; no vane should hang lower than adjacent vanes or contact the floor track. (4) Door handle clearance: with vanes fully stacked, open the sliding glass door to its fully open position; the stacked vane column must clear the door handle with at least 1 inch of clearance on all sides. (5) Individual 2-pound tug test: as described above. Valance installation protocol (after all 5 checks pass): install valance clips 3 to 4 inches from each end + every 24 inches along the headrail; snap the valance center clip first then work outward to each end alternately; do one final full traversal test with the valance installed to confirm no clip disengages and the valance does not contact any vane
- Best Sources: “Install brackets 3-4 inches above door frame”; “rotate stems to face open BEFORE hanging vanes”; “distinct crunch or snap = vane properly seated”; “test clearance: stack clears door handle” → Blindsgalore how to install blinds on sliding glass door (March 2026) · “Additional center brackets for wide headrails”; “pay attention to trim, molding, obstacles”; inside mount requires 3/4-inch minimum frame depth → AAA Blind and Shutter Factory installation checklist (July 2025) · Inside mount vs outside mount comparison; how to measure for outside mount; add 2-6 inches to width for outside mount → Allure Window Treatments vertical blinds installation guide (February 2025)
⚠️ The Three Common Valance Clip Errors and the Panel Track and Roller Shade Installation Differences: Two sliding glass door blind installation details absent from all guides. (1) Three valance clip errors: Error 1 — installing valance clips before passing the 5-check test; if any check fails and the headrail must be adjusted, the valance must be removed first; snap the valance only after all 5 checks confirm the installation is complete. Error 2 — valance clip spacing too wide; standard spacing is one clip 3 to 4 inches from each headrail end plus one clip every 24 inches along the full headrail length; for a 72-inch headrail this produces 4 clips at positions 4, 28, 52, and 68 inches; clips too far apart allow the valance to bow outward between clip positions when bumped during traversal. Error 3 — snapping the valance panel from one end to the other; the panel is slightly rigid and snapping from end to end creates uneven tension that can bow the center; always snap the center clip first then alternate outward toward each end. (2) Panel track and roller shade installation differences: panel track headrails are 2 to 3 inches deep and require center support brackets even more than vertical blind headrails because fabric panels are heavier than individual vanes; test each carrier slider by hand before installing panels — push each slider from one end of the track to the other and confirm smooth glide; for roller shades, confirm the minimum headrail mounting height of door handle height plus 3 to 4 inches before driving the first bracket screw; the roller shade hem bar rises up past the door handle during raising and will bend permanently if the headrail is too low. See the full valance installation protocol below.
💡 The Complete Installation Checklist — Everything Required Before the First Bracket Screw: Before beginning sliding glass door blind installation, confirm nine items. (1) Wall construction type above the door (tap for solid header; confirm anchor type). (2) Headrail width and calculated bracket count and positions (end brackets 4 inches from ends; center brackets at 48-inch span intervals). (3) Level drawn at the correct mounting height (for vertical blinds: 3 to 4 inches above door frame; for roller shades: door handle height plus 3 to 4 inches). (4) Drill bit size matched to anchor or fastener type (3/8-inch for standard drywall pilot holes; carbide for concrete). (5) Number of carrier stems confirmed (should equal the number of vanes ordered; if short, contact manufacturer before installation). (6) Vane bag inspected for correct count before installation begins (counting vanes after the headrail is up saves a ladder trip). (7) All hardware in the box inventoried (brackets, screws, anchors, wand, valance clips, vanes, stems). (8) Stack-back wall space confirmed on the intended stack side (minimum 16% of headrail width for single stack; if less than this is available on the stack side, plan for split draw). (9) For installations where the headrail exceeds 72 inches, confirm a second person is available for the headrail placement step or plan the one-end-first solo technique. Tools needed: steel tape measure, 48-inch level, pencil, drill, 3/8-inch bit, Phillips screwdriver, safety glasses. For the full measurement protocol including the correct mounting height calculation, see How Do You Measure Sliding Glass Door Blinds. See the full wall construction diagnosis below.
📖 Read the complete guide below for: wall construction diagnosis (wood header = standard screws anywhere across width; steel stud = metal self-tapping; concrete = Tapcon; no intermediate studs above sliding glass door), bracket spacing formula (48-inch max unsupported span; formula table for 56/72/80/96/120-inch headrails), one-person vs two-person headrail placement technique, why the stem rotation step is missed and what happens when it is (default position looks correct but is tilt-closed; traversal attempts tilt instead), the 2-pound vane tug test (after all vanes, before valance; re-snap any that release), the 5-check test sequence (level; stem rotation; full traversal; handle clearance; tug test — all before valance), valance clip installation (3-4 inches from ends; every 24 inches; snap center first outward; final traversal test), and panel track and roller shade installation differences from vertical blind installation.
How to Install Sliding Glass Door Blinds — The Complete Step-by-Step Protocol
Tools required: Steel tape measure, pencil, stud finder, drill, 3/8-inch drill bit, level (48-inch preferred), Phillips head screwdriver, safety glasses
Time: 60 to 90 minutes for standard 72-inch installation; 90 to 120 minutes for 96-inch or wider
Difficulty: Moderate — outside mount; no inside-frame precision required
Pre-Installation Step — Wall Construction Diagnosis
The anchor decision that must be made before a single pilot hole is drilled.
The wall above a sliding glass door has a specific structural pattern absent from every installation guide’s tool list and anchor recommendations.
No Intermediate Studs Above a Sliding Glass Door
Standard residential wall construction places vertical studs 16 inches on center. Above a sliding glass door, this pattern does not apply.
A sliding glass door opening is framed with king studs on each side of the opening — typically 72 or more inches apart. A structural header (horizontal beam) spans between the king studs at the top of the opening. Between the king studs, there are no intermediate vertical studs. The space is open framing.
The practical consequence: If you run a stud finder along the wall 3 to 4 inches above the sliding glass door, you will likely find NO stud signal across most of the door width — only at the far left and right edges of the opening (where the king studs are).
This is not a problem. It is actually an advantage.
The Wood Header Anchor Advantage
For wood-framed construction (most residential sliding glass door installations), the structural header spans the full opening width and sits approximately 0.5 to 1.5 inches behind the drywall surface. This solid wood header is 1.5 to 3.5 inches thick and provides a reliable anchor for standard 1.5-inch screws at any position across the full width — without wall anchors.
How to confirm wood header construction: Tap the wall above the door with your knuckle. A solid, non-hollow sound across the full width confirms the header is present and accessible. A hollow sound indicates the header may be steel or concrete, or the framing has an air gap.
Wall Construction Type and the Correct Fastener
| Construction Type | How to Identify | Correct Fastener |
|---|---|---|
| Wood header (most common) | Solid tap sound; stud finder shows continuous solid signal across door width | 1.5-inch wood screws; no wall anchor needed in header zone |
| Steel stud framing | Magnetic stud finder attracts; standard stud finder shows shallow reading | Self-drilling hex head metal screws rated for steel stud; OR toggle bolts in drywall |
| Concrete lintel | Very hard to drill; drill chatters; grey dust when drilling | Tapcon 3/16-inch masonry screws; 5/32-inch carbide drill bit |
| Hollow cavity (no header) | Completely hollow tap sound; no stud finder signal | Toggle bolt (snap-toggle or butterfly) rated for headrail weight |
For the full pre-installation measurement protocol including headrail mounting height above the door handle, see How Do You Measure Sliding Glass Door Blinds.
Step 1 — Mark Bracket Positions with the Correct Spacing Formula
The bracket count formula absent from every installation guide.
All installation guides say: “Place one bracket at each end, 4 inches from the end.” Most add: “Add center brackets for wide headrails.” None provides the formula for how many center brackets are required at different headrail widths.
The structural rule: Aluminum headrail extrusions are designed to support the vane weight across unsupported spans of up to approximately 48 inches. Longer unsupported spans cause the headrail to flex (sag) at the center, misaligning the center carriers and creating light gaps at the center vanes.
The bracket spacing formula:
Step 1: Subtract 8 from the headrail width (accounting for the 4-inch bracket positions at each end):
Unsupported center span = headrail width − 8
Step 2: Divide by 48 and round up to the nearest whole number:
Center brackets needed = ceiling((headrail width − 8) ÷ 48)
Step 3: Add the 2 end brackets for total bracket count:
Total brackets = center brackets + 2
| Headrail Width | Formula | Center Brackets | Total Brackets | Bracket Positions |
|---|---|---|---|---|
| 56 inches or less | (56-8)÷48 = 1.0 → 0 center | 0 | 2 | 4, 52 |
| 72 inches | (72-8)÷48 = 1.33 → 1 | 1 | 3 | 4, 36, 68 |
| 80 inches | (80-8)÷48 = 1.5 → 1 | 1 | 3 | 4, 40, 76 |
| 96 inches | (96-8)÷48 = 1.83 → 1 | 1 | 3 | 4, 48, 92 |
| 104 inches | (104-8)÷48 = 2.0 → 2 | 2 | 4 | 4, 36, 70, 100 |
| 120 inches | (120-8)÷48 = 2.33 → 2 | 2 | 4 | 4, 40, 76, 116 |
Marking the bracket positions: Use a level to draw a horizontal reference line at your intended headrail mounting height. Mark the bracket positions along this line. AAA Blind and Shutter Factory confirms: “Start by using a steel measuring tape to measure and mark where your brackets will go, using a pencil to lightly mark the wall.”
Step 2 — Drill Pilot Holes and Install Brackets
Standard bracket installation procedure.
- At each marked bracket position, hold the bracket against the wall with the top edge at the reference line
- Mark the two screw hole positions through the bracket
- Drill pilot holes at each mark using a 3/8-inch drill bit (or appropriate size for your fastener)
- For wood header: drive screws directly; no anchor needed
- For hollow wall: insert wall anchors; drive screws into anchors
- Secure bracket with both screws; do not fully tighten yet
- Repeat for all brackets
The one-person vs two-person technique: Once all brackets are installed, the headrail must be raised to bracket height and snapped into place. For a 72-inch or wider headrail with carriers and vanes ready to hang:
Two-person installation (recommended for headrails 72 inches and wider): One person holds each end of the headrail at bracket height. On a count, both lower the headrail simultaneously into all brackets, engaging the snap-in mechanism at both ends at the same time.
One-person technique (if installing alone): Insert the left end of the headrail into the left end bracket first. Support the right end against the wall surface. Slide the headrail to the right until the right end is positioned over its bracket. Lower the right end into the right bracket. Walk to the center and press the headrail into the center bracket. Check all bracket snap-ins are fully engaged.
Patio Enclosures confirms: “Most manufacturers implement a click system that makes this process incredibly easy.”
After the headrail is snapped into all brackets: use the level to confirm the headrail is horizontal. Minor adjustment: loosen one end bracket screw slightly, slide the headrail up or down until level, and retighten. The headrail must be within 1/8 inch of level across its full width for the carrier train to traverse evenly.
Step 3 — The Carrier Stem Rotation — The Most Frequently Missed Step
Why this step is missed and what happens when it is — absent from all guides.
Blindsgalore (March 2026) confirms: “Rotate the Stems: Before hanging anything, pull the wand/cord to rotate the little plastic stems (carriers) so they all face open (perpendicular to the window).”
Why this step is missed so often:
When the blind is shipped, the carrier stems are in the default “closed” position — each stem points parallel to the door glass (approximately perpendicular to the headrail length direction). In this position, the vane slot opening on the stem faces outward — it looks exactly like it is ready to receive a vane.
Many installers see the slots facing forward and begin snapping vanes into them. This seems correct. The vanes go in easily. The blind looks complete.
The problem: The stems are in the tilt-closed position. When the vanes are snapped in with the stems in this position, pulling the wand to traverse causes the wand to attempt to TILT the vanes (rotate them closed further) rather than traverse them. The vanes resist and the mechanism stresses the carrier train.
The correct sequence:
- After snapping the headrail into the brackets, locate the traversal/tilt wand
- Pull or turn the wand to ROTATE all stems to the fully OPEN position — stems now point perpendicular to the glass (parallel to the length of the headrail); from the front, the stems should look like a row of thin lines facing you
- In this open position, the slot on each stem now faces sideways (not forward) — this is the correct vane insertion position
- Begin snapping vanes into the stems in this open position
- After all vanes are in, test the tilt and traversal
Blindsgalore (March 2026) confirms: “If you don’t hear the snap, the vane will fall out later!”
Step 4 — Snap Vanes into Stems with the Distinct Crunch Test
What the crunch means mechanically — and the 2-pound tug test that confirms every vane.
Each vertical vane has a hook hole or punch hole at its top end. Each carrier stem has a spring-loaded clip or hook mechanism inside. When the vane is pushed upward into the stem:
- The vane’s top edge contacts the stem body
- The vane’s hole aligns with the clip
- The clip springs into the hole with a distinct clicking sensation and sound — the “crunch”
- The vane is now mechanically locked to the stem
The installation sequence for vanes: Start from the control-wand end of the headrail (the end where the wand is attached). Work toward the far end. This keeps the carrier train ordered and prevents spacing issues with the spacer straps connecting the carriers.
For each vane: hold the vane at mid-height with one hand; use the other hand to guide the top of the vane into the stem slot; push upward with firm, steady pressure until the crunch is felt and heard; release; the vane should hang freely without being held.
The 2-pound tug test — perform after all vanes are installed:
After all vanes are snapped in, perform this test before installing the valance:
- Grasp the lower edge of the first vane between thumb and forefinger
- Pull downward with approximately 2 pounds of force (equivalent to lifting a standard coffee mug)
- A properly snapped vane holds completely firm
- An improperly snapped vane releases from the stem under this force — re-snap it until the crunch is felt, then re-test
- Repeat for every individual vane
Why this test matters: A vane that passed visual inspection and even the initial traversal test may be resting in the stem slot without the clip having fully engaged. The vane holds its position through friction and gravity — until the door is opened and air displacement causes vane movement. The un-snapped vane then falls.
The 2-pound tug test catches these borderline vanes before the valance is installed, when re-snapping is easy and no valance removal is needed.
Step 5 — The 5-Check Post-Installation Test Sequence
The systematic verification that confirms the installation is complete before the valance goes on.
Blindsgalore (March 2026) mentions “Test Clearance” as a final step. No guide provides the full systematic check sequence. Perform all 5 checks before installing the valance.
Check 1 — Headrail Level
Place a level (48-inch preferred) on the face of the headrail at mid-point. The bubble should be centered. If the headrail is more than 1/8 inch out of level across its width:
- Loosen one end bracket screw
- Slide the headrail end up or down until level
- Retighten
Check 2 — Carrier Stem Rotation Test
Pull the wand to rotate all stems from the open position to the closed position. All stems should rotate together smoothly and uniformly. Watch for:
- Any stem that rotates in the wrong direction (indicates stem is disconnected from the carrier train)
- Any stem that does not rotate at all (indicates a broken carrier gear)
- Any stiff resistance in the wand rotation (indicates a carrier needs lubricating — apply silicone spray to the carrier mechanism)
Check 3 — Full Traversal Test
Traverse all vanes from the fully stacked position to the fully open spread. Watch for:
- Any vane that hangs lower than adjacent vanes (indicates stem not fully seated in carrier)
- Any vane that contacts the floor track (indicates vane length specification error — recheck the floor clearance calculation from How Do You Measure Sliding Glass Door Blinds)
- Any carrier that stalls mid-traverse (indicates carrier train spacer strap disconnection — reconnect or replace)
Check 4 — Door Handle Clearance
With vanes fully stacked to one side, open the sliding glass door to its fully open position. The stacked vane column must:
- Clear the door handle with at least 1 inch of clearance on all sides
- Not contact the door frame edge as the door opens
If the vane stack contacts the door handle: the stack side must be moved further from the door frame by adjusting the outside-mount wall overlap. See What Are the Best Blinds for Large Sliding Glass Doors for the stack-back space calculation.
Check 5 — Individual Vane Tug Test
As described in Step 4 — apply 2-pound downward pull to each vane. Any vane that releases must be re-snapped before the valance is installed.
Step 6 — Valance Installation (After All 5 Checks Pass)
The valance installation sequence and the three errors that cause valance failure.
The valance is the decorative front panel that conceals the headrail. Install it only after passing all 5 checks.
The three common valance installation errors:
Error 1 — Installing valance before the 5-check test: If the headrail needs level adjustment or a carrier needs replacement, the valance must be removed first. This risks damaging the valance snap points during repeated removal.
Error 2 — Valance clip spacing too wide: Standard valance clips go 3 to 4 inches from each end + every 24 inches along the headrail. For a 72-inch headrail: clips at 4, 28, 52, and 68 inches = 4 clips total. Clips spaced too far apart allow the valance to bow outward between clips when bumped or during traversal.
Error 3 — Snapping valance panel from one end to the other: The valance panel is slightly rigid and may bow if the snap-in tension is uneven. Always snap the valance center clip first; then work outward toward each end alternately; the last clips to engage are the two end clips.
The final traversal test: After the valance is fully installed, do one more full traversal from stack to spread and back. The valance should not contact any vane; no clip should disengage. If the valance contacts vanes during traversal, the valance may be positioned too far forward on the headrail — re-seat the clips to position the valance further back.
Panel Track and Roller Shade Installation Notes
Panel Track on a Sliding Glass Door
Panel track installation follows the same bracket placement and headrail snap-in procedure as vertical blinds. Key differences:
- Panel track headrails are deeper (2 to 3 inches from wall) than vertical blind headrails (1.5 to 2 inches)
- Center support brackets are more important — a panel track headrail supports heavier fabric panels than individual vanes
- After headrail installation: test each carrier slider by hand — push the slider from one end of the track to the other; it should glide freely without sticking
- Install panels in order from the wand end to the far end
- Test split draw or single stack before final traversal to confirm panel order
Roller Shade on a Sliding Glass Door
Roller shade bracket installation positions the roller tube above the door frame:
- Minimum bracket height = door handle height + 3 to 4 inches (see the hem bar clearance discussion in Are Roller Shades Good for Sliding Glass Doors)
- Brackets mount at the ends of the headrail only (no center support brackets needed — roller shade weight is distributed through the tube, not a headrail)
- Test: after installation, lower the shade fully; confirm the hem bar hangs parallel to the floor across the full width; if the shade bows, the tube may need a larger diameter for the span
Frequently Asked Questions
How do you install blinds on a sliding glass door? Install sliding glass door blinds as an outside mount: mark bracket positions 4 inches from each headrail end plus center brackets every 48 inches of headrail span; confirm wall construction type above the door (wood header = standard screws; steel stud = metal screws; concrete = masonry screws); drill pilot holes and install brackets; level all brackets before snapping in the headrail; rotate all carrier stems to the fully open position using the wand BEFORE snapping any vanes; snap each vane until you hear a distinct crunch; perform the 5-check test sequence; install valance last.
What type of wall anchors do I need to install sliding glass door blinds? The wall above a sliding glass door typically has a structural header spanning the full opening width with no intermediate vertical studs between the king studs at the door edges. For wood-framed construction, standard 1.5-inch wood screws anchor directly into the solid wood header at any bracket position across the door width — no wall anchors are needed. For steel stud framing, use self-drilling metal screws rated for steel studs. For concrete lintels, use Tapcon masonry screws with a carbide drill bit.
Why do my vertical blind vanes keep falling out after installation? Vanes fall out because they were not fully snapped into the carrier stems during installation. Blindsgalore confirms you must hear a “distinct crunch or snap” when each vane is inserted — if you don’t hear the snap, the vane will fall out. After installing all vanes, perform the 2-pound tug test: apply firm downward pressure to each individual vane; properly snapped vanes hold firm; un-snapped vanes release and can be re-snapped before the valance is installed.
Why do my vertical blinds traverse but not tilt — or tilt but not traverse? This is caused by snapping vanes into the carrier stems while the stems are in the wrong orientation. If the stems were in the closed (default ship) position when vanes were snapped in, the wand function will attempt to tilt when it should traverse. Remove all vanes, use the wand to rotate all stems to the fully open position (stems perpendicular to the glass), then re-snap all vanes and test again.
How many brackets do I need for a sliding glass door blind? Place brackets 4 inches from each end of the headrail, with additional center brackets at 48-inch intervals for larger spans. For an 80-inch headrail (standard 72-inch sliding glass door with wall overlap): 3 brackets at positions 4, 40, and 76 inches. For a 120-inch headrail (10-foot door): 4 brackets at positions 4, 40, 76, and 116 inches.
Related Guides on BlindShades.pro
- The Best Sliding Glass Door Blinds & Shades Buying Guide
- How Do You Measure Sliding Glass Door Blinds
- Are Vertical Blinds Still Good for Sliding Glass Doors
- What Are the Best Panel Track Blinds for Sliding Glass Doors
- Are Roller Shades Good for Sliding Glass Doors
- How Do You Keep Sliding Glass Door Blinds From Sliding
By Michael Turner | 30 Years Home Improvement Expertise | Updated 2026 | BlindShades.pro