How Do I Measure Windows for Blackout Blinds — Inside Mount vs Outside Mount Guide
Authored By Michael Turner -30 Years Home Improvement Expertise | Updated 2026 | BlindShades.pro
Updated on May 13, 2026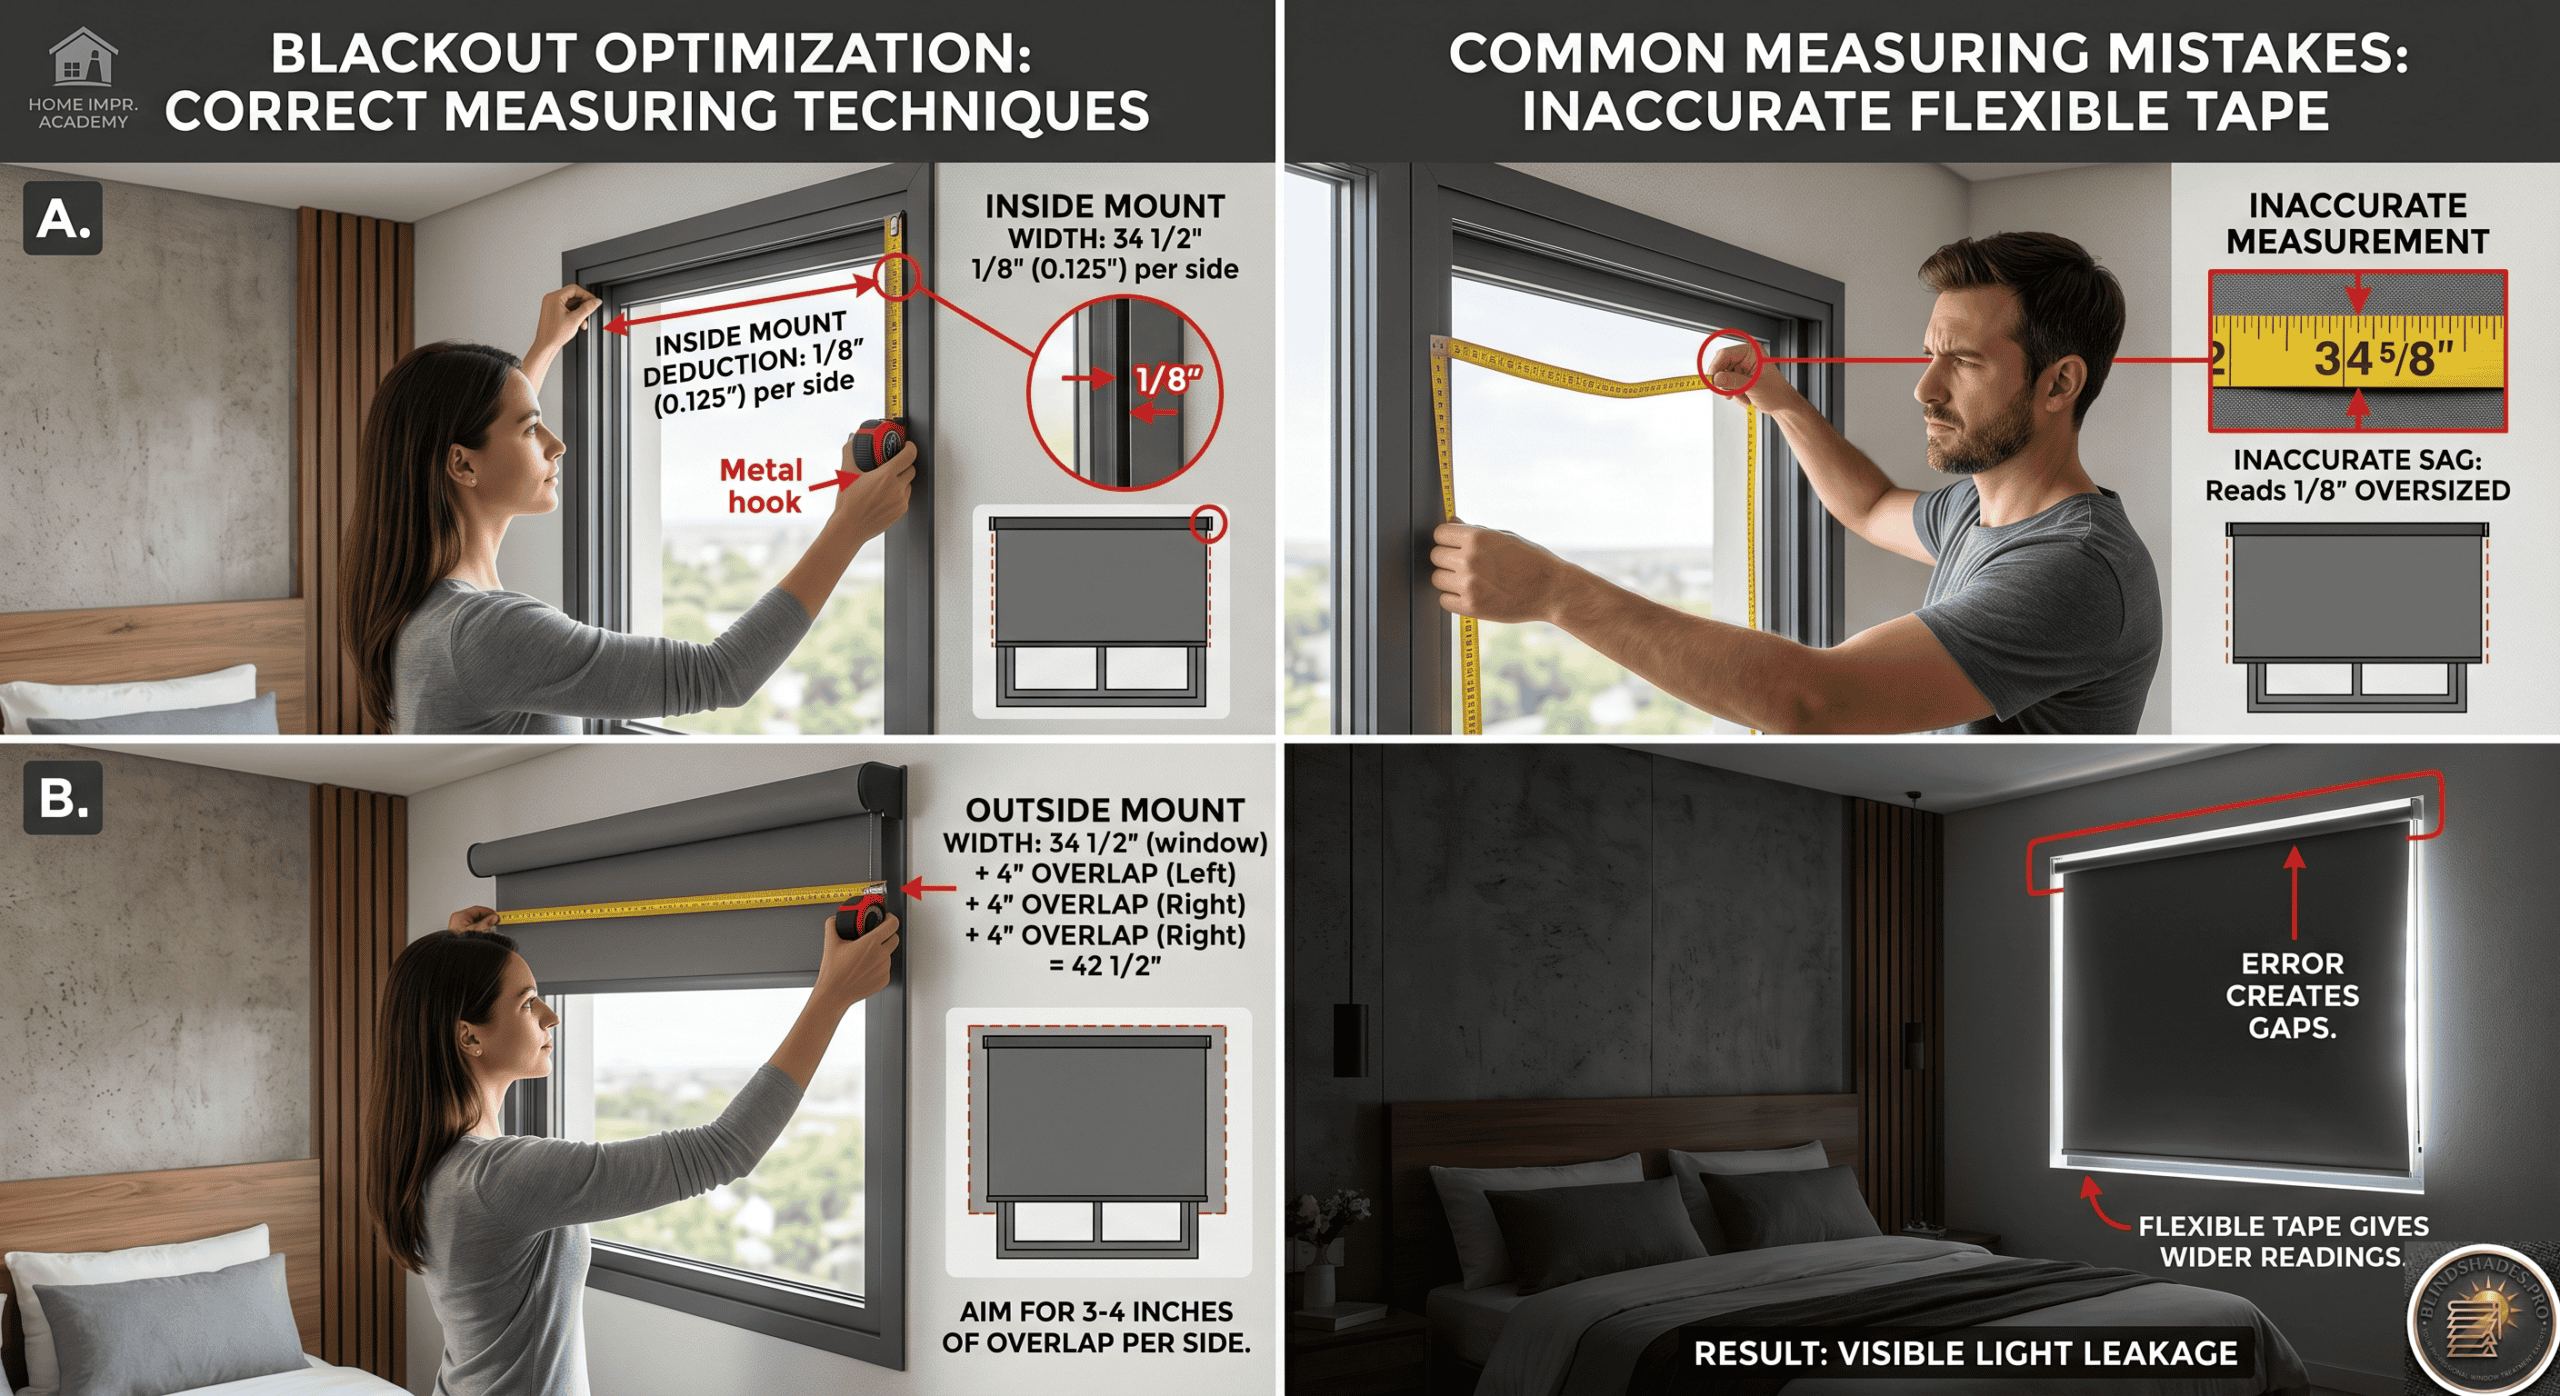
⭐ Quick Answer — How to Measure Windows for Blackout Blinds
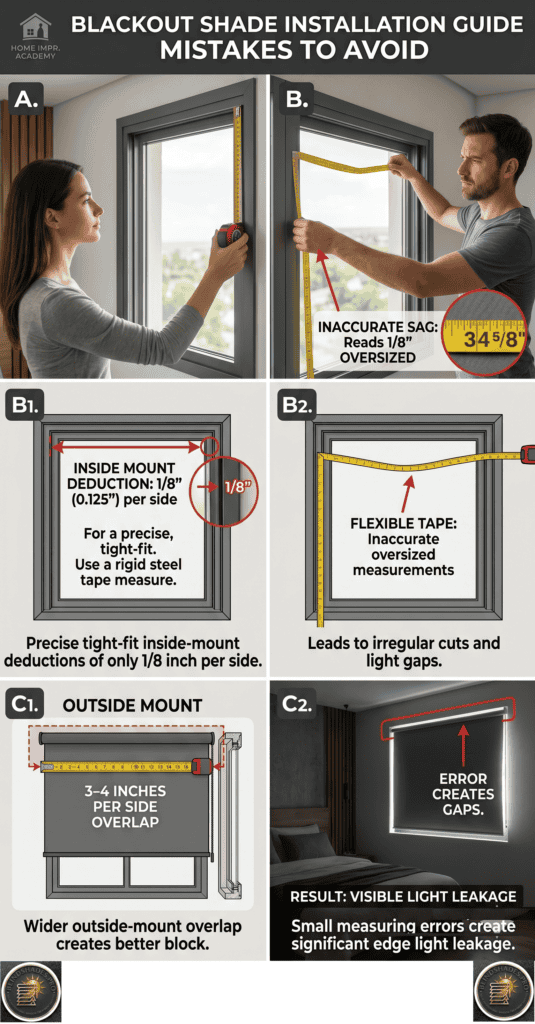
- The Blackout Difference: When you measure windows for blackout blinds, two rules change vs standard blinds — outside mount needs 3–4 inches per side (not the generic 2 inches), and inside mount should use a “tight-fit” deduction of 1/8 inch per side (not standard 3/8 inch). Both changes reduce the edge gaps that admit the most light
- Steel Tape Only — Flexible Tape Stretches: A flexible or cloth tape stretched across a 36-inch window reads 1/8 to 1/4 inch longer than actual. For an inside-mount blackout blind, that over-measurement means the blind will not fit the frame. Use a locking steel tape measure only
- Check Depth Before Ordering — Product-Specific Minimums: Blackout roller shade (manual) = 2.5–3 inches minimum · Motorized roller = 3–4 inches · Single-cell cellular = 3–4 inches · Double-cell cellular = 3.5–4.5 inches · Triple-cell = 4–5 inches. If window depth is below minimum → specify outside mount
- Three Measurements — Not One: Measure width at top, middle, and bottom. Use the smallest width for inside mount. Measure height at left, centre, and right. Use the largest height for inside mount. Check both diagonals — if they differ by more than 1/2 inch, specify outside mount for best blackout performance
- Outside Mount Calculation: Frame width + 6–8 inches total width (3–4 per side) · Mount 3–4 inches above frame · Extend 3–4 inches below sill. Example: 36″ frame → order 43″ wide; 48″ drop + 6″ = order 54″ drop
- Best Sources After Measuring: Inside mount tight-fit → note in order comments at Blindsgalore · Outside mount cellular → SelectBlinds Premier Blackout · Premium dealer-measured → Hunter Douglas
⚠️ The Obstruction Check and Out-of-Square Window Protocol: Before you measure windows for blackout blinds — check inside the frame for: window cranks (casement windows need 2–3 inches of clearance for the blind mechanism), window locks (protrude 1/2–1 inch and can block the bottom rail), and security sensor wires (often prevent inside-mount entirely). Then check for out-of-square: measure both diagonals of the window opening. If they differ by less than 1/4 inch — inside mount is fine. Between 1/4 and 1/2 inch — inside mount acceptable but expect slight edge gap variation. More than 1/2 inch — specify outside mount. For blackout applications the tolerance is tighter than for standard blinds: a diagonal difference above 1/4 inch creates a visibly larger edge gap in one corner. See the full obstruction checklist below.
💡 The Measurement Record Card — Prevents Multi-Window Mix-Up Errors: When you measure windows for blackout blinds across multiple rooms, ordering errors are common — the large bedroom window dimensions get entered for the small one. Use a dedicated record card for each window: Room name · Wall position (N/S/E/W) · Width measurements (top/middle/bottom) · Height measurements (left/centre/right) · Depth · Diagonal difference · Obstruction notes · Mount decision · Deduction request. The tight-fit deduction request (1/8 inch per side instead of standard 3/8 inch) is the most commonly forgotten note — add it to every inside-mount blackout order at Blindsgalore, SelectBlinds, or a Hunter Douglas dealer. See the full SelectBlinds measuring guide and Blinds.com measuring tool for additional resources. Download the free measurement card format below.
📖 Read the complete guide below for: why blackout blinds need different measuring rules (3–4 inch overlap vs 2 inch), the steel tape vs flexible tape error quantified (1/8–1/4 inch over 36 inches), the product-specific depth minimum table by shade type, the step-by-step inside mount and outside mount measurement process, the diagonal out-of-square check, the systematic obstruction checklist, the sill vs no-sill height measurement difference, the full measurement record card format, and the five most common measuring mistakes with their fixes.
Why Measuring for Blackout Blinds Is Different
Every measurement guide gives the same advice: measure three times, use the smallest width for inside mount, add 2 inches per side for outside mount. This is correct for general light-filtering blinds. When you measure windows for blackout blinds, two specific criteria change.
Criterion 1 — The overlap must be larger for blackout: General blinds need 2 inches of overlap on each side. Blackout blinds need 3–4 inches on each side because at sunrise and sunset, light enters at a shallow angle that passes around a standard 2-inch overlap.
Criterion 2 — The inside-mount deduction should be minimised: Standard inside-mount blinds are made 1/2 to 3/4 inch narrower than the measured width for mechanical clearance. For blackout, request a “tight fit” deduction of 1/8 inch per side — reducing the edge gap from 3/8 inch per side to 1/8 inch per side.
Tools Required Before You Measure Windows for Blackout Blinds
Essential:
- Locking steel tape measure — NOT a flexible or cloth tape. Flexible tapes stretch 1/8 to 1/4 inch over a 36-inch span, causing the blind not to fit or creating a light-admitting gap. Steel tape only.
- Pencil and paper (or measurement record card) — Use the record card format at the end of this guide to prevent multi-window mix-up errors.
- Spirit level — For outside-mount installations to ensure the headrail is level on wide windows.
Recommended for blackout applications:
- Flashlight — To check frame depth and identify obstructions inside the frame
- Depth gauge or steel rule — For measuring the exact window recess depth when close to the minimum threshold
The Obstruction Check — Do This Before Measuring
Catching obstructions before ordering saves the cost of a remeasure and reorder. Check for these inside-frame obstructions:
Window cranks (casement windows): Crank handles protrude into the frame. A blackout roller shade needs 2 inches of clearance; a blackout cellular shade needs 3 inches.
Window locks and latches: Locking mechanisms protrude 1/2 to 1 inch from the frame and can block the bottom rail of a raised blind.
Security sensor wires: Alarm sensor wires running along the frame often prevent inside-mount installation entirely.
Shallow window recesses — the depth table:
| Product Type | Minimum Depth Required |
|---|---|
| Blackout roller shade (manual) | 2.5–3 inches |
| Blackout roller shade (motorized) | 3–4 inches |
| Single-cell blackout cellular | 3–4 inches |
| Double-cell blackout cellular | 3.5–4.5 inches |
| Triple-cell blackout cellular | 4–5 inches |
If the window depth is less than the minimum for the chosen product — specify outside mount. This is the most common ordering mistake for blackout cellular shades in modern homes with shallow window recesses.
How to Measure Windows for Blackout Blinds — Inside Mount
Step 1 — Measure the Width (Three Positions)
Using a locking steel tape measure, measure the inside width of the window frame at:
- Top of the opening
- Middle of the opening
- Bottom of the opening
Record all three measurements to the nearest 1/8 inch. Use the smallest of the three. This ensures the blind fits even in the narrowest part of the frame.
Blackout-specific: request “tight fit” deduction when ordering. Standard deduction = 1/2 to 3/4 inch total. Tight fit deduction = 1/4 inch total (1/8 inch per side). The tighter fit reduces side edge gaps that admit light. Blindsgalore (note in order comments), SelectBlinds (call customer service), and Hunter Douglas dealers all accommodate tight-fit requests.
Step 2 — Measure the Height (Three Positions)
Measure the inside height at left, centre, and right. Record all three.
For sill windows: Use the largest of the three heights — the blind rests on the sill when lowered.
For no-sill windows (newer construction): Measure to the bottom of the frame opening. Add 1–2 inches so the bottom rail covers the bottom gap. An unsupported blackout blind must be long enough to fully cover the opening without swinging away from the wall.
Step 3 — Measure the Depth
Measure from the front face of the window frame to the glass. Compare to the minimum depth table above. If below minimum — switch to outside mount.
Step 4 — The Out-of-Square Diagonal Check
Measure both diagonals of the window opening (corner to corner). Compare the two measurements.
| Diagonal Difference | Action |
|---|---|
| Less than 1/4 inch | Inside mount acceptable |
| 1/4 to 1/2 inch | Inside mount OK; expect slight edge gap variation |
| More than 1/2 inch | Outside mount required |
For blackout applications: The threshold is tighter. A diagonal difference above 1/4 inch in a blackout installation creates a visibly larger edge gap in one corner. Specify outside mount for any out-of-square window in a blackout bedroom.
How to Measure Windows for Blackout Blinds — Outside Mount
Outside mount is the better specification for blackout performance in most bedrooms — it eliminates the depth constraint, accommodates out-of-square windows, and allows larger overlaps to block angled low-sun light.
Step 1 — Determine the Coverage Width
Measure the full window frame (including casing/trim) and add overlap:
- For blackout performance: add 3–4 inches per side (6–8 inches total)
- Standard non-blackout: 2 inches per side
Example: 36-inch frame + 7 inches overlap = order 43-inch wide shade
Step 2 — Determine the Coverage Height
For blackout applications:
- Mount position: 3–4 inches above the top of the window frame
- Lower position: 3–4 inches below the window sill (or bottom of frame if no sill)
Example: 3 inches above frame + 48-inch frame height + 3 inches below sill = order 54-inch drop
The greater extension above and below (vs the standard 3 inches + 2 inches) blocks the low-angle morning and evening light that enters at the top and bottom edges of standard outside-mount installations.
Step 3 — Identify the Mounting Surface
Confirm the mounting surface is structurally adequate:
- Solid wood window casing — adequate for standard blackout roller shades
- Drywall above the casing — requires toggle bolts or locating wall studs
- Masonry — requires masonry anchors
For motorized blackout shades with wall-surface mount — verify structural adequacy before ordering. The combined weight of a double-cell cellular blackout shade plus motor on a wide window can be 8–15 lbs.
The Measurement Record Card
Use this format for every window. Recording this way prevents the mix-up errors that occur when ordering multiple windows at once.
WINDOW MEASUREMENT RECORD
Room: _____________  Wall Position: N/S/E/W  Date: _______

INSIDE MOUNT:
  Width:   Top ___"  Middle ___"  Bottom ___"   ORDER: ___ (smallest)
  Height:  Left ___"  Centre ___"  Right ___"   ORDER: ___ (largest + sill note)
  Depth:   ___"   Product minimum: ___"   PASS / FAIL
  Diagonal A: ___"   Diagonal B: ___"   Difference: ___"

OUTSIDE MOUNT:
  Frame width: ___" + Left overlap ___" + Right overlap ___" = TOTAL: ___"
  Above frame: ___"   Frame height: ___"   Below sill: ___" = TOTAL DROP: ___"

OBSTRUCTIONS: Crank YES/NO   Lock YES/NO   Sensor wire YES/NO
MOUNT DECISION: INSIDE / OUTSIDE
DEDUCTION REQUEST: TIGHT FIT (1/8" per side) / STANDARD
PRODUCT: Roller / Single-cell / Double-cell / Triple-cell / Motorized
Print one card per window. File all cards together before placing the order.
The Most Common Measuring Mistakes
Mistake 1 — Using the wrong tape measure: Flexible tape over 36 inches stretches 1/8 to 1/4 inch longer than actual. Use locking steel tape only.
Mistake 2 — Not measuring three positions: Single-point measurement misses frame irregularities of 1/4 to 3/8 inch. Always measure top, middle, and bottom.
Mistake 3 — Standard 2-inch overlap for blackout outside mount: Order 3–4 inch overlap per side for any blackout bedroom application.
Mistake 4 — Not checking depth: Ordering a double-cell cellular shade for a 3-inch recess produces an unusable shade. Always check depth against the product-specific table.
Mistake 5 — Using the wrong height measurement: For inside mount: use the largest (not smallest) height. The smallest applies to width only.
Where to Order — Resources and Suppliers
Measuring guides from retailers (outbound resources):
- SelectBlinds — Full measuring guide and measurement check service before production: selectblinds.com/tech-tips/guide-measuring-windows-for-blinds-or-shades.html
- Blinds.com — Step-by-step measuring guide with visual diagrams: blinds.com/measure
- Hunter Douglas — Dealer-measured service for precision blackout installation: hunterdouglas.com
For blackout blind orders after measuring: Blindsgalore Blackout Roller Shade — note “tight fit inside mount” in order comments. SelectBlinds Premier Blackout Cellular — measurement check service. Hunter Douglas through a dealer — dealer measures on-site.
Frequently Asked Questions
How do I measure windows for blackout blinds? To measure windows for blackout blinds, use a locking steel tape measure and record width at three positions (top, middle, bottom) — use the smallest for inside mount. Record height at three positions (left, centre, right) — use the largest. Measure frame depth and compare to the minimum for the product type: 2.5 to 3 inches for roller shades, 3.5 to 4.5 inches for double-cell cellular. For outside-mount blackout blinds, add 3 to 4 inches per side (not the standard 2 inches) to block angled low-sun light. Request “tight fit” deduction of 1/8 inch per side when ordering inside-mount blackout blinds to minimise the edge gap.
What is the minimum window depth for inside-mount blackout blinds? The minimum depth varies by product: a manual blackout roller shade requires 2.5 to 3 inches; motorized roller shade 3 to 4 inches; single-cell cellular 3 to 4 inches; double-cell cellular 3.5 to 4.5 inches; triple-cell 4 to 5 inches. If the window depth is below the minimum — specify outside mount. An inside-mounted shade in a too-shallow recess contacts the glass and cannot operate, creating large light gaps at the top of the window.
Should blackout blinds be inside mount or outside mount? Outside mount provides better blackout performance for most bedrooms. It eliminates the depth constraint, accommodates out-of-square windows, and allows the 3 to 4 inch overlap that blocks angled morning and evening sunlight. Inside mount is acceptable for deep window frames with adequate square tolerance, using a tight-fit deduction. For shift worker bedrooms and nurseries — outside mount on the wall surface extending 3 to 4 inches beyond the frame on all sides is the preferred blackout specification.
How much should outside-mount blackout blinds overlap the frame? For blackout performance — 3 to 4 inches per side (6 to 8 inches total added width). Generic guides specify 2 inches per side for general blinds, but for blackout applications the extra 1 to 2 inches per side blocks the shallow-angle light that enters at sunrise and sunset. Extend 3 to 4 inches above the window frame and 3 to 4 inches below the sill for complete top and bottom edge coverage.
What is a “tight fit” deduction for blackout blinds? When ordering inside-mount blinds, manufacturers deduct approximately 1/2 to 3/4 inch from the measured width for mechanical clearance (standard deduction). For blackout applications — request a “tight fit” deduction of 1/4 inch total (1/8 inch per side). This reduces the side edge gap from 3/8 inch to 1/8 inch per side, significantly reducing the light admitted through the gaps alongside the shade fabric. Not all manufacturers accommodate tight-fit requests; confirm availability when ordering from Blindsgalore, SelectBlinds, or Hunter Douglas dealers.
Related Guides on BlindShades.pro
- The Best Bedroom Blinds & Shades Buying Guide
- What Is the Difference Between Blackout Shades and Room-Darkening Shades
- Why Is Light Coming Through the Sides of My Blackout Blinds
- Blackout Roller Shades vs Blackout Cellular Shades
- What Is the Best Window Treatment for a Bedroom That Faces East
By Michael Turner | 30 Years Home Improvement Expertise | Updated 2026 | BlindShades.pro