How Do You Hang Curtains on a Bay Window?
Authored By Michael Turner -30 Years Home Improvement Expertise | Updated 2026 | BlindShades.pro
Updated on June 3, 2026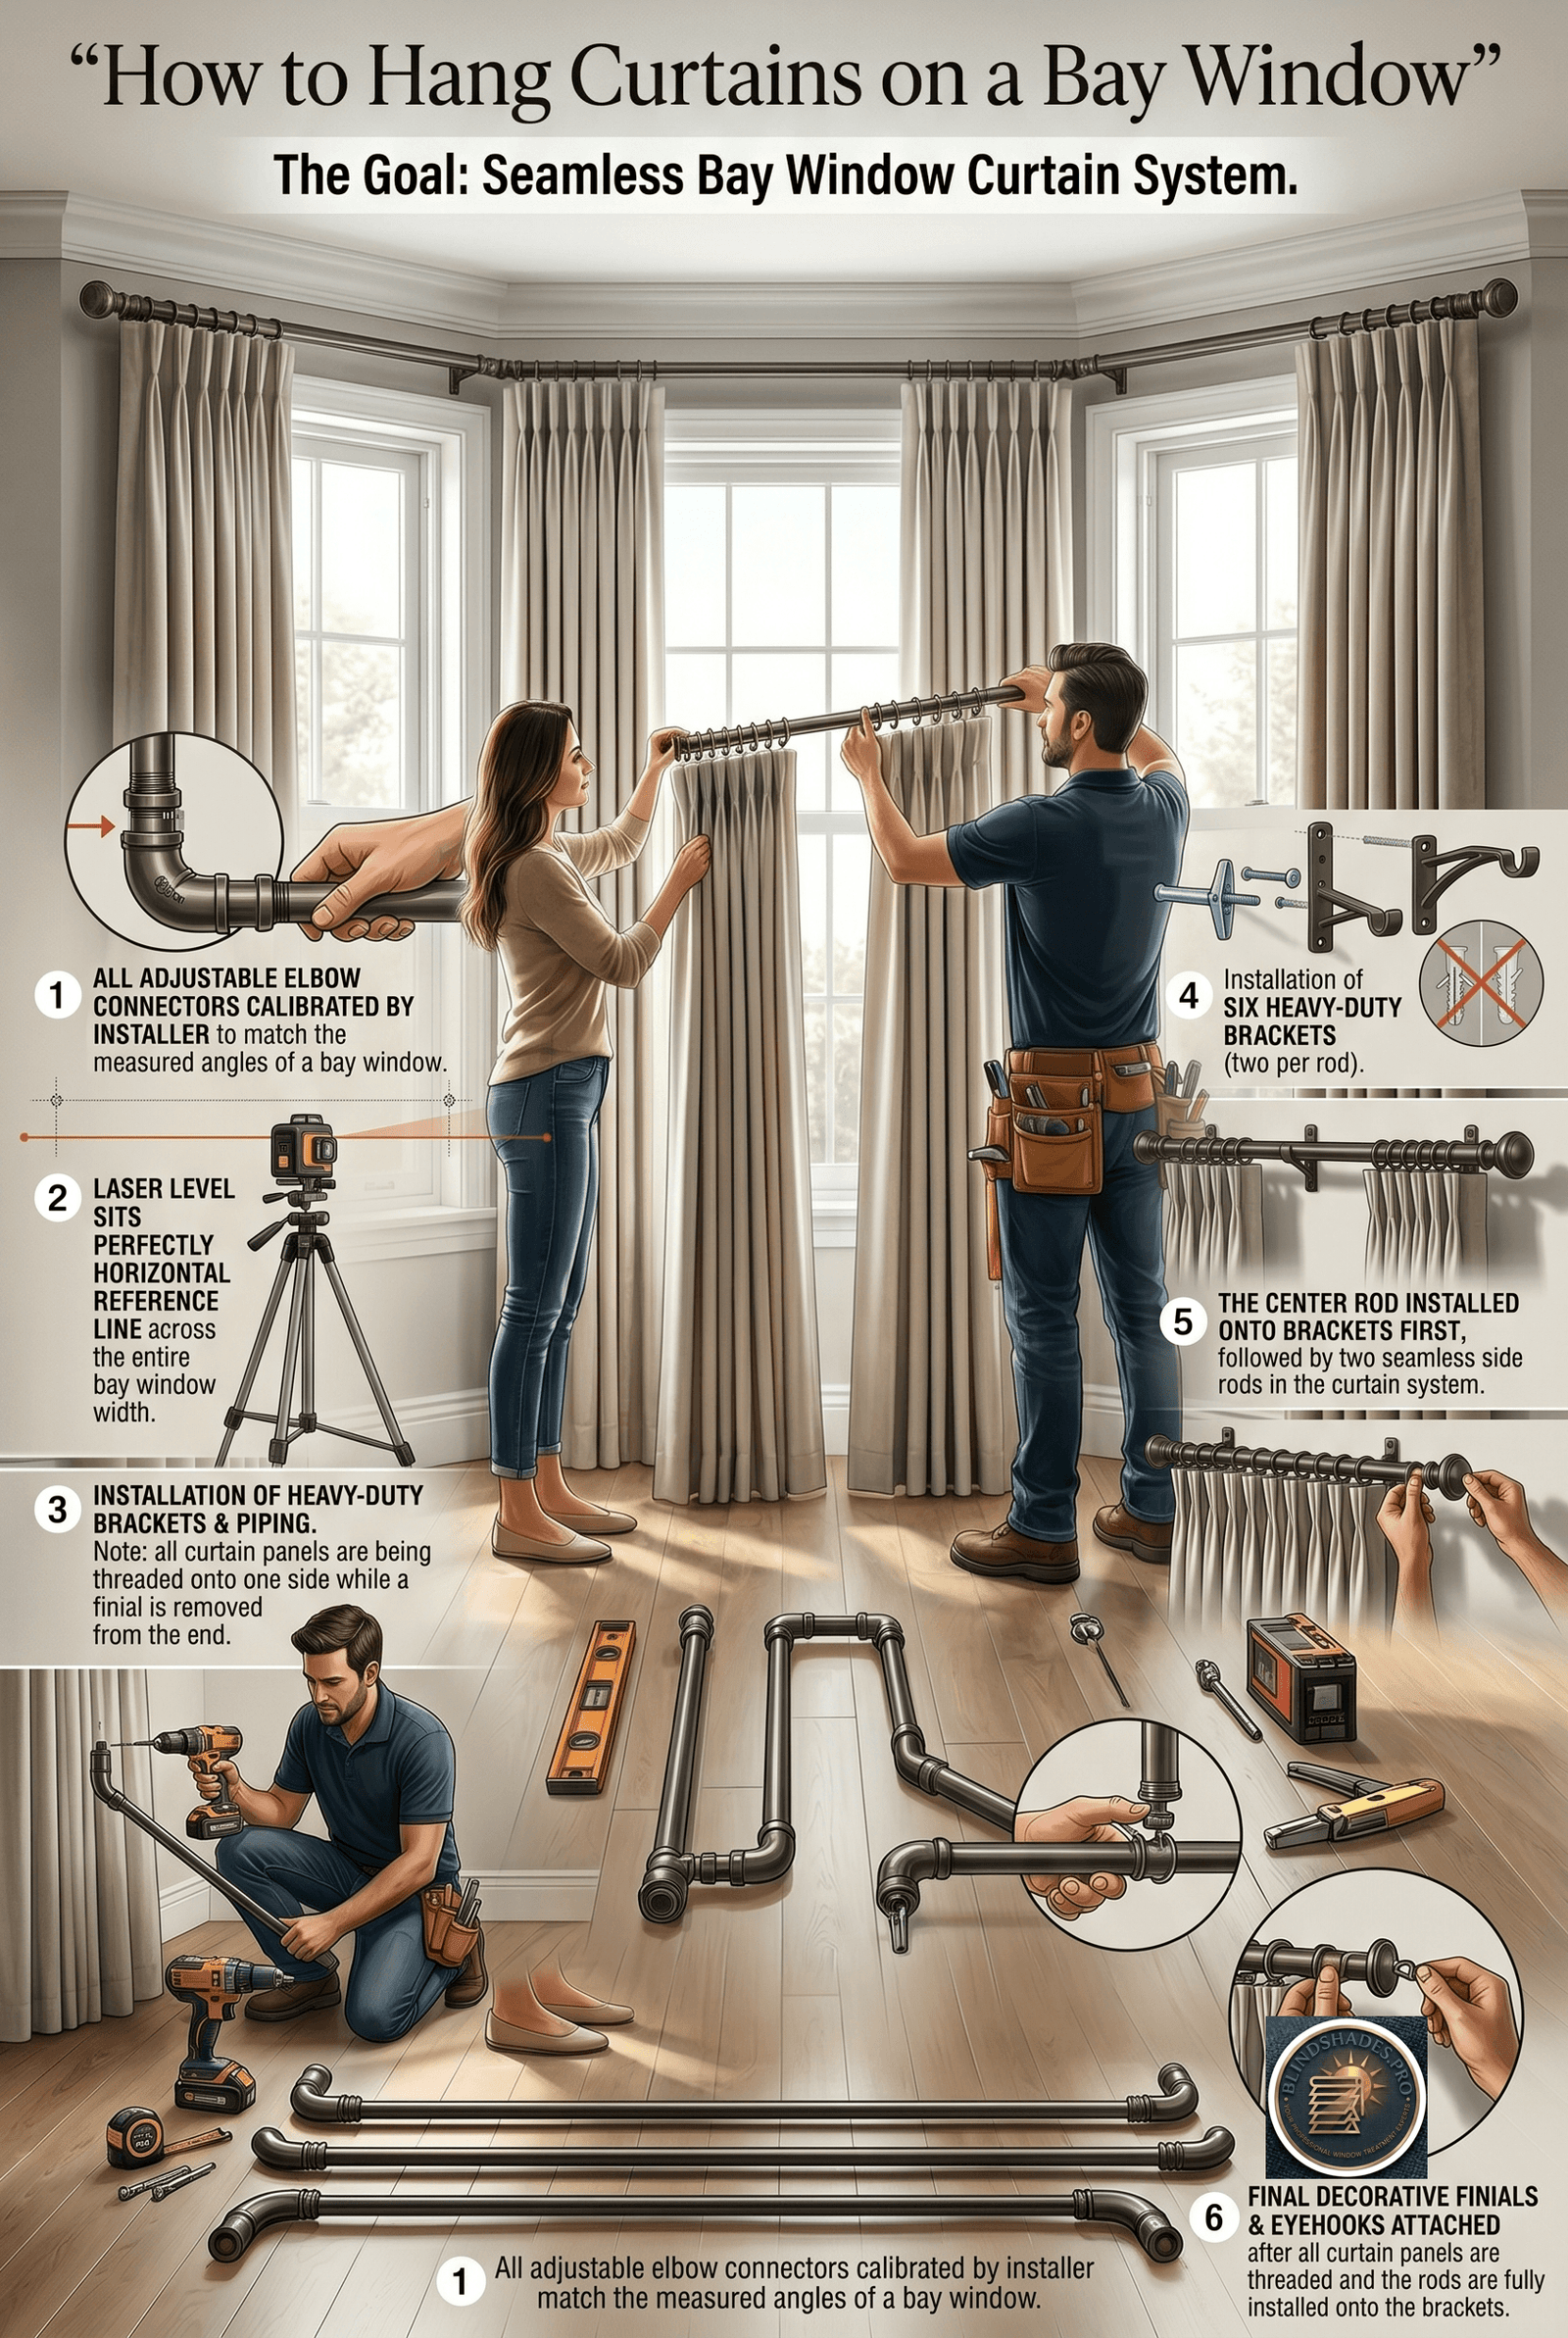
Key Takeaways:
- Hanging curtains on a bay window requires three separate curtain rods and six brackets; the threading load order is critical: thread all curtain panels onto the center rod first with one finial left off, then thread the corner panel that spans the junction onto both the center and side rod simultaneously before mounting either rod; threading panels after the rods are fully mounted and finials attached is impossible
- Never use plastic expansion wall anchors in bay window walls; bay windows are cantilevered projections with lighter framing than standard load-bearing walls; at 5 to 8 lbs per bracket for heavy curtains, plastic anchors can pull out of bay wall drywall; specify toggle bolts (Molly bolts) for drywall without a stud, toggle bolts for plaster over lath, and sleeve anchors with a hammer drill for masonry bay walls
- The elbow connector angle must be calibrated before installing any brackets; lay the assembled rod on the floor against the bay window from below to see how it fits; adjust the elbow connectors until the rod follows the bay angles exactly; mark the connector angle with a felt tip pen before dismounting; incorrect connector angle produces a visible kink at the transition between rod sections
- A magnetic level that attaches to the metal curtain rod and a laser level that projects a reference line across the full bay width are both required for accurate six-bracket bay window curtain rod installation; the magnetic level frees both hands for positioning while marking; the laser level ensures all six brackets are at exactly the same height
- Each curtain rod finial must protrude beyond the outermost bracket on each end by at least the finial length (typically 3 to 5 inches); mount the outermost bracket at least 4 inches inward from the rod end; a bracket positioned too close to the rod end prevents finial attachment after mounting and requires the bracket to be remounted
⭐ Quick Answer — How Do You Hang Curtains on a Bay Window?
- The Threading Load Order — Must Complete Before Mounting Any Rod: To hang curtains on a bay window, thread ALL panels before any rod is mounted to the wall. This is the single most critical step absent from all competitor guides. Thistlewood Farm confirms: “the key is to only attach one finial to the end of the curtain rod because we are going to hang the curtains on both rods at the same time.” The correct load order: (1) Thread all center panels onto the center rod; leave ONE end without a finial — the open end will meet the side rod. (2) Thread side panels onto the side rod; leave the inner end without a finial. (3) Hold both rods adjacent at the junction; thread the corner panel that spans both rods onto both simultaneously. (4) Mount rods to wall. (5) Attach remaining finials. Threading panels after rods are fully mounted and finials are in place is impossible — the rods must be dismounted and the process restarted
- Elbow Connector Calibration on the Floor — Before Any Drilling: When hanging curtains on a bay window, calibrate elbow connector angles on the floor before marking any bracket positions. Assemble the complete rod system; lay it on the floor directly below the bay window; press it against the bay wall base and adjust each elbow connector until the rod follows the bay angles exactly. 30-degree bay: connectors set to approximately 150 degrees. 45-degree bay: connectors set to approximately 135 degrees. 90-degree box bay: 90 degrees. Mark each connector’s angle setting with a felt tip pen on both sides before tightening the set screws. If the connector angle is not calibrated before drilling, the installed rod will either not follow the bay profile or create a visible kink at the angle transition — visible from across the room when curtains are open
- Toggle Bolts — Not Plastic Anchors — for Bay Window Wall Brackets: Standard plastic expansion wall anchors are insufficient for curtain rod brackets in bay window walls. Bay windows are cantilevered projections with lighter framing than standard load-bearing walls. Heavy curtains exert approximately 5 to 8 lbs per bracket from curtain weight plus cyclic opening and closing forces. Plastic anchors can pull out of bay wall drywall under this repeated loading. Anchor specification when hanging curtains on a bay window: drywall with stud = #8 × 2-inch wood screw directly into stud. Drywall without stud = toggle bolt (Molly bolt) rated 25+ lbs. Plaster over wood lath = toggle bolt through plaster and lath. Masonry or brick = sleeve anchor with hammer drill. A magnet on a string helps find studs in bay window walls where stud-finders can give false positives at corner joints
- Magnetic Level + Laser Level — Both Required for Six-Bracket Installation: Hanging curtains on a bay window correctly requires two levels. A laser level projects a continuous horizontal reference line across the entire bay width simultaneously — all six bracket marks can be made at exactly the same height without measuring up from the floor at each of the six positions. A magnetic level (Paso Robles Ironworks confirms this tool) attaches to the metal curtain rod and stays in place, freeing both hands to hold and position the rod while marking. The combination: laser level to establish the horizontal reference line; magnetic level on each rod section to confirm the section matches the reference before tightening brackets. A standard handheld level requires three hands to hold the level, hold the rod, and mark the wall — impractical for bay window rod installation
- Finial Clearance, Corner Bracket Choice, and the Two-Person Dry Fit: Three details that prevent remounting. (1) Finial clearance: the outermost bracket must be positioned at least the finial length plus 0.5 inch inward from the rod end; for a 4-inch finial: minimum bracket inset = 4.5 inches; bracket too close to the rod end prevents finial attachment after mounting; slide the finial onto the rod and position the bracket to confirm clearance before drilling any holes. (2) Corner bracket wall choice: at each inner bay corner, mount the bracket on the side wall rather than the center wall; stacked side curtains cover the bracket when open; center wall mounting leaves the bracket visible from the room’s primary viewpoint. (3) Two-person dry fit: assemble the complete rod with all panels threaded; hold it at the intended height; second person marks all six bracket positions simultaneously — prevents the compounding error from marking each bracket independently without the full rod assembled
- Best Sources: Three-rod method with full photo tutorial and threading order tip → Thistlewood Farm bay window curtains · Magnetic level protocol, required tools list, and toggle bolt guidance → Paso Robles Ironworks bay window rod installation · Bay window curtain installation overview with rod height and tension rod options → Wayfair bay window curtain guide
⚠️ The Complete 8-Step Protocol and Tools List for Bay Window Curtain Hanging: Required tools for hanging curtains on a bay window: laser level; magnetic level (attaches to metal rod); tape measure and pencil; battery-powered screw gun or drill with a 4 to 6 inch screw holder extension tip (Paso Robles Ironworks confirms this as required equipment for reaching into bay corners); appropriate drill bits and anchors for wall type; hacksaw if cutting standard rods to custom bay lengths; second person for the dry fit step. The 8-step protocol in order: (1) Identify which rod system to use (dedicated bay window curtain rod vs three standard rods joined at angles). (2) Calibrate elbow connector angles on the floor. (3) Complete the threading load order for all panels. (4) Mark bracket heights using the laser level reference line. (5) Two-person dry fit with full assembled rod to mark all six bracket positions simultaneously. (6) Drill bracket holes using the correct anchor type for the wall surface. (7) Mount center rod first; then side rods; confirm magnetic level at each section. (8) Attach finials and adjust panel positions. Three separate rods with six brackets total are required for a standard three-panel bay window installation; attempting to use two rods or fewer brackets will produce a sagging or misaligned installation. For the full panel count, fullness ratio, and header type compatibility specifications needed before purchasing the curtains that will hang on this rod, see What Are the Best Curtains for a Bay Window. See the full 8-step hanging protocol below.
💡 Dedicated Bay Window Curtain Rods vs Three Standard Rods — The Decision: Thistlewood Farm confirms dedicated bay window curtain rods exist and “will solve your problem in minutes” for a single bay window installation. A purpose-built bay window curtain rod has elbow connectors at preset or adjustable angles, a continuous rod path, and typically costs $40 to $120 for adjustable angle models from Amazon or specialty suppliers such as Paso Robles Ironworks for custom lengths. The three-standard-rods approach gives more control over rod diameter, finish, and style to match existing room hardware — but requires cutting rods to custom lengths with a hacksaw, ensuring each cut rod retains a finial end, and managing the more complex threading and mounting sequence. The three-rod approach is better when: the room has existing curtain rods in a specific style (matching gold, brass, matte black, etc.) that dedicated bay window curtain rods may not match; or when the bay has unusual dimensions not matched by standard adjustable rod products. For renters or anyone who cannot drill into walls, Wayfair confirms tension rods can be used: “secure the tension rod to fit between the two interior sides of the window frame” — one tension rod per individual panel, no drilling required. For the complete measurement protocol including touching vs separated panels, three-point width measurement per panel, and the obstruction addition formula, see How Do You Measure a Bay Window for Blinds. See the full elbow connector calibration protocol below.
📖 Read the complete guide below for: the two rod system options (dedicated bay window curtain rod vs three standard rods with six brackets), elbow connector angle calibration on the floor before drilling (150 degrees for 30-degree bay; 135 for 45-degree; 90 for box bay), the threading load order (center rod first with one finial off; corner panel on both rods simultaneously; mount then finials), laser level reference line for all six bracket positions, the two-person dry fit protocol, toggle bolt vs plastic anchor specification for bay window walls (anchor type by wall surface), corner bracket position choice (side wall = hidden by stacked curtains; center wall = visible), finial clearance requirement (finial length plus 0.5 inch minimum bracket inset), and the complete tools list (battery screw gun with 4-6 inch extension; magnetic level; laser level).
How to Hang Curtains on a Bay Window — The 8-Step Protocol
Tools required:
- Laser level (or standard level — but laser is strongly recommended)
- Magnetic level (attaches to the curtain rod; frees both hands during installation)
- Tape measure and pencil
- Battery-powered screw gun or drill/driver with 4 to 6 inch screw holder extension tip (Paso Robles Ironworks confirms this as required equipment)
- Appropriate drill bits for wall type (see Step 6)
- Hacksaw (if cutting standard rods to custom bay lengths)
- Second person for the dry fit step
Step 1 — Identify Which Rod System to Use
Two system options:
Option A: Dedicated bay window curtain rod A purpose-built bay window curtain rod has elbow connectors at preset or adjustable angles, a continuous rod path from one side wall to the other, and typically requires fewer custom cuts. Thistlewood Farm confirms these exist: “I was trying to solve a puzzle there was already an answer for — did you know there are bay window curtain rods? This curtain rod will solve your problem in minutes.” Find adjustable bay window curtain rods on Amazon (typically $40–$120 for adjustable angle models) or at specialty hardware stores such as Paso Robles Ironworks for custom lengths.
Option B: Three standard rods joined at angles Three standard curtain rods (one center rod for the main panel; two side rods for the angled panels) are cut to the correct lengths and joined at the corners using elbow connectors or bracket arrangements. Thistlewood Farm confirms: “there are actually three different rods for this. At first, we were only going to use two and cut one in half, but you have to have the ends where the finials attach — so you’ll need three curtain rods.” Six brackets total: two per rod.
The choice: Dedicated bay window rod: faster installation; fewer custom cuts; best if only one bay window to address. Three standard rods: more control over rod style and diameter; better for matching existing room hardware.
Step 2 — Calibrate Elbow Connector Angles on the Floor
The step absent from all competitor guides — do this before marking any wall positions.
If using a dedicated bay window rod with adjustable elbow connectors, or constructing a three-rod system with angled corner connections, calibrate the angles on the floor before drilling anything.
The calibration method:
- Assemble the complete rod system with all connectors and elbow joints loosely in place
- Lay the assembled rod on the floor directly below the bay window
- Press the rod against the base of the bay window — the floor position mirrors the wall position
- Adjust each elbow connector until the rod follows the bay angles exactly, with each rod section pressed flat against its respective bay wall base
- Mark each connector’s angle setting with a felt tip pen or a piece of tape on both sides of the connector
- Tighten the connector set screws at the marked positions
The angle reference by bay type: For a 30-degree bay: the interior angle between adjacent walls is 150 degrees; elbow connectors set to 150 degrees. For a 45-degree bay: the interior angle is 135 degrees; elbow connectors set to 135 degrees. For a 90-degree box bay: elbow connectors at 90 degrees.
If the connector angle is not calibrated correctly, the installed rod will either not follow the bay window profile or will create a visible kink at the angle transition — visible from across the room when curtains are open.
Step 3 — The Threading Load Order
The most critical installation order detail absent from all competitor guides.
Thistlewood Farm confirms: “the key is to only attach one finial to the end of the curtain rod because we are going to hang the curtains on both rods at the same time.”
Before mounting ANY rod to the wall, all curtain panels must be threaded in the correct order. Threading panels after the rods are fully mounted and all finials are in place is impossible.
The correct load order for a three-rod bay installation:
- Thread all center panel curtains onto the center rod; leave the right end of the center rod without a finial (the finial-free end will be adjacent to the first side rod connection)
- Thread the side panel curtains onto the first side rod; leave the inner end (facing the center rod) without a finial
- Hold both rods adjacent to each other at their junction point; slide the innermost ring from the center rod and the innermost ring from the side rod together so both panels are accessible from the same ring position — this is the corner panel that must travel across both rods
- Mount the center rod first; secure both center brackets
- Mount the first side rod; secure both side brackets
- Attach the remaining finials at all open rod ends
- Repeat for the second side rod
If finials are attached at both ends of all rods before threading: the panels cannot be slid onto the rods and the brackets cannot be passed during threading. The rods must be dismounted, finials removed, and the process restarted.
Step 4 — Mark Bracket Heights Using the Laser Level
The two-tool leveling system absent from all guides.
Why bay windows need two levels:
- Six bracket positions across three angled walls must all be at exactly the same height
- A standard level confirms that two points on one rod section are level with each other, but cannot guarantee that the bracket on the center wall is at the same height as the bracket on the angled side wall
- A laser level projects a continuous horizontal reference line across the entire bay width simultaneously — all six bracket marks can be made at exactly the same height without measuring up from the floor at each position
The protocol:
- Set up a laser level at the intended rod height across the bay (typically 4 to 6 inches above the window frame top)
- Mark all six bracket positions along the laser line with a pencil
- Use a magnetic level (Paso Robles Ironworks confirms this tool) placed on top of the assembled rod during final installation to confirm each rod section remains level while tightening the brackets
Height above window: The standard recommendation is 4 to 6 inches above the window frame top to create the illusion of height. For maximum ceiling height effect: mount at the ceiling line or crown molding.
Step 5 — The Dry Fit Protocol
The two-person dry fit step absent from all bay window curtain guides.
Before drilling any holes, do a complete dry fit:
- Assemble the complete rod system with all panels threaded (from Step 3 above)
- Hold the assembled rod up against the bay window at the intended height with one person holding each end
- Have a second person stand back and confirm: (a) the rod follows the bay angles correctly; (b) the rod height looks correct from the room; (c) the stacked panels on each side do not overlap the glass panels when the curtains are pushed open
- With the rod held in position, have the second person mark all six bracket positions on the wall with a pencil
This two-person dry fit ensures all bracket positions are marked with the complete rod assembly in the exact final position — preventing the compounding bracket position errors that occur when each bracket position is marked independently without the full assembled rod.
Step 6 — Bracket Anchor Selection by Bay Wall Surface
The load-rated anchor guide specific to bay window walls — absent from all guides.
Bay windows are cantilevered projections with lighter wall framing than standard load-bearing walls. Curtain rods loaded with heavy curtains (velvet, lined drapes) exert approximately 5 to 8 lbs per bracket. Standard plastic expansion wall anchors are typically rated for 20 to 25 lbs in standard stud framing — but in the lighter framing of bay window walls, they may pull out under cyclic loading from curtains being opened and closed repeatedly.
The correct anchor by wall surface:
| Wall Surface | Correct Anchor | Notes |
|---|---|---|
| Standard drywall, stud found | #8 × 2-inch wood screw directly into stud | Most reliable; 100+ lb holding capacity |
| Drywall, no stud | Toggle bolt (Molly bolt) rated ≥25 lbs | Do NOT use plastic expansion anchor; toggle bolt spreads load across drywall face |
| Plaster over wood lath | Toggle bolt through plaster and lath | Plaster alone is brittle; toggle bolt reaches through plaster to lath backing |
| Masonry or brick | Sleeve anchor + hammer drill + masonry bit | Standard drill will not penetrate brick |
Finding studs in bay window walls: A standard magnetic stud-finder can give false positives on bay window walls due to the multiple drywall layers at corner joints and the metal nailing plates at the window frame connections. China Shutters recommends: “a magnet on a string helps you find studs” — the steel nail heads attract the magnet at stud positions.
Step 7 — Corner Bracket Position — Which Wall to Mount On
The design decision absent from all guides.
At each inner corner of the bay window where the center wall meets the angled side wall, the corner bracket can be mounted on either the center wall face or the side wall face.
Center wall mounting:
- Bracket is closer to the room’s center viewpoint and more visible when curtains are open
- Easier to install (installer faces the center of the room)
- The bracket face is visible between the center and side panel curtains when the curtains are pushed open
Side wall mounting:
- Bracket is less visible from the room’s primary viewpoint when curtains are open
- More difficult to install (installer must reach into the corner from the side)
- The stacked side panel curtains largely cover the bracket when the curtains are pushed open
Recommendation: Mount the corner bracket on the side wall for the least visual impact from the room’s primary viewpoint. Stacked side curtains naturally cover the bracket in the open position. Highland Forge confirms: “corner brackets can be mounted on whichever wall you prefer” — giving full discretion; choose based on visibility preference.
Step 8 — Finial Clearance Check
The measurement before any bracket holes are drilled — absent from all guides.
Thistlewood Farm confirms: “make sure you leave enough room for the finials to protrude beyond the brackets.”
A curtain rod finial attaches to the outer end of the rod. The outermost bracket (the bracket closest to the rod end) must be positioned inward from the rod end by at least the finial’s length plus 0.5 inches for assembly clearance.
The measurement:
- Measure the length of the intended finial from the end cap to the end of the screw fitting (typically 3 to 5 inches)
- Add 0.5 inch for assembly clearance
- The outermost bracket position must be at least this distance inward from the rod end
Example: Finial length = 4 inches. Minimum inset from rod end = 4 + 0.5 = 4.5 inches.
If the outermost bracket is positioned 2 inches from the rod end and the finial is 4 inches long: the finial cannot be threaded past the bracket after the bracket is mounted. The bracket must be moved or the installation remounted.
Pre-check: Before drilling any holes, slide the finial onto the rod end and position the bracket at its intended position. Confirm the finial clears the bracket. This 30-second check prevents the most common bay window curtain rod installation error.
Where to Order
For step-by-step bay window curtain installation with photo documentation: Thistlewood Farm at thistlewoodfarms.com/how-to-hang-curtains-in-a-bay-window — three-rod method with full photo tutorial; six-bracket layout; note on dedicated bay window curtain rod products; finial clearance tip.
For professional hardware installation guides and magnetic level protocol: Paso Robles Ironworks at ironhardware.com/blogs/installation-guides/how-to-install-bay-window-curtain-rods — magnetic level on rod; self-drilling set screws; required tools including 4 to 6 inch screw extension tip; toggle bolt guidance for non-stud installation.
For general bay window curtain installation overview: Wayfair guide at wayfair.com/sca/ideas-and-advice/guides/how-to-hang-bay-window-curtains-T21540 — measurement steps; tension rod alternative for renters; rod height 4 to 6 inches above frame; curved rod alignment for bay angles.
Frequently Asked Questions
How do you hang curtains on a bay window? To hang curtains on a bay window, assemble three separate curtain rods for the center and two side sections, calibrate elbow connector angles on the floor before drilling, thread all curtain panels onto the rods in the correct load order before mounting any rod to the wall, use a laser level to mark all six bracket positions at the same height across the bay, install brackets using toggle bolts for drywall without studs, and mount the center rod first followed by the side rods. Six brackets total are needed and the finials are attached last after all panels are threaded.
What is the threading load order for bay window curtains? The threading load order for bay window curtains requires threading all curtain panels onto the rods before any rod is mounted to the wall. Thread all center panels onto the center rod with one finial left off the end that will meet the side rod. Thread the side panels onto the side rod with one finial left off the inner end. Hold both rods adjacent at the junction and thread the corner panel onto both simultaneously. Only after all panels are threaded should the rods be mounted to the wall and the remaining finials attached. Threading panels after rods are fully mounted and all finials are in place is impossible.
Why should you use toggle bolts instead of plastic anchors for bay window curtain brackets? Toggle bolts should be used instead of plastic expansion anchors for bay window curtain brackets because bay windows are cantilevered projections with lighter wall framing than standard load-bearing walls. Heavy curtains create approximately 5 to 8 pounds of load per bracket from the curtain weight plus cyclic opening and closing forces. Plastic expansion anchors rated for 20 to 25 pounds in standard stud framing may pull out under repeated loading in the lighter framing of bay window walls. Toggle bolts spread the load across the drywall face rather than relying on the wall’s edge grain strength, providing a much more reliable hold for curtain rod brackets in bay window walls.
What is the elbow connector angle for a bay window curtain rod? The elbow connector angle for a bay window curtain rod depends on the bay window’s angle configuration. For a 30-degree bay where the side panels angle 30 degrees from the main wall, the elbow connectors must be set to approximately 150 degrees, which is the interior angle between adjacent walls. For a 45-degree bay, the connectors are set to approximately 135 degrees. For a 90-degree box bay, the connectors are set to 90 degrees. The correct method is to calibrate the angles on the floor by laying the assembled rod against the bay window base before drilling any wall holes, and marking the connector angle with a felt tip pen before tightening the set screws.
How high should a bay window curtain rod be hung? A bay window curtain rod should be hung 4 to 6 inches above the top of the window frame as the standard recommendation. This creates the visual illusion of taller ceilings by drawing the eye upward. For maximum ceiling height effect, the rod can be mounted at the ceiling line or crown molding. The rod height also determines the required curtain panel length, calculated as rod height from floor minus 0.5 to 1 inch for float hem clearance. For a rod at 102 inches from the floor, 101-inch panels are needed; standard panels come in 84, 96, and 108 inches, so 108-inch panels would be ordered and hemmed or left to puddle at the floor.
Related Guides on BlindShades.pro
- The Best Bay Window Blinds & Shades Buying Guide
- What Are the Best Curtains for a Bay Window
- How Do You Measure a Bay Window for Blinds
- Can You Put One Blind Across a Bay Window
- How Do You Add Privacy to a Bay Window Without Blocking Light
By Michael Turner | 30 Years Home Improvement Expertise | Updated 2026 | BlindShades.pro